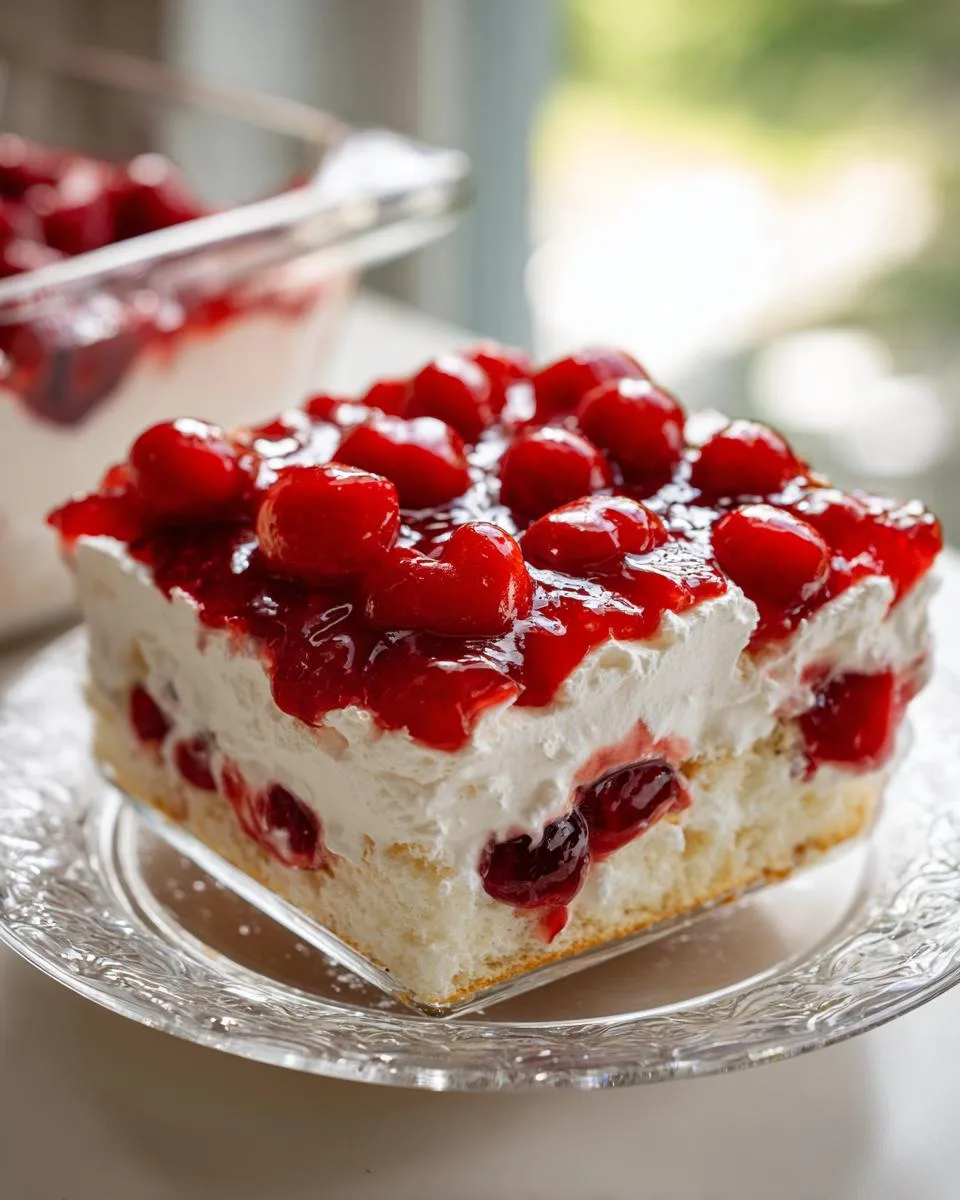
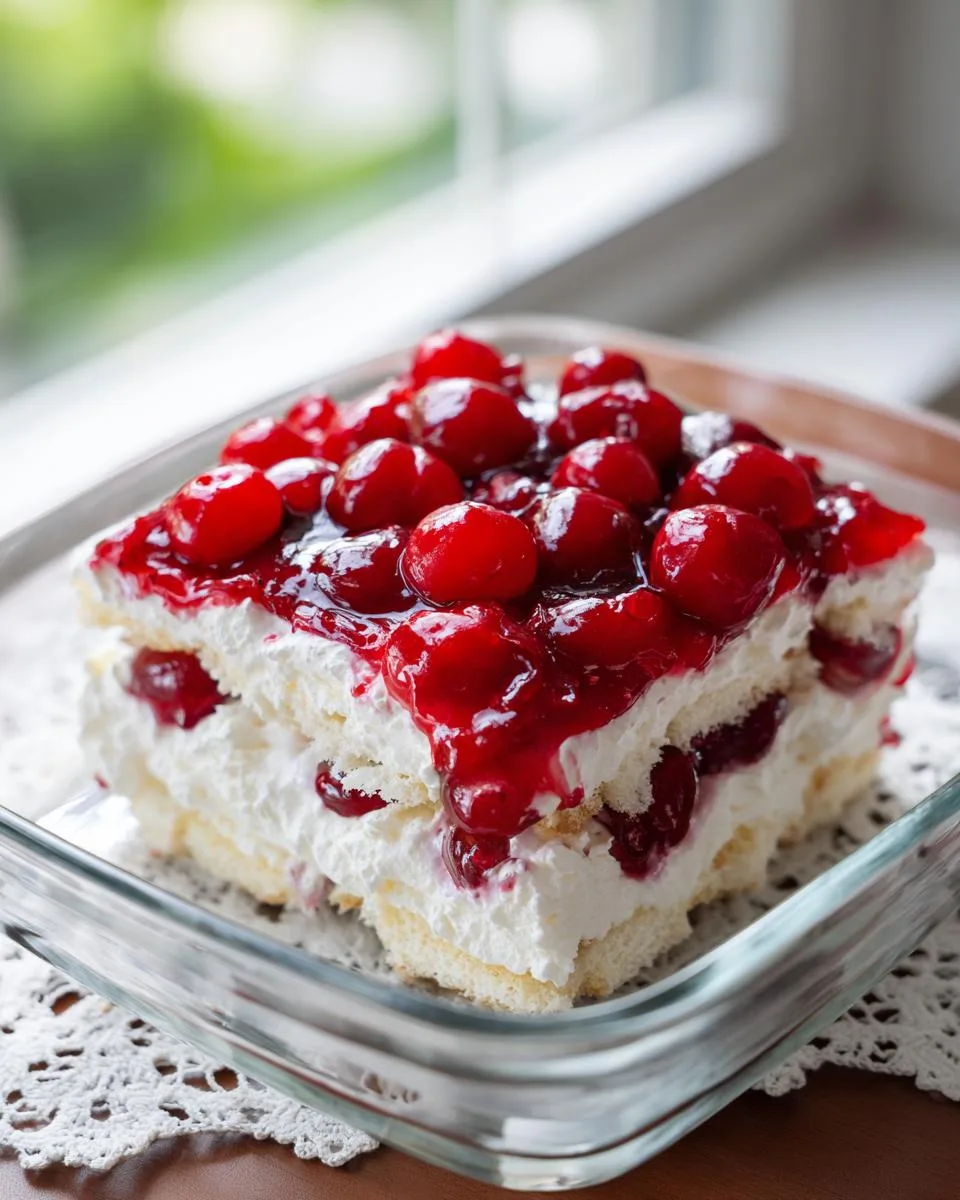
Oh my goodness, you have to try this Cherries in the Snow Dessert! It’s been my go-to potluck lifesaver for years – the kind of recipe that looks fancy but secretly takes 15 minutes to throw together. I first had it at my aunt’s summer picnic when I was twelve, and I’ve been obsessed ever since.

What makes this no-bake wonder so special? Imagine fluffy angel food cake pieces folded into sweet cream cheese clouds, all topped with that gorgeous ruby-red cherry pie filling. It’s like eating a cloud with cherries! The contrast between the snowy white base and those vibrant cherries is downright magical. Plus, it’s practically foolproof – perfect for when you need something impressive but don’t want to turn on the oven.
Table of Contents
Table of Contents
Ingredients for Cherries in the Snow Dessert
Here’s everything you’ll need to whip up this dreamy dessert – trust me, you probably have most of these in your kitchen already!
- 1 pre-baked 9-inch angel food cake (store-bought works perfectly – no shame!)
- 8 oz. cream cheese, softened (leave it out for 30 minutes – crucial for smooth mixing)
- ½ cup powdered sugar (pack it lightly – I use the scoop-and-level method)
- ½ cup cold milk (whole milk makes it extra creamy)
- 1 tsp vanilla extract (the good stuff makes all the difference)
- 12 oz. whipped topping (thawed but still chilled)
- 2 (21 oz.) cans cherry pie filling (look for the ones with plump cherries!)
- Chopped pecans for topping (optional, but adds such a nice crunch)
See? Simple ingredients for spectacular results. Now let’s get mixing!
How to Make Cherries in the Snow Dessert
Alright, let’s dive into making this gorgeous dessert! It’s so easy you’ll be shocked at how fancy it looks. Just follow these simple steps – I’ve made this dozens of times, so I’ll share all my little tricks along the way.
Preparing the Cream Cheese Mixture
First things first – that creamy dreamy base! Grab your softened cream cheese (if you forgot to take it out earlier, no worries – just microwave it for 10 seconds at a time until it’s spreadable). Beat it with powdered sugar and vanilla until it’s completely smooth – no lumps allowed! I use my hand mixer on medium speed for about 2 minutes. Then slowly drizzle in the milk while mixing. The mixture should look like thick pancake batter at this point.
Assembling the Dessert
Now for the fun part! Gently fold in your whipped topping until everything’s combined. Then take your angel food cake and tear it into bite-sized pieces – I like irregular chunks for texture. Fold them into the cream mixture carefully – you want to keep some air in there! Spread this heavenly cloud into your dish, then pour that gorgeous cherry pie filling over the top. The red against the white is just stunning! Pop it in the fridge for at least 30 minutes (though overnight is even better). Right before serving, sprinkle with pecans if you’re feeling fancy. That’s it – you’ve just made magic!
Why You’ll Love This Cherries in the Snow Dessert
Seriously, what’s not to love about this dessert? Let me count the ways:
- No oven required – perfect for hot summer days or when you just can’t deal with baking
- Ready in 15 minutes (plus chilling) – my kind of “fancy” dessert
- Always a crowd-pleaser – kids and adults go crazy for those cherry clouds
- Endlessly customizable – swap fruits, add nuts, or drizzle with chocolate
- Budget-friendly – uses simple, affordable ingredients you probably already have
Once you try it, you’ll understand why this has been my secret weapon for years!
Tips for the Perfect Cherries in the Snow Dessert
Okay, let me share all my little secrets for making this dessert absolutely perfect every single time. I’ve made this so often I could probably do it in my sleep, and these tips make all the difference!
Keep everything cold: That whipped topping needs to stay chilled right up until you fold it in – warm topping makes a soggy mess. I even pop my mixing bowl in the freezer for 10 minutes before starting.
Texture matters: When tearing the angel food cake, aim for pieces about the size of marshmallows – too small and they disappear, too big and they’re awkward to eat. And don’t be neat about it! Irregular pieces give the best texture.
Patience pays off: I know it’s tempting to dig right in, but letting it chill for at least 30 minutes (better yet, overnight) lets all the flavors marry beautifully. The cake soaks up just enough creaminess without getting mushy.
Drain those cherries: If your pie filling seems extra juicy, give it a quick strain so your dessert doesn’t get watery. Save that gorgeous syrup for drizzling over ice cream later!
Presentation pro tip: For parties, I sometimes layer everything in clear glasses instead of a dish – it looks so elegant and everyone gets perfect cherry-to-snow ratio!
Print
Irresistible 15-Minute Cherries in the Snow Dessert Recipe
A simple and delicious no-bake dessert featuring angel food cake, cream cheese, and cherry pie filling.
- Total Time: 45 minutes
- Yield: 12 servings 1x
Ingredients
- 1 pre-baked 9-inch angel food cake
- 8 oz. cream cheese, softened
- ½ cup powdered sugar
- ½ cup milk
- 1 tsp vanilla extract
- 12 oz. whipped topping
- 2 (21 oz.) cans cherry pie filling
- Chopped pecans for topping (optional)
Instructions
- Tear the angel food cake into small, bite-sized pieces. Set aside.
- In a large bowl, whip cream cheese, powdered sugar, milk, and vanilla extract together.
- Gently mix in whipped topping.
- Fold in angel food cake pieces until fully incorporated.
- Spread mixture evenly in a 9×13-inch dish.
- Pour cherry pie filling over the top and spread evenly.
- Refrigerate for at least 30 minutes before serving.
- Optionally, sprinkle chopped pecans over individual servings.
Notes
- Use fresh whipped cream instead of whipped topping for a richer taste.
- Substitute cherry pie filling with blueberry or strawberry for variation.
- Best served chilled.
- Prep Time: 15 minutes
- Cook Time: 0 minutes
- Category: Dessert
- Method: No-Bake
- Cuisine: American
- Diet: Vegetarian
Nutrition
- Serving Size: 1 slice
- Calories: 280
- Sugar: 25g
- Sodium: 200mg
- Fat: 10g
- Saturated Fat: 6g
- Unsaturated Fat: 3g
- Trans Fat: 0g
- Carbohydrates: 45g
- Fiber: 1g
- Protein: 4g
- Cholesterol: 20mg
Variations for Cherries in the Snow Dessert
One of my favorite things about this recipe is how easily you can make it your own! Here are some delicious twists I’ve tried over the years – feel free to get creative!
Fruit swaps: That ruby red cherry filling is classic, but don’t be afraid to mix it up! Strawberry pie filling makes a gorgeous “Strawberries in the Snow” version (my daughter’s favorite). Blueberry gives it a patriotic vibe perfect for Fourth of July parties. And peach pie filling? Absolute summer magic.
Flavor boosters: Try adding a tablespoon of almond extract to the cream mixture for a maraschino cherry vibe. Or mix in some lemon zest for brightness. My neighbor swears by adding a splash of cherry liqueur to the pie filling – adults only for that version!
Texture lovers: Toss in a handful of toasted coconut flakes with the cake pieces for tropical flair. Chopped toasted almonds add wonderful crunch. And for chocolate lovers, mini chocolate chips folded into the cream layer are pure heaven.
The possibilities are endless – once you master the basic recipe, have fun playing with flavors! Just don’t tell my aunt I’ve messed with her original – some traditions are sacred.
Serving and Storing Cherries in the Snow Dessert
Here’s the scoop on keeping your Cherries in the Snow looking and tasting its absolute best! This dessert is practically made for make-ahead magic, but there are a few tricks I’ve learned over the years.
Chill time is key: I never serve this straight after assembling – that 30 minute minimum chill lets the cake soak up just enough creaminess while keeping its lovely texture. My secret? Overnight in the fridge makes it even better! The flavors meld beautifully without getting soggy.
Serving it right: I like to take it out of the fridge about 10 minutes before serving – just enough to take the edge off the chill. Use a sharp knife dipped in warm water for clean slices. If you went the individual glass route, a spoon is all you need!
Storage smarts: Cover tightly with plastic wrap and it’ll keep happily in the fridge for 3 days. The cherries might bleed a tiny bit into the cream layer after day two, but it still tastes amazing. Pro tip: if storing longer than a day, wait to add any crunchy toppings until right before serving.
Freezing? Honestly, I don’t recommend it – the texture changes too much. But if you must, freeze just the cream and cake layers without the cherry topping, then add fresh pie filling when thawed. It’s not quite the same, but works in a pinch!
One last thing – this dessert actually tastes better cold, so no need to let it come all the way to room temp. That cool, creamy bite with the sweet-tart cherries? Pure bliss!
Nutritional Information for Cherries in the Snow Dessert
Okay, let’s talk numbers – but remember, these are just estimates! Your exact nutrition will depend on the brands you use and any tweaks you make to the recipe. Here’s the breakdown per serving (about 1/12th of the dessert):
- Calories: Around 280
- Sugar: 25g (mostly from the pie filling and powdered sugar)
- Fat: 10g (cream cheese and whipped topping do their thing)
- Carbs: 45g (thank the angel food cake and cherries)
- Protein: 4g (not bad for dessert!)
A little tip from me – if you’re watching sugar, try using sugar-free pie filling and reducing the powdered sugar by half. The dessert will still taste amazing! And remember, portion control is everything – this is rich enough that small servings satisfy.
FAQs About Cherries in the Snow Dessert
Can I use fresh cherries instead of pie filling?
Oh, I love this question! While the pie filling gives that signature thick, glossy topping, you can absolutely use fresh cherries. Pit and halve about 3 cups of fresh cherries, then simmer them with 1/4 cup sugar and 1 tablespoon cornstarch until thickened. Let it cool completely before using – it’ll taste amazing, though the texture will be a bit different from the classic version.
How long does Cherries in the Snow keep in the fridge?
This dessert actually gets better after a day in the fridge! Just cover it tightly with plastic wrap, and it’ll stay fresh for up to 3 days. After that, the cake pieces start getting too soft. Pro tip: If you’re making it ahead, wait to add any crunchy toppings like pecans until right before serving so they stay crisp.
Can I use homemade whipped cream instead of whipped topping?
You bet! I sometimes make this with fresh whipped cream when I want to be extra fancy. Just whip 1 1/2 cups heavy cream with 2 tablespoons powdered sugar until stiff peaks form. Fold it in gently – the texture will be slightly lighter and more delicate than with whipped topping. Keep it extra chilled though, as real cream doesn’t hold its shape as long.
What other cake can I use if I don’t have angel food?
In a pinch, pound cake works beautifully! Tear it into pieces just like you would angel food cake. The texture will be denser but still delicious. I’ve even used leftover vanilla sponge cake or chiffon cake with great results. Just avoid anything too heavy or moist – you want that lovely contrast with the creamy layer.
Can I make individual servings for a party?
Absolutely – this is one of my favorite ways to serve it! Layer the components in clear glasses or dessert cups for a stunning presentation. I usually do cake pieces first, then cream mixture, then cherries, repeating if the glasses are tall. It makes for such an elegant potluck contribution, and everyone gets their own perfect portion!
Share Your Cherries in the Snow Dessert
I can’t wait to see your beautiful creations! There’s something so special about seeing how this simple dessert brings joy to different kitchens. Snap a photo of your masterpiece – I love spotting those bright red cherries against the snowy white background. Tag me @FrostyRecipes on Instagram so I can cheer you on! Bonus points if you catch someone mid-bite with that “oh wow” expression we all get with the first taste.
Did you try any fun variations? Maybe you added a splash of almond extract or switched up the fruit filling? Drop a comment below and share your twist – your idea might inspire someone else’s new favorite version! And if this recipe becomes your new go-to like it is for me, give it a 5-star rating to let others know it’s a winner.
Most importantly, enjoy every bite of that creamy, dreamy goodness. Some of my favorite family memories happen over simple desserts like this. Now go make some sweet memories of your own! You can also follow along for more fun recipes on our Facebook page.