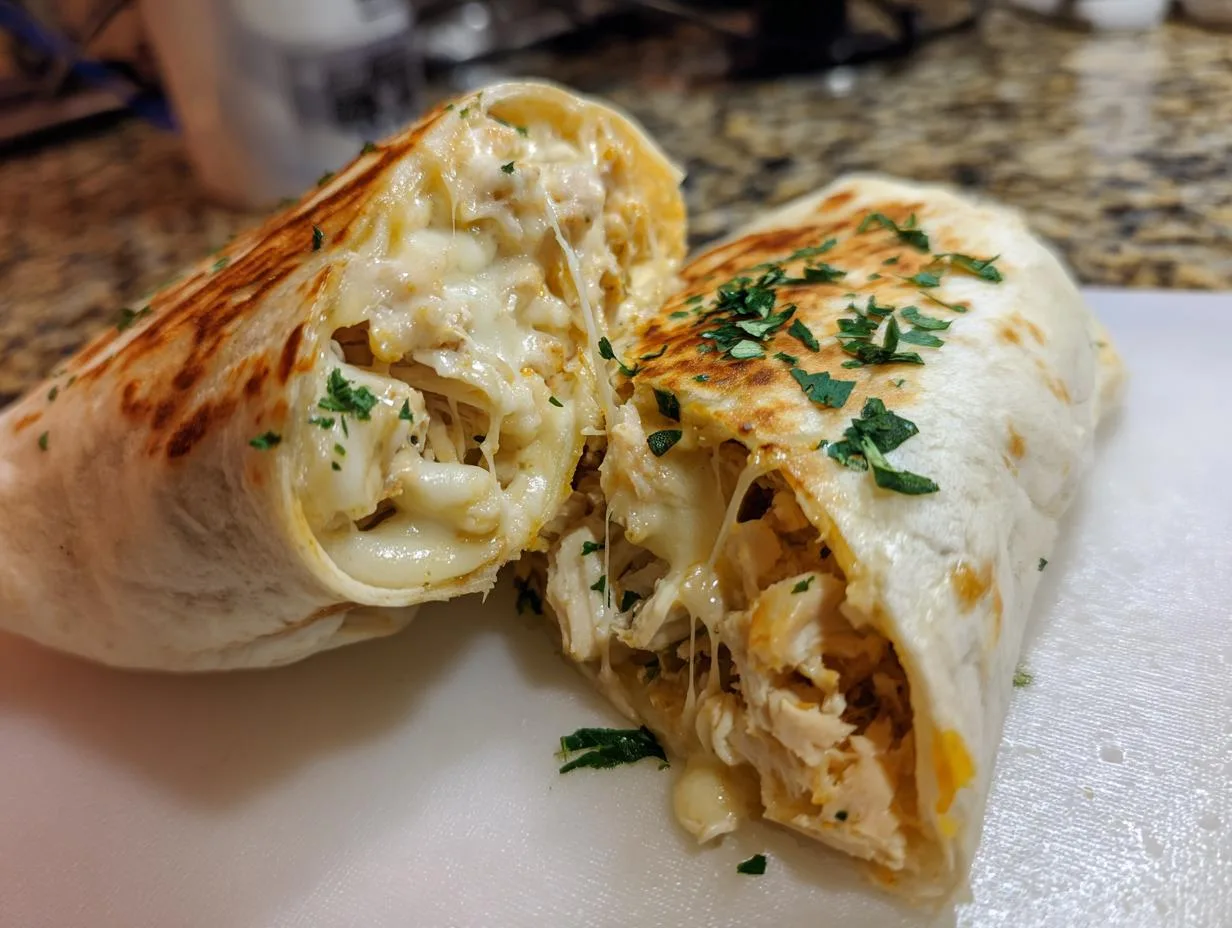
You know those nights when you’re racing against the clock, the kids are hangry, and takeout sounds tempting? That’s exactly when my Chicken Sliders with Rotisserie Chicken swoop in to save the day! I swear by this recipe – it’s my go-to when I need something fast, delicious, and guaranteed to disappear from the plate. The best part? That juicy rotisserie chicken does all the heavy lifting. Just shred, mix, and bake – you’ll have golden, melty sliders ready faster than you can say “drive-thru.” Trust me, these little sandwiches pack big flavor and even bigger convenience for busy families like ours.
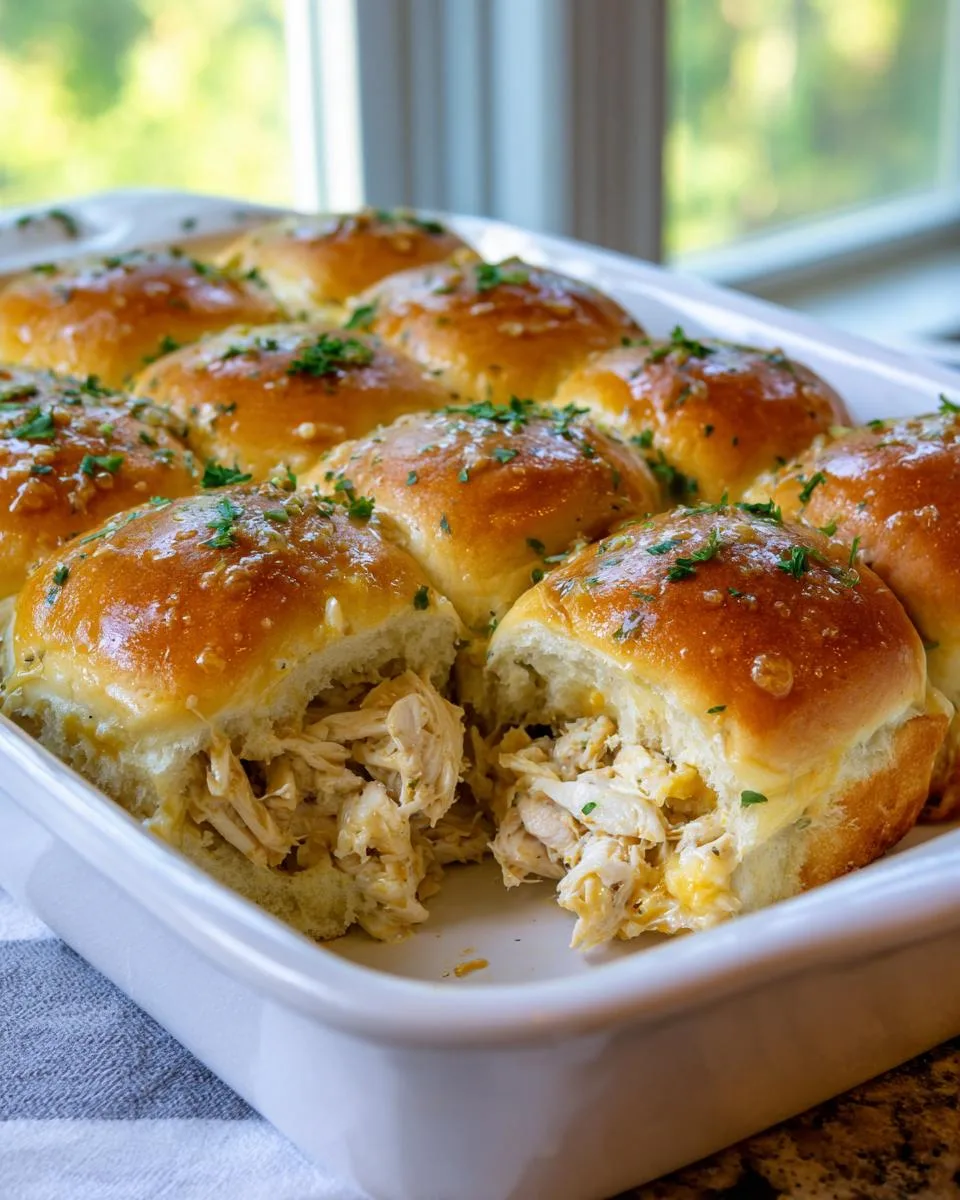
Table of Contents
Table of Contents
Why You’ll Love These Chicken Sliders with Rotisserie Chicken
Oh my goodness, where do I even start? These sliders are my secret weapon for crazy weeknights and last-minute potlucks. Let me count the ways they’ll steal your heart:
- Speed demon: From fridge to table in under 30 minutes – even my toddler can’t whine that long!
- Flavor bomb: That rotisserie chicken brings so much savory goodness, and the melty cheese? *Chef’s kiss*
- Crowd pleaser: Kids gobble them up, adults sneak seconds – it’s the ultimate peace treaty at family dinners
- No-fuss fancy: They look bakery-worthy but are easier than making toast (perfect for impressing in-laws!)
- Leftover magic: Stash extra chicken from the rotisserie to make these again later in the week
Seriously, once you try these, you’ll wonder how you ever survived busy nights without them!
Ingredients for Chicken Sliders with Rotisserie Chicken
Gather these simple ingredients – most might already be in your kitchen! The magic happens when ordinary stuff transforms into something extraordinary. Here’s everything you’ll need:
- 12 slider buns: I’m obsessed with Hawaiian rolls here – their sweetness plays so nicely with the savory chicken
- 2 cups shredded rotisserie chicken: Get the meat while it’s still warm if you can (I pick at the crispy skin bits while shredding – cook’s treat!)
- 1/2 cup mayonnaise: The glue that holds our flavor party together
- 1 tablespoon Dijon mustard: That little tang makes all the difference
- 1/2 teaspoon each garlic powder & onion powder: My dynamic duo for instant depth
- Salt and pepper: Taste as you go – rotisserie chickens vary in saltiness
- 6 slices provolone or mozzarella: Melts like a dream and makes that perfect cheese pull
- 2 tablespoons melted butter: For that golden, shiny top we all crave
- 1 tablespoon chopped parsley: Fresh or dried both work (no judgment here!)
- 1/2 teaspoon poppy seeds: Optional but adds such a nice little crunch
Equipment Needed
Don’t worry – you won’t need any fancy gadgets for these sliders! Just grab:
- A 9×13 baking dish (or any oven-safe pan that fits your buns)
- One medium mixing bowl for the chicken filling
- A small bowl for the butter glaze
- Pastry brush (or use a spoon in a pinch!)
- Aluminum foil – our trusty baking buddy
That’s it! Now let’s get those sliders assembled.
How to Make Chicken Sliders with Rotisserie Chicken
Alright, let’s get these beauties in the oven! I promise it’s easier than folding a fitted sheet (why are those things so impossible?). Follow these simple steps, and you’ll have golden, melty sliders that’ll make your whole kitchen smell amazing.
Step 1: Prep the Buns and Chicken Mixture
First, crank that oven to 350°F (175°C) – no sneaky preheating skips allowed! While it warms up, grab your slider buns. Here’s my favorite trick: keep them connected and slice the whole pack horizontally with a serrated knife (like you’re making one giant sandwich). So much easier than separating each bun!
Now for the chicken mixture – this is where the magic happens. In a bowl, combine your shredded rotisserie chicken with mayo, Dijon, garlic powder, onion powder, and a pinch of salt and pepper. Mix it until every bit of chicken is coated and happy. Taste it! This is your moment to adjust the seasoning – maybe it needs more pepper or a tiny squeeze of lemon juice?
Step 2: Assemble the Sliders
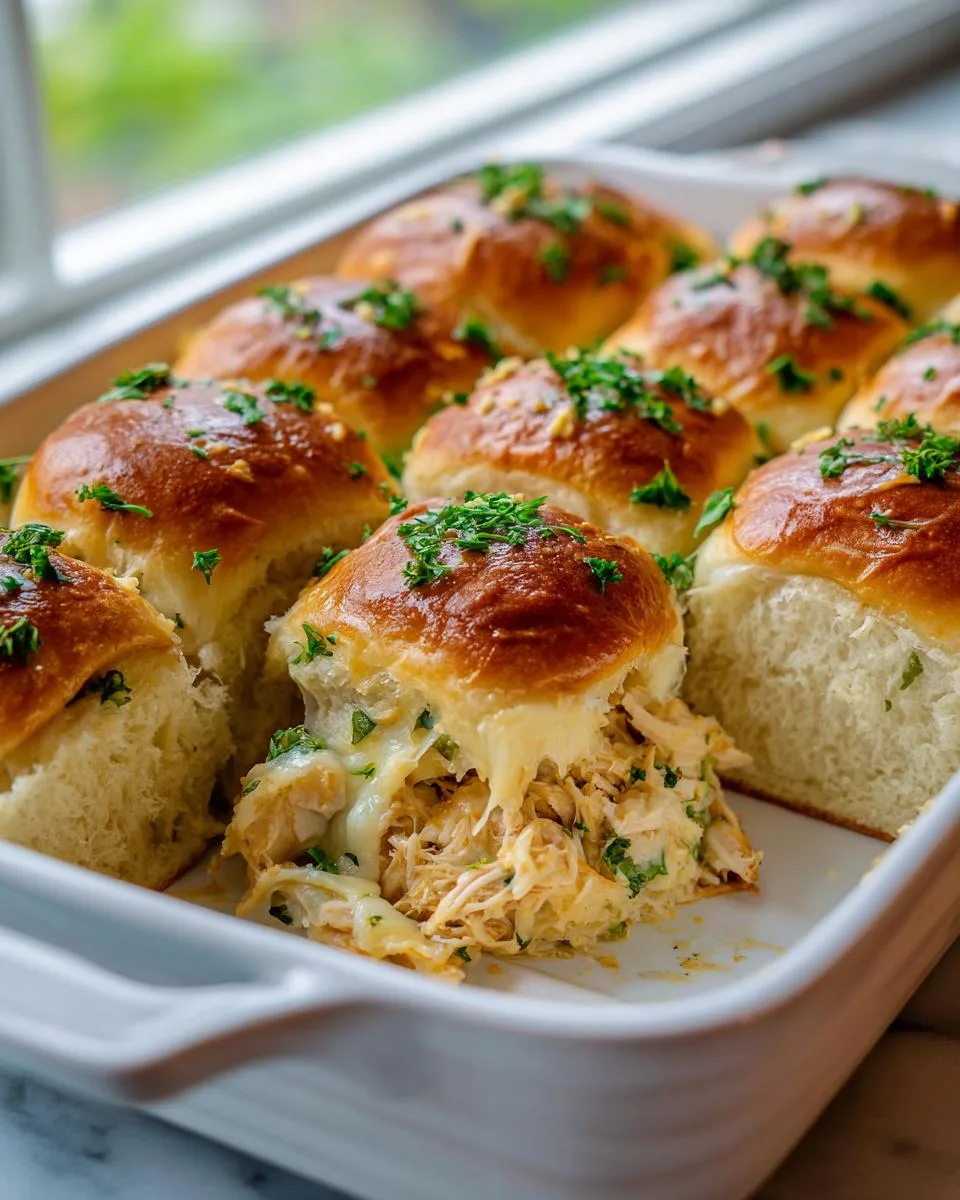
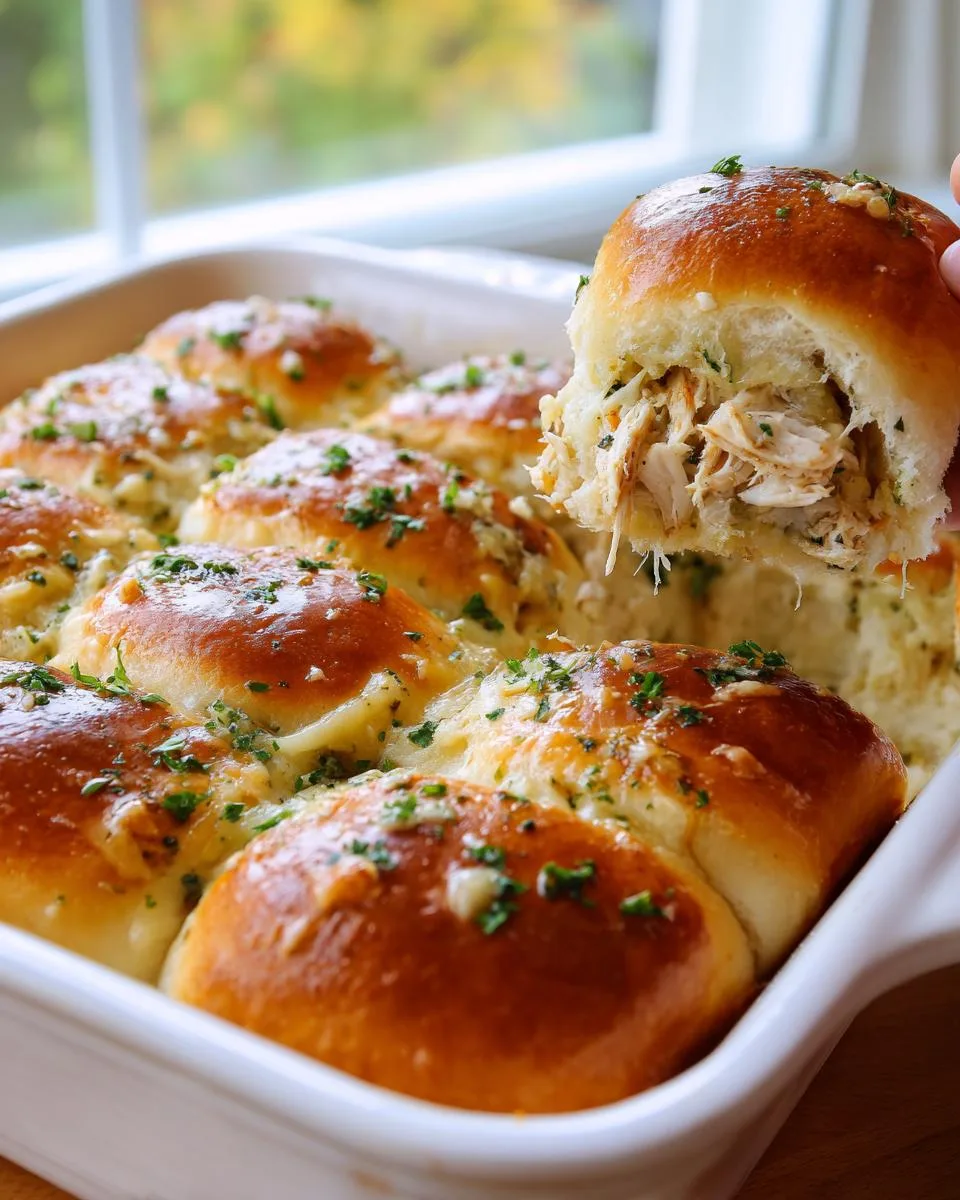
Place the bottom halves of your buns in a greased baking dish. Spread that glorious chicken mixture evenly over them – I use the back of a spoon to press it gently into all the nooks. Now for the cheese! Layer those slices over the chicken (tear them if needed to cover). Pop the top halves of the buns on like little hats.
In a small bowl, mix melted butter with parsley and poppy seeds if using. Generously brush this over the tops – don’t be shy, this gives that gorgeous golden color! Pro tip: use the brush to get butter down into the bun crevices too.
Step 3: Bake to Perfection
Cover the whole dish loosely with foil – this prevents over-browning while the cheese melts underneath. Bake for 10 minutes, then remove the foil for the final magic. Give them another 5-7 minutes until the tops are toasted golden and you can see the cheese oozing at the edges.
Let them cool just enough so you don’t burn your mouth (learned that the hard way!), then slice and serve. That first bite of warm, cheesy, buttery goodness? Pure heaven!
Tips for the Best Chicken Sliders with Rotisserie Chicken
After making these sliders more times than I can count (my family demands them weekly!), I’ve picked up some foolproof tricks:
- Hawaiian roll magic: That touch of sweetness balances the savory chicken perfectly – don’t skip it!
- Taste as you mix: Rotisserie chickens vary in seasoning, so adjust your salt and pepper accordingly
- Poppy seed power: They add such a fun little crunch – I keep a jar just for these sliders
- Warm chicken hack: Shred while still slightly warm – it mixes into the mayo so much easier
- Butter brush bonus: Get that butter down into the cracks between buns for extra flavor in every bite
Trust me, these small touches make a BIG difference!
Print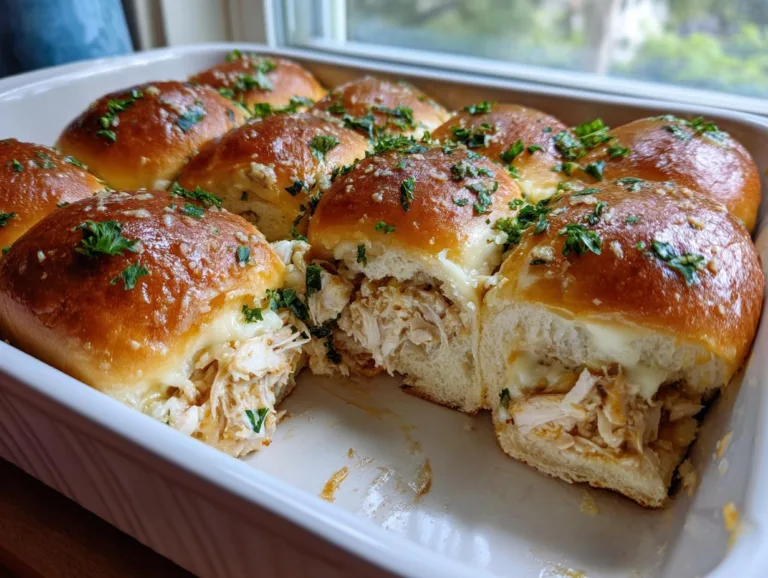
Juicy Chicken Sliders with Rotisserie Chicken
Easy chicken sliders made with rotisserie chicken, perfect for quick dinners or gatherings.
- Total Time: 27 minutes
- Yield: 12 sliders 1x
Ingredients
- 12 slider buns (Hawaiian rolls work best)
- 2 cups shredded rotisserie chicken
- 1/2 cup mayonnaise
- 1 tablespoon Dijon mustard
- 1/2 teaspoon garlic powder
- 1/2 teaspoon onion powder
- Salt and pepper to taste
- 6 slices provolone or mozzarella cheese
- 2 tablespoons unsalted butter, melted
- 1 tablespoon finely chopped parsley
- 1/2 teaspoon poppy seeds (optional)
Instructions
- Preheat oven to 350°F (175°C). Lightly grease or line a baking dish with parchment paper.
- Slice the slider buns horizontally to separate tops from bottoms. Place the bottom halves in the prepared baking dish.
- In a bowl, mix shredded rotisserie chicken with mayonnaise, Dijon mustard, garlic powder, onion powder, salt, and pepper.
- Spread the chicken mixture evenly over the bottom halves of the buns.
- Layer cheese slices over the chicken mixture.
- Place the top halves of the buns over the cheese to close the sliders.
- In a small bowl, mix melted butter with parsley and poppy seeds (if using). Brush the tops of the buns generously with the butter mixture.
- Cover the dish loosely with foil and bake for 10 minutes. Remove foil and bake for an additional 5–7 minutes, or until the tops are golden brown and cheese is melted.
- Serve warm and enjoy!
Notes
- Use Hawaiian rolls for a slightly sweet touch.
- Adjust seasoning to your taste.
- Add poppy seeds for extra crunch.
- Prep Time: 10 minutes
- Cook Time: 17 minutes
- Category: Sandwiches
- Method: Baking
- Cuisine: American
- Diet: Low Lactose
Nutrition
- Serving Size: 1 slider
- Calories: 220
- Sugar: 3g
- Sodium: 320mg
- Fat: 12g
- Saturated Fat: 4g
- Unsaturated Fat: 6g
- Trans Fat: 0g
- Carbohydrates: 18g
- Fiber: 1g
- Protein: 10g
- Cholesterol: 35mg
Variations for Chicken Sliders with Rotisserie Chicken
Oh, the fun we can have with these sliders! Here are my favorite ways to mix things up when I’m feeling creative (or just cleaning out the fridge):
- Cheese swap: Try sharp cheddar for bite, pepper jack for heat, or Swiss for that fancy deli feel
- Veggie boost: Stir in some finely chopped celery or shredded carrots for crunch (sneaky nutrition!)
- Southern twist: Add a tablespoon of BBQ sauce to the chicken mix and top with crispy onions
- Italian vibes: Mix in pesto instead of mustard and use mozzarella with sun-dried tomatoes
- Buffalo style: Toss chicken with hot sauce and blue cheese crumbles – game day perfection!
The possibilities are endless – make them your own! If you’re looking for other easy weeknight chicken ideas, check out my fajita chicken cottage cheese bake.
Serving Suggestions
These sliders shine brightest with simple sides! I love serving them with:
- Crisp dill pickles for that perfect tangy crunch
- A big bowl of creamy coleslaw (the cool crunch is magic)
- Sweet potato fries for dunking in extra mayo
- Fresh watermelon slices in summer – so refreshing!
- Just grab-and-go for crazy busy nights (no shame!)
Honestly? They’re delicious all by themselves too – I won’t tell! For another great side dish, consider my recipe for oven baked mashed potatoes.
Storage and Reheating
These sliders keep like a dream! Store leftovers (if you’re lucky enough to have any!) in an airtight container in the fridge for up to 3 days. When reheating, pop them in a 350°F oven for 5-7 minutes – the cheese gets all melty again like magic. Microwave works in a pinch, but trust me, the oven brings them back to life!
Nutritional Information
Okay, let’s talk numbers – but remember, these are just ballpark figures because we all use slightly different brands and amounts! Each slider comes in around 220 calories, with 10g of protein to keep you full. The rotisserie chicken does most of the heavy lifting nutrition-wise, while those Hawaiian rolls bring about 18g of carbs per slider (perfect for soaking up all that flavor!).
Now for my standard disclaimer – and I say this as someone who’s measured ingredients a hundred different ways: Your exact nutrition will vary based on how much chicken you pack in, which brand of rolls you use, and whether you go heavy on that delicious butter glaze (no judgment here!). The cheese choice makes a difference too – mozzarella tends to be a bit lighter than provolone.
The good news? These sliders balance protein, carbs, and fats beautifully for a satisfying meal. And if you’re watching certain nutrients, you can always tweak the recipe – use light mayo, less cheese, or whole wheat slider buns. But between you and me? Sometimes you just need that perfect bite of comfort food exactly as written!
Frequently Asked Questions
I get so many questions about these sliders – here are the ones that pop up most often in my kitchen and inbox!
Can I use canned chicken instead of rotisserie?
Oh honey, I won’t lie – rotisserie chicken makes all the difference with its flavor and texture! But in a pinch? Drained canned chicken works. Just amp up the seasonings and maybe add a squeeze of lemon to brighten it up.
How long do leftovers last?
These sliders keep beautifully for 3 days in the fridge – just reheat in the oven to revive that crispy top. They’re my favorite next-day lunch (if they last that long!).
Can I freeze assembled sliders?
Absolutely! Assemble without the butter glaze, wrap tightly, and freeze for up to 2 months. Add the glaze right before baking – they’ll taste fresh as ever!
What other shredded chicken recipes work with rotisserie chicken?
Oh, the possibilities! Try it in tacos, salads, or my famous chicken pot pie. That pre-cooked bird is a weeknight superhero! For more ideas on using up that chicken, check out my rotisserie chicken shepherd pie.
Did these Chicken Sliders with Rotisserie Chicken save your busy weeknight like they do mine? I’d love to hear your story! Drop a star rating below and tell me – did your kids gobble them up? Did your partner sneak an extra one when you weren’t looking? Your feedback makes my day and helps other home cooks know what to expect. And hey, if you snapped a pic of your golden, melty masterpieces, tag me @FrostyRecipes – I live for those cheesy slider pull shots! Now go enjoy those sliders, you kitchen rockstar!