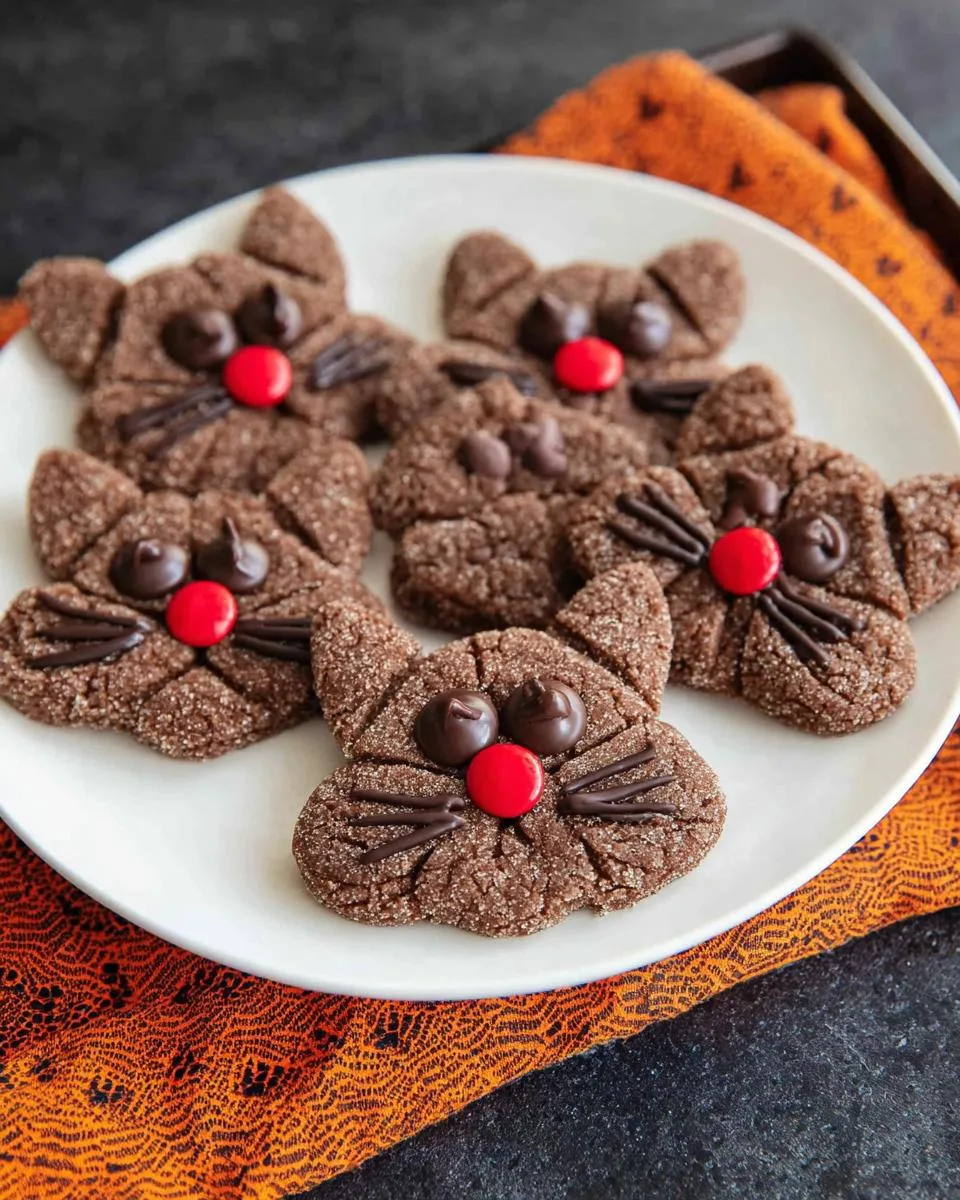
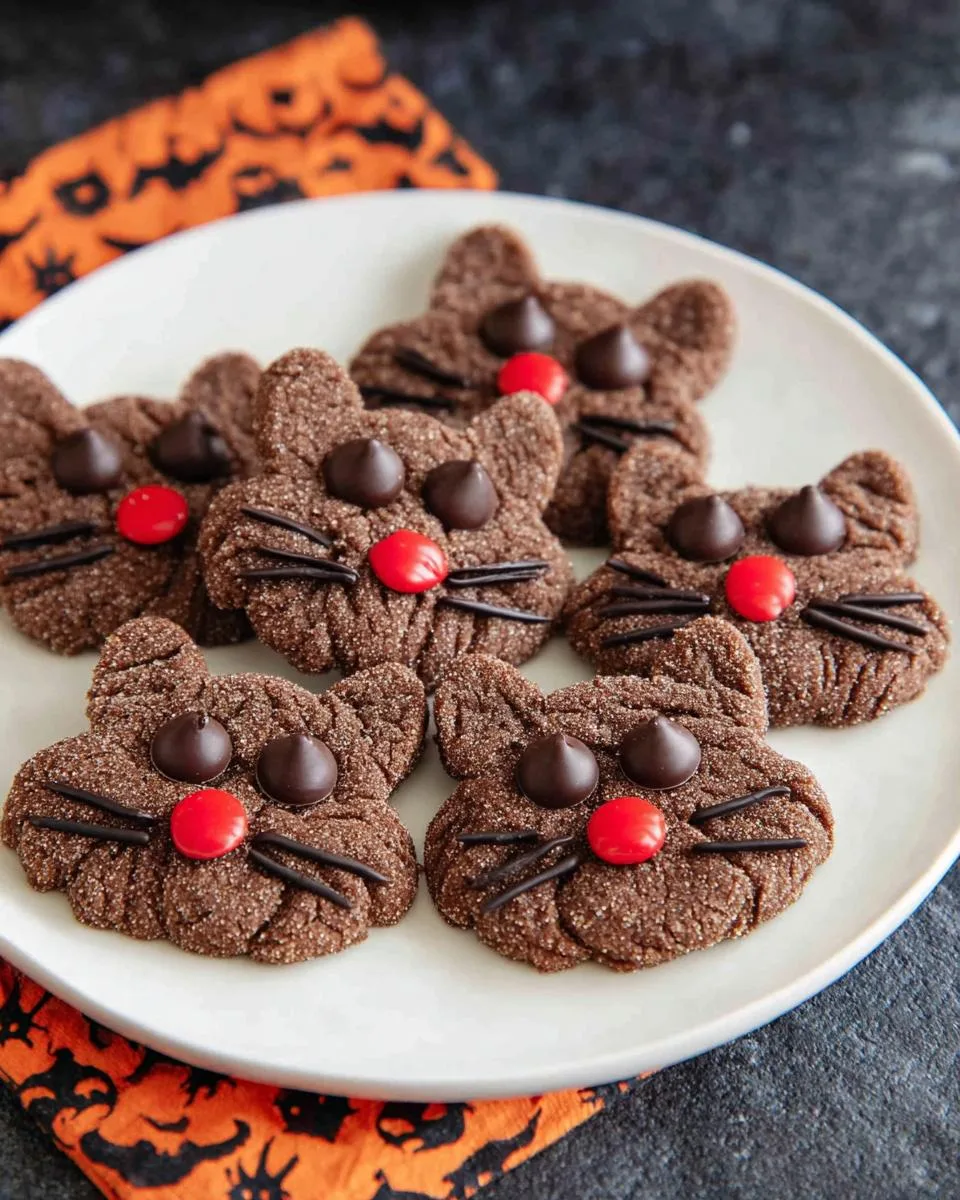
Oh my gosh, you have got to try these Chocolate Black Cat Cookies! They’re the easiest, cutest Halloween treat you’ll ever make—I swear. I stumbled upon this recipe a few years ago when my kids begged for “spooky cookies,” and now they’re a must-make every October. The best part? You start with a simple chocolate cake mix, so even if baking isn’t your superpower, these little feline faces will turn out perfect.
Trust me, I’ve burned my share of cookies (hello, distracted mom life), but these are foolproof. The peanut butter gives them that chewy magic, and the chocolate chips? Well, they’re just begging to be turned into mischievous cat eyes. Last year, my daughter insisted we make a whole “clowder” of them (that’s a group of cats, FYI—I had to Google it too) for her school party. The teachers still talk about them!
What I love most is how these cookies bring out everyone’s inner kid. My husband gets way too competitive decorating the “scariest” cat, and my littlest always sneaks extra chocolate chips when he thinks I’m not looking. Whether you’re hosting a Halloween bash or just want a fun after-school project, these Chocolate Black Cat Cookies are about to become your new tradition. Just wait until you see how easy it is to pinch those adorable ears—total game changer!
Table of Contents
Table of Contents
Why You’ll Love These Chocolate Black Cat Cookies
Listen, these cookies aren’t just adorable—they’re downright addictive. Here’s why they’ve become my go-to Halloween treat year after year:
- So easy a zombie could make them – Seriously, cake mix does most of the work! No fancy techniques, just mix, shape, and bake. Even my 6-year-old can handle decorating (though his cats sometimes end up looking more like blobs… but hey, artistic license!).
- Kid-approved magic – The peanut butter-chocolate combo is a guaranteed crowd-pleaser. Last year, my daughter’s friends declared them “even better than candy” (high praise from sugar-crazed trick-or-treaters!).
- Pantry-friendly ingredients – Chances are you’ve got everything already: cake mix, peanut butter, eggs. No last-minute grocery runs for obscure spices!
- Customizable fun – Swap the red candies for yellow to make tigers, or use white chocolate chips for ghost cats. I’ve even done a “zombie cat” version with green gel frosting scars!
- Instant Halloween vibes – That moment when you pull a tray of these wide-eyed kitties out of the oven? Pure spooky joy. They make even store-bought treats look boring.
Honestly, the hardest part is not eating them all while you decorate. Consider yourself warned!
Ingredients for Chocolate Black Cat Cookies
Gather these simple ingredients – you probably have most in your pantry already! The magic is in how they come together to create these purr-fectly spooky treats.
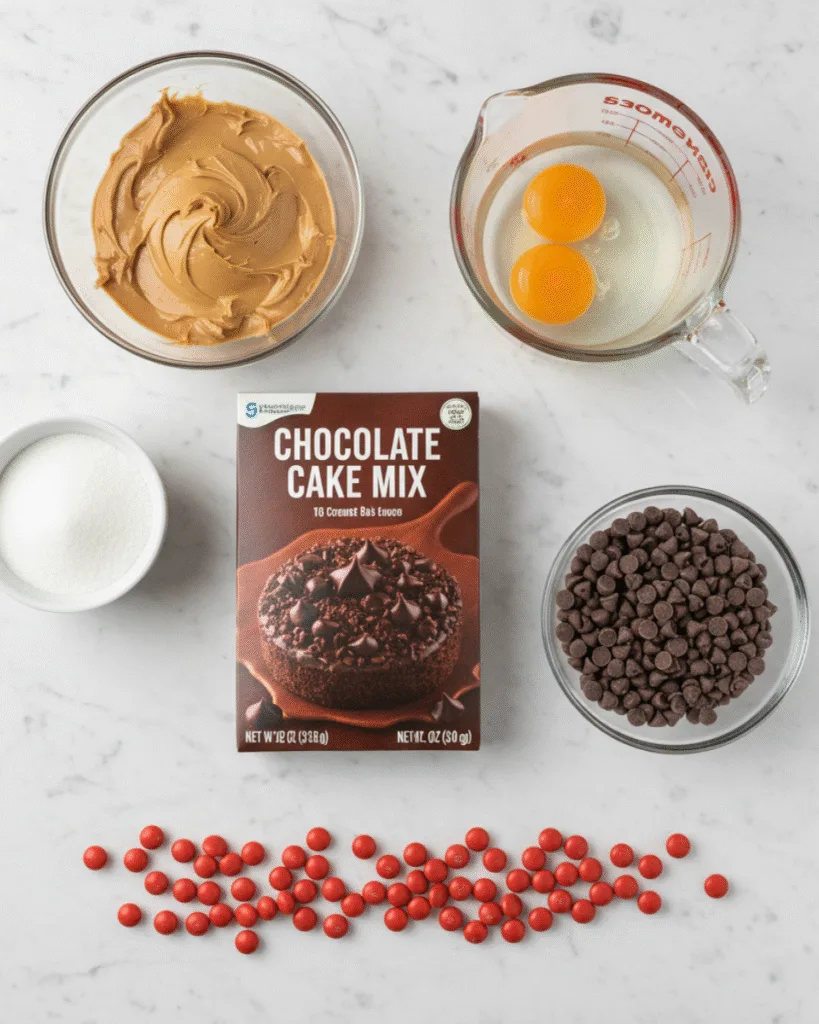
- 1 box chocolate cake mix – Any brand works, but I’m partial to the devil’s food variety for that deep black cat color. Just don’t get one with pudding in the mix – it changes the texture.
- 1 cup creamy peanut butter – This is the secret to that chewy texture! For nut-free friends, sunflower seed butter works great (just know it’ll turn the cookies slightly green – bonus for Halloween creep factor!).
- 2 large eggs – Room temp is best if you remember to take them out beforehand, but I’ve used cold eggs in a pinch with no disasters.
- ¼ cup water – You may need an extra tablespoon if your dough feels too stiff – it should be like playdoh, not crumbly.
- ½ cup granulated sugar – For rolling! This gives the cookies their slightly crackled “fur” texture.
- ¾ cup chocolate chips – Mini chips work best for the eyes, but regular-sized ones broken in half give a great “wide-eyed” look too.
- 42 pieces red mini-chocolate candies – Think mini M&Ms or similar. I’ve used red hots in a pinch, but warn kids they’re spicy!
See? Nothing fancy – just pantry staples ready to transform into something magical. Now let’s make some cookie cats!
Equipment You’ll Need
No fancy gadgets required here – just basic kitchen tools you likely already own! Here’s your quick checklist:
- Large mixing bowl – This dough comes together fast, so grab your biggest one to avoid flour volcanoes.
- Baking sheets – Standard half-sheet pans work perfectly. Line ’em with parchment if you’re fancy, but I often go bare (living dangerously!).
- Rubber spatula – For scraping every last bit of that peanut-buttery goodness into the mix.
- Drinking glass – The perfect tool for flattening cookies! I use a juice glass with a 3-inch diameter.
- Fork – Essential for creating those signature cat whisker indents.
That’s it! Now let’s get our paws dirty and make some cookies.
How to Make Chocolate Black Cat Cookies
Alright, let’s turn that cake mix into the most adorable cookie cats you’ve ever seen! Follow these steps – I promise it’s easier than herding actual cats.
- Preheat that oven! Crank it to 325°F (163°C). This lower temp keeps our kitties from getting too dark – we want them spooky, not burnt!
- Mix your dough. In your big bowl, stir together the peanut butter, cake mix, eggs, and water with a rubber spatula. It’ll look dry at first, but keep mixing! The dough should come together like Play-Doh – if it’s crumbly, add water 1 tbsp at a time until it holds together when pinched.
- Shape your cats. Pour sugar into a shallow bowl. Roll dough into 1½-inch balls (about the size of a ping pong ball), then roll each in sugar to coat. Place them 2 inches apart on your baking sheet – these little guys spread!
- Flatten with finesse. Use the bottom of your drinking glass to press each ball into a ¼-inch thick circle. Don’t smash them too thin – we want plump, happy cats!
- Pinch those ears! This is the fun part! Gently pinch the top of each cookie to form two pointy ears. If they crack, just smoosh the dough back together – peanut butter makes it very forgiving.
- Give them personality. Press two chocolate chips pointy-side-down for eyes and one red candy for the nose. Then use a fork to press whisker marks on both sides. Pro tip: Dip the fork in sugar between cookies to prevent sticking!
- Bake to perfection. Pop them in the oven for 7-8 minutes. They’re done when they look set but still feel soft to the touch – they’ll firm up as they cool. No overbaking unless you want crispy cats!
- Cool like a pro. Let cookies sit on the baking sheet for exactly 1 minute (sets the shape), then transfer to a wire rack. Try not to eat them all while warm… though I won’t judge if you “quality test” one or three.
See? Even if your first few look more like abstract art than cats, they’ll still taste amazing. By the third cookie, you’ll be a black cat cookie Picasso!
Print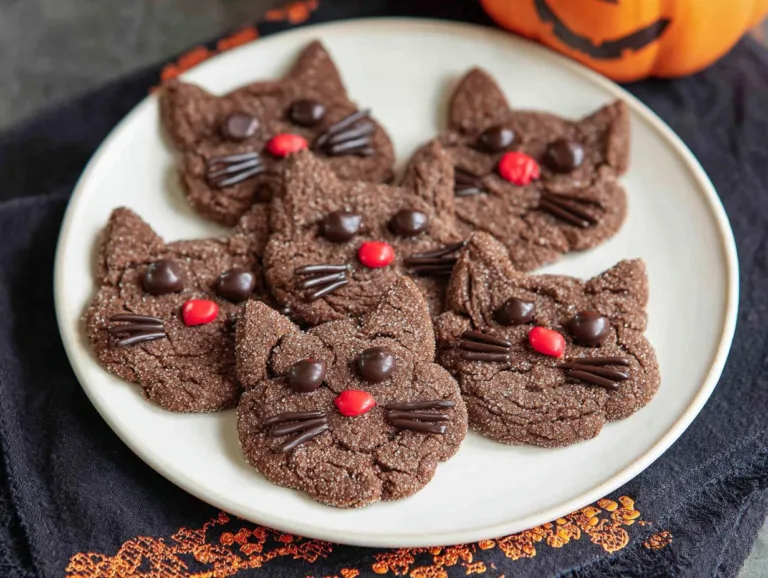
Scrumptious Chocolate Black Cat Cookies Every Kid Adores
Simple and fun chocolate black cat cookies made with cake mix, peanut butter, and chocolate chips, perfect for Halloween or any spooky occasion.
- Total Time: 23 mins
- Yield: 42 cookies 1x
Ingredients
- 1 box chocolate cake mix
- 1 cup creamy peanut butter (substitute with another nut butter or sun butter if needed)
- 2 large eggs
- ¼ cup water
- ½ cup granulated sugar
- ¾ cup chocolate chips
- 42 pieces red mini-chocolate candies (like mini M&Ms)
Instructions
- Preheat oven to 325°F.
- In a large bowl, mix together peanut butter, cake mix, eggs, and water using a spoon or rubber spatula. Add more water if the dough is too stiff.
- Place sugar in a shallow bowl. Roll dough into 1 ½-inch balls, coat with sugar, and place on a lined baking sheet.
- Flatten dough balls to ¼-inch thickness using the bottom of a drinking glass.
- Pinch two ears at the top of each cookie to form cat faces.
- Add chocolate chips for eyes and a red candy for the nose.
- Use a fork to create whiskers on both sides of the face.
- Bake for 7-8 minutes until soft to the touch.
- Cool on the baking sheet for 1 minute, then transfer to a rack to cool completely.
Notes
- Store in an airtight container for up to 3 days.
- For a nut-free version, use sunflower seed butter.
- Prep Time: 15 mins
- Cook Time: 8 mins
- Category: Dessert
- Method: Baking
- Cuisine: American
- Diet: Vegetarian
Nutrition
- Serving Size: 1 cookie
- Calories: 120
- Sugar: 10g
- Sodium: 80mg
- Fat: 5g
- Saturated Fat: 2g
- Unsaturated Fat: 2g
- Trans Fat: 0g
- Carbohydrates: 16g
- Fiber: 1g
- Protein: 3g
- Cholesterol: 10mg
Tips for Perfect Chocolate Black Cat Cookies
After making these Chocolate Black Cat Cookies more times than I can count (and yes, eating my share of “mistakes”), here are my hard-won secrets for purr-fect black cat cookies every time:
- The dough tells all – If it cracks when shaping, add 1 tsp of water at a time until it’s playdoh-soft. Too sticky? A sprinkle of extra cake mix fixes it fast.
- Bake with your nose – When you smell chocolate (about 7 minutes in), check them! They continue cooking on the hot tray, so pull them when centers look slightly underdone.
- Get creative with faces – Use sliced almonds for pointy ears, or swap M&Ms for candy eyes. Last year we made “vampire cats” with mini marshmallow fangs!
- Chill for sharp details – If your kitchen’s warm, pop the shaped cookies in the fridge for 10 minutes before baking to keep those whisker marks crisp.
- The rescue trick – Broke an ear? Dab on some melted chocolate as “glue” to reattach it – no one will ever know!
Remember – even the wonky ones taste amazing dunked in milk. That’s cookie magic!
Ingredient Substitutions and Variations
These cookies are crazy adaptable – here’s how to customize your clowder (yep, still using that word!) for different diets and tastes:
- Nut-free magic: Swap peanut butter for sunflower seed butter – though heads up, it’ll turn cookies slightly green (spooky bonus!). Cookie butter works too for a speculoos twist.
- Candy alternatives: No mini M&Ms? Use red Skittles cut in half, cinnamon imperials, or even dried cranberry pieces soaked in warm water to soften.
- Extra-dark cats: Add 2 tbsp black cocoa powder to the cake mix for inky black cookies worthy of a witch’s familiar!
- Flavor twists: Try mint chocolate chips for “witch’s brew” cats or add orange zest to the dough for a citrusy surprise.
The best part? No matter what swaps you make, these cookies always disappear faster than a black cat at midnight!
Storing and Serving Chocolate Black Cat Cookies
Here’s the scoop on keeping your cookie cats fresh and fabulous – because let’s be real, they never last long in my house! Store them in an airtight container at room temperature for up to 3 days (if they survive that long). Layer them with parchment paper to prevent whisker smudges.
Want that just-baked magic? Pop a cookie in the microwave for 5 seconds – the chocolate chips get all melty again! For parties, arrange them on a black platter with candy corn “paws” trailing behind. My kids love making a whole “cookie cemetery” scene with tombstone cookies nearby. The best part? No refrigeration needed, so they’re perfect for classroom parties or Halloween potlucks!
Frequently Asked Questions About Chocolate Black Cat Cookies
Got questions? I’ve got answers! Here are the most common things people ask me about these adorable Halloween treats:
- Can I use a different cake mix flavor? Absolutely! Devil’s food gives the darkest color, but regular chocolate works too. I’ve even made “orange tabby” versions with spice cake mix – just reduce the water by 1 tbsp since those mixes are moister.
- How do I make these completely nut-free? Swap the peanut butter for sunflower seed butter (the cookies will turn slightly green – bonus spooky points!) or use Wowbutter. Just check that your cake mix is nut-free too.
- Why do my cats’ faces melt in the oven? This usually means your dough was too warm. Chill the shaped cookies for 10 minutes before baking to keep those adorable features sharp!
- Can I freeze these cookies? You bet! Freeze undecorated cookies for up to 2 months. Thaw at room temp, then add the chocolate chip eyes and candy noses fresh so they don’t get soggy.
- Help! My cookies spread too much! Try adding 2 tbsp extra cake mix to your dough. And always bake at 325°F – higher temps make them spread like scaredy-cats!
Still stumped? Drop me a comment – I’ve made every mistake so you don’t have to!
For more fun recipes and updates, follow us on Facebook!