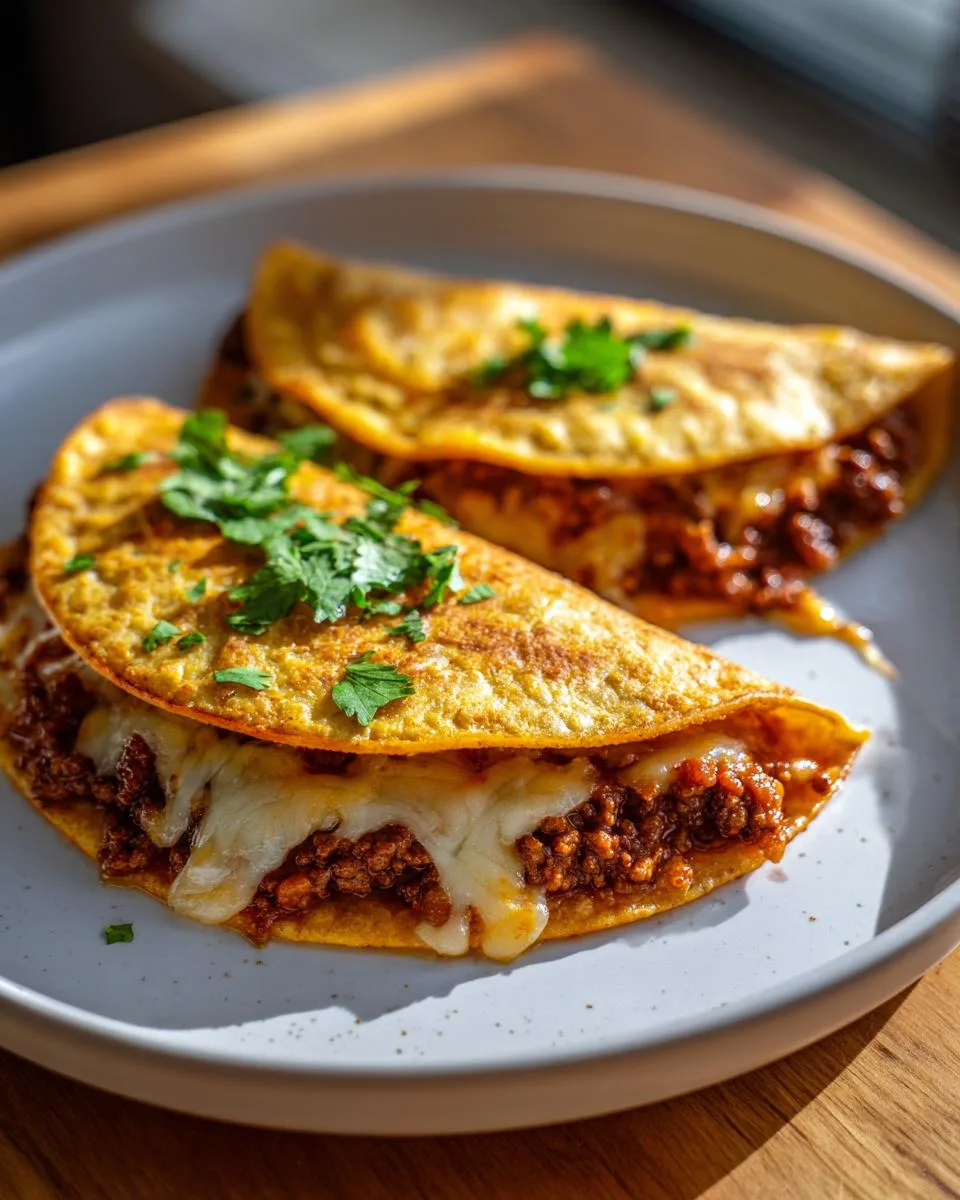
You know those nights when you need dinner on the table fast, but you still want that satisfying crunch that makes everyone come running to the kitchen? That’s when my crispy ground beef tacos save the day! As a mom constantly juggling after-school activities and work, I’ve perfected this recipe to be quick, foolproof, and packed with that golden crispiness we all crave. The secret? A generous layer of melty mozzarella that gets perfectly pan-fried until it’s golden and irresistible. My kids call them “cheesy crunch tacos” – and trust me, they disappear faster than I can make them!

Table of Contents
Table of Contents
Why You’ll Love These Crispy Ground Beef Tacos
These tacos are my go-to for a reason – here’s why they’ll become your family’s new favorite too:
- That irresistible crunch: Pan-frying gives each bite that perfect golden crispiness you can’t get from soft tacos
- Weeknight superhero: From fridge to table in under 30 minutes – even my picky eaters can’t resist them
- Cheese lovers rejoice: Melty mozzarella creates the most delicious crispy-chewy edges (my kids fight over these bits!)
- Customizable for everyone: Dress them up with toppings or keep it simple – they’re delicious either way
Ingredients for Crispy Ground Beef Tacos
Here’s everything you’ll need to make these golden beauties (and why each ingredient matters):
- 1 pound 90/10 ground beef: Lean enough to avoid greasiness but with enough fat for flavor – trust me, that ratio makes all the difference
- 1/2 medium onion, finely chopped: Cooks faster when diced small and adds sweetness
- 2 tablespoons taco seasoning: Use your favorite brand or homemade blend
- 2 tablespoons tomato paste: That concentrated umami boost that makes the filling sing
- 1/4 cup water or beef broth: Just enough to keep things moist without making soggy tacos
- 8 (6 inch) flour tortillas: The perfect size for folding and frying
- 2-3 cups shredded mozzarella: Melts beautifully and gives that signature crispy-chewy edge
- Avocado or vegetable oil: For frying – has a high smoke point so nothing burns
- Fresh cilantro (optional): That fresh pop of green makes all the difference
How to Make Crispy Ground Beef Tacos
Okay, let’s get cooking! I promise these tacos are easier than they look – just follow these simple steps for that perfect golden crunch every time.

Step 1: Cook the Ground Beef Filling
First, grab your favorite skillet (I always use my trusty cast iron) and heat about 1 tablespoon of oil over medium heat. Toss in those finely chopped onions and let them soften for 2-3 minutes – you’ll know they’re ready when they turn translucent and smell sweet. Now add the beef, breaking it up with your spoon as it browns. Don’t rush this part! Let it cook undisturbed for a minute at a time to develop flavor. Once mostly browned (about 4-5 minutes), stir in the tomato paste and taco seasoning. If it looks dry, splash in that water or broth – just enough to keep things moist but not soupy. Cook another 3-4 minutes until the liquid evaporates. Taste and add salt if needed, then set aside to cool slightly (hot filling makes soggy tacos – learned that the hard way!).
Step 2: Assemble the Tacos
Now the fun part! Lay out your tortillas on a clean surface. On the top half of each, sprinkle about 1½ tablespoons of cheese – this first layer acts like glue. Spoon on 2-3 tablespoons of beef filling (don’t overstuff!), then top with another 1½ tablespoons of cheese. Fold the bottom half over and gently press to seal – the cheese should peek out the edges (that’s where the magic happens!). Repeat until all your tacos are assembled and lined up like little soldiers ready for battle.
Step 3: Pan-Fry to Crispy Perfection
Heat 3-4 tablespoons of oil in your skillet over medium heat – you’ll know it’s ready when a tiny cheese crumb sizzles. Working in batches (don’t crowd the pan!), fry tacos for about 1 minute per side until golden brown. Listen for that satisfying sizzle! Use tongs to flip carefully – the cheese should be melty and the tortilla crisp. Transfer to a wire rack (this keeps them crispy underneath) and repeat with remaining tacos, adding more oil as needed. Pro tip: Let the oil reheat between batches for even browning. Now breathe in that amazing aroma – dinner is served!
Tips for the Best Crispy Ground Beef Tacos
After making these tacos more times than I can count (seriously, my family requests them weekly!), here are my foolproof secrets for maximum crispiness:
- Keep that beef lean: 90/10 ground beef gives you flavor without greasiness – too much fat makes soggy tacos
- Serve immediately: These beauties lose their crunch fast, so eat them hot off the skillet
- Don’t skimp on oil: That golden crust needs enough oil to fry properly – about 3-4 tablespoons per batch
- Wire rack magic: Letting tacos rest on a rack prevents steam from making the bottoms soft

Crispy Ground Beef Tacos: 3 Secrets for Irresistible Crunch
Crispy ground beef tacos with melted mozzarella cheese, pan-fried to golden perfection. A quick and delicious meal perfect for busy weeknights.
- Total Time: 25 minutes
- Yield: 8 tacos 1x
Ingredients
- 1 pound 90/10 ground beef
- 1/2 medium onion, finely chopped
- 2 tablespoons taco seasoning
- 2 tablespoons tomato paste
- 1/4 cup water or beef broth, as needed
- salt to taste, as needed
- 8 (6 inch) taco size flour tortillas
- 2 to 3 cups mozzarella cheese, shredded
- avocado or vegetable oil
- fresh cilantro, finely chopped, garnish
Instructions
- Heat some oil (about 1 tablespoon) in a large skillet over medium heat. Add in the onions and cook until softened, about 2-3 minutes.
- Next, add in the beef. Use a large spoon to break up the beef and cook until most of the beef is browned, about 4-5 minutes.
- Mix in the tomato paste and then the taco seasoning. Stir in the water (or beef broth) if filling appears dry and continue to cook until the beef is fully cooked through and most of the cooking liquid has evaporated, about 3-4 minutes. Taste the filling and season with salt, if needed. Remove from heat and set aside to cool slightly before assembling tacos.
- On a clean work surface, place down a tortilla. On the top half of the tortilla, add some mozzarella cheese (about 1 1/2 to 2 tablespoons). Spoon over a portion of the beef filling and top with some more cheese (about 1 1/2 to 2 tablespoons). Fold the bottom half of the tortilla over the filling and gently press down to seal.
- Transfer assembled taco to a large baking sheet and repeat with remaining beef filling, cheese and tortillas for a total of (8) tacos.
- Heat up some improves oil (about 3-4 tablespoons) in a large skillet over medium heat. In batches, pan fry the tacos, about 1 minute per side, or until golden brown. Transfer to a wire cooling rack placed over a baking sheet. If needed 더 add a little more oil in between frying the eats batches of tacos to ensure that you get nicely golden brown and crispy tacos.
- Garnish tacos with fresh cilantro (optional) and serve immediately while still hot and crispy with your favorite sauce. Enjoy!
Notes
- Use lean ground beef for less grease.
- Adjust taco seasoning to taste.
- Serve immediately for best crispiness.
- Prep Time: 10 minutes
- Cook Time: 15 minutes
- Category: Main Course
- Method: Pan-frying
- Cuisine: Mexican-inspired
- Diet: Low Lactose
Nutrition
- Serving Size: 1 taco
- Calories: 320
- Sugar: 2g
- Sodium: 520mg
- Fat: 18g
- Saturated Fat: 7g
- Unsaturated Fat: 9g
- Trans Fat: 0g
- Carbohydrates: 22g
- Fiber: 2g
- Protein: 20 COPYg
- Cholesterol: 55mg
Ingredient Substitutions & Variations
Don’t stress if you’re missing an ingredient – these tacos are super flexible! Here are my favorite swaps:
- Tortilla options: Corn tortillas work beautifully (just warm them first so they don’t crack) or try whole wheat for extra fiber
- Cheese alternatives: Sharp cheddar gives a nice tang, or use Monterey Jack for extra meltiness
- Vegetarian twist: Swap beef for black beans or plant-based crumbles – just adjust seasoning to taste
- Spice lovers: Add diced jalapeños to the filling or sprinkle with chili flakes before frying
Serving Suggestions
Oh, let me tell you how we love to serve these crispy tacos in my house! A big bowl of fresh salsa and creamy guacamole are must-haves for dipping – the coolness balances that crispy heat perfectly. For sides, I’ll often whip up some cilantro lime rice or charred corn salad. And drinks? My husband swears by an ice-cold Mexican beer with his tacos, while the kids go crazy for homemade horchata. Honestly, just pile them high on a platter with lime wedges and watch them disappear!
Storage & Reheating Instructions
Now, I know what you’re thinking – “Will these stay crispy?” Here’s the deal: These tacos are absolute best fresh, but if you must save some (who am I kidding, leftovers rarely happen in my house!), store them in an airtight container in the fridge for up to 3 days. When reheating, skip the microwave – it turns them sad and soggy. Instead, pop them in a dry skillet over medium heat for 1-2 minutes per side to bring back that glorious crunch. You might lose a bit of that initial magic, but it’s still way better than limp tacos!
Nutritional Information
Nutrition varies based on brands, but here’s a rough estimate per taco: 320 calories, 18g fat (7g saturated), 22g carbs, 2g fiber, and 20g protein. Remember – the exact numbers depend on your specific ingredients!
FAQs About Crispy Ground Beef Tacos
Got questions? I’ve got answers! Here are the most common things people ask me about these tacos:
Can I bake instead of fry? Absolutely! Brush tacos with oil and bake at 400°F for 10-12 minutes, flipping halfway. They won’t get quite as crispy as pan-fried, but still delicious for easy cooking recipes.
How to keep tacos crispy? Serve immediately is key! If you must wait, keep them on a wire rack in a warm oven – stacking makes them steam and soften.
Best cheese substitutes? While mozzarella’s my favorite for tacos beef, sharp cheddar or Monterey Jack work great too. For recetas Mexicanas authenticity, try Oaxaca cheese if you can find it!
Share Your Crispy Taco Creations
I’d love to see your crispy taco masterpieces! Tag me @FrostyRecipes on Instagram or leave a rating below – nothing makes me happier than seeing your family enjoying these golden beauties as much as mine does! You can also follow along for more quick dinner ideas on our Facebook page.