Picture this: your kitchen filled with giggles, colorful sprinkles flying everywhere, and the smell of melted chocolate in the air. That’s exactly what happens when my kids and I whip up our famous Halloween Candy Bark! This no-bake treat is our go-to for spooky season – it’s ridiculously easy, totally customizable, and disappears faster than a ghost in the night. Every year, we make big batches to share at school parties and neighborhood gatherings. The best part? Even if you’ve never made candy bark before, you’ll look like a kitchen wizard when you pull this festive creation out of the fridge. Let me show you how we turn simple ingredients into the most fun Halloween dessert!
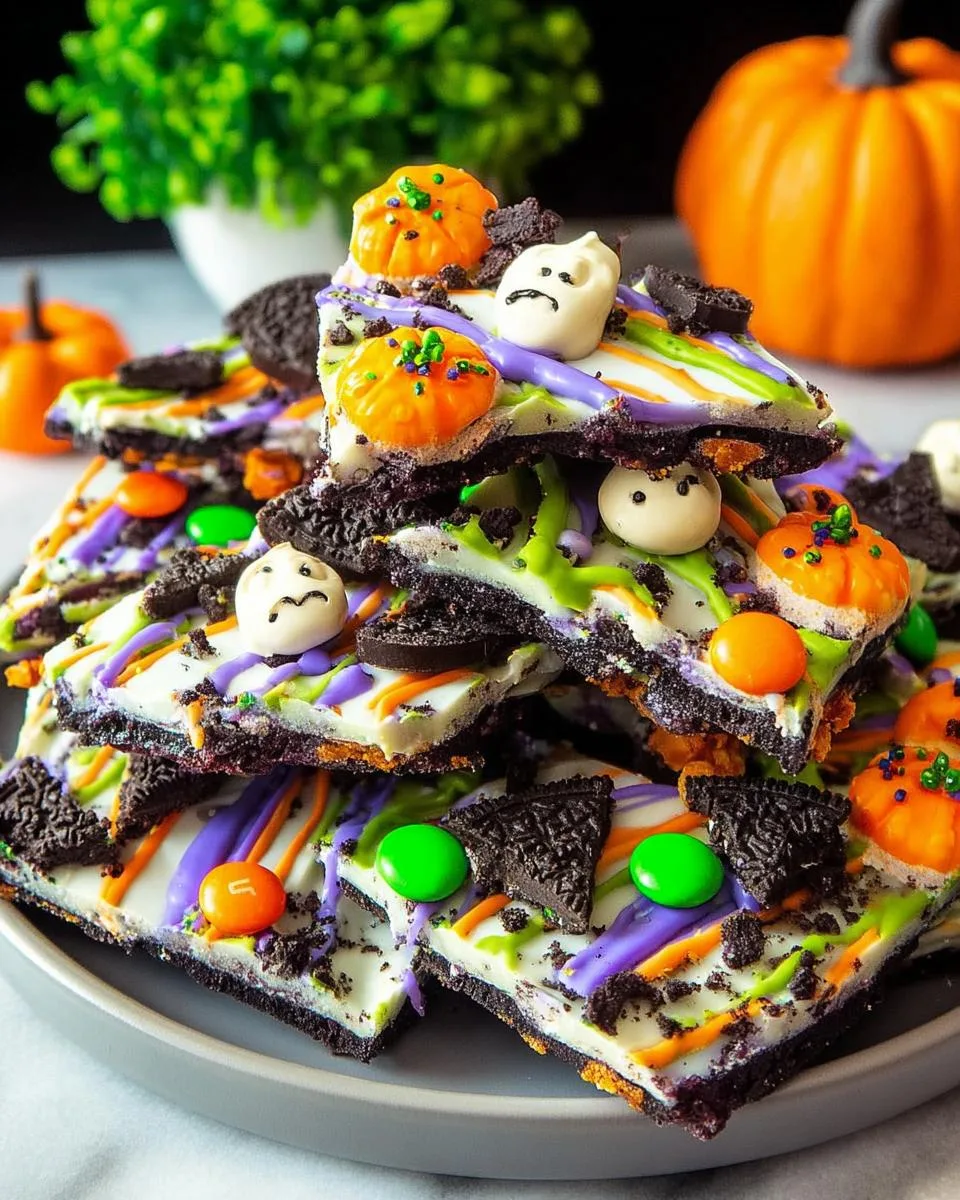
Table of Contents
Table of Contents
Why You’ll Love This Halloween Candy Bark
Trust me, this isn’t just another Halloween treat – it’s the ultimate crowd-pleaser that checks all the boxes:
- No-bake magic: No oven required! Melt, decorate, chill – that’s it. Perfect for when you’re drowning in costume-making and pumpkin carving.
- 15-minute wonder: From fridge to finished in less time than it takes to watch a Halloween special episode.
- Kid-approved fun: My little goblins go wild decorating their own sections – it’s like an edible art project!
- Instantly festive: Those orange and purple sprinkles? Total game-changer for your Halloween dessert table.
Seriously, this bark has saved my sanity during many last-minute “Mom, I need to bring treats tomorrow!” emergencies.
Halloween Candy Bark Ingredients
Here’s everything you’ll need to create this spooktacular treat – I promise you probably already have half of it in your pantry! The beauty of this recipe is how simple the ingredients are, but how magical they become when combined:
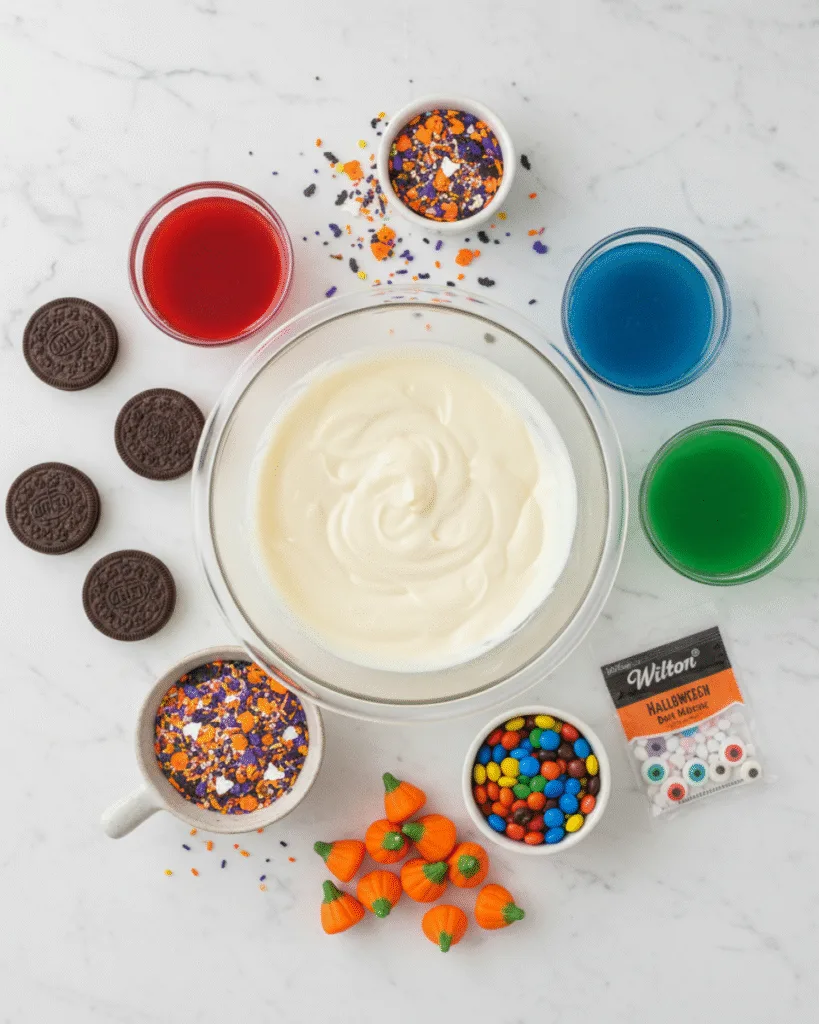
- 16 oz (454 g) white candy melts or white candy bark – This forms our delicious base. Pro tip: I prefer candy melts over baking chocolate because they set firmer.
- 3-5 drops each red, blue, and green food coloring (optional) – For creating those fun purple and green swirls!
- 15 whole Halloween Oreo cookies – The orange filling makes them extra festive, but regular Oreos work too.
- ¼ cup (40 g) Halloween sprinkles blend – Go wild with bats, ghosts, or whatever sprinkles make you happy!
- ⅓ cup (49 g) Peanut M&Ms – I use the Halloween colors, but any M&M variety works.
- ¼ cup (29 g) Brach’s Candy Pumpkins – These little guys are non-negotiable in our house!
- 1 package Wilton Halloween Dot Matrix Decorations – Those cute edible candy eyes make everything better.
A few notes from my trial-and-error experiences: Measure your toppings before melting the chocolate (trust me on this!), and have all your ingredients ready to go because once that chocolate melts, things move fast!
How to Make Halloween Candy Bark
Okay, let’s get to the fun part! Making this candy bark is seriously foolproof – I’ve taught my 6-year-old to do it (with supervision, of course). Follow these simple steps, and you’ll have a Halloween masterpiece in no time!
Step 1: Melt the White Chocolate
First things first – grab your biggest microwave-safe bowl and those white candy melts. Here’s my golden rule: low and slow wins the race! Microwave at 50% power in 30-second bursts, stirring really well between each one. Why? Because chocolate is sneaky – it holds its shape even when melted, so stirring is your best friend to avoid burnt spots. Should take about 1½ minutes total. You’ll know it’s ready when it’s smooth as spider silk!
Step 2: Color and Drizzle
Now for the magic! Scoop out about ¼ cup of melted white chocolate into two separate bowls. Add red + blue food coloring to one (hello, spooky purple!) and green to the other. Stir until you get vibrant colors – if they thicken, zap them for just 5 seconds. Lay your Oreos on parchment paper (this prevents sticking disasters), then pour the white chocolate over them. Use a spatula to spread it about ¼-inch thick. Here comes the fun part – drizzle your colored chocolates wildly over the top!
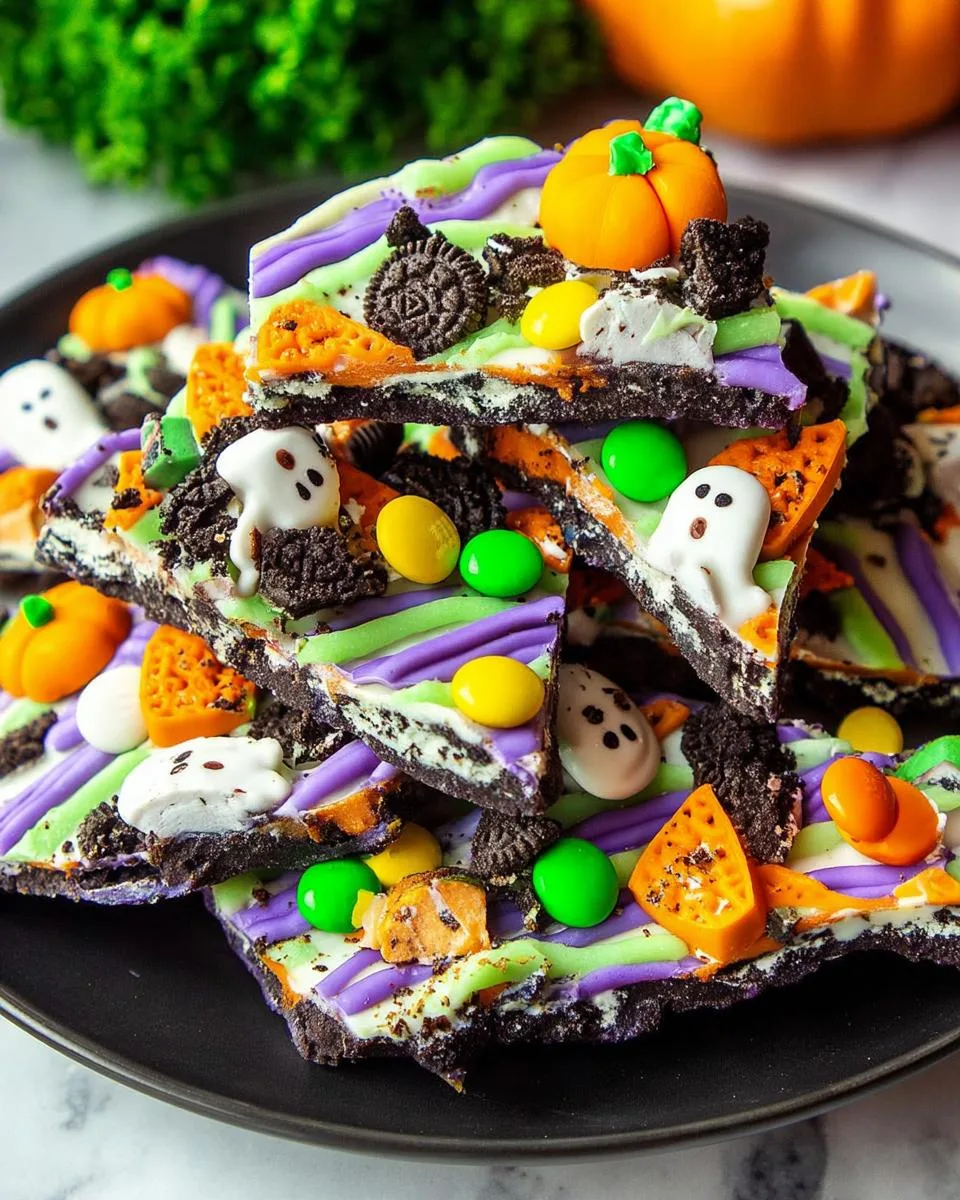
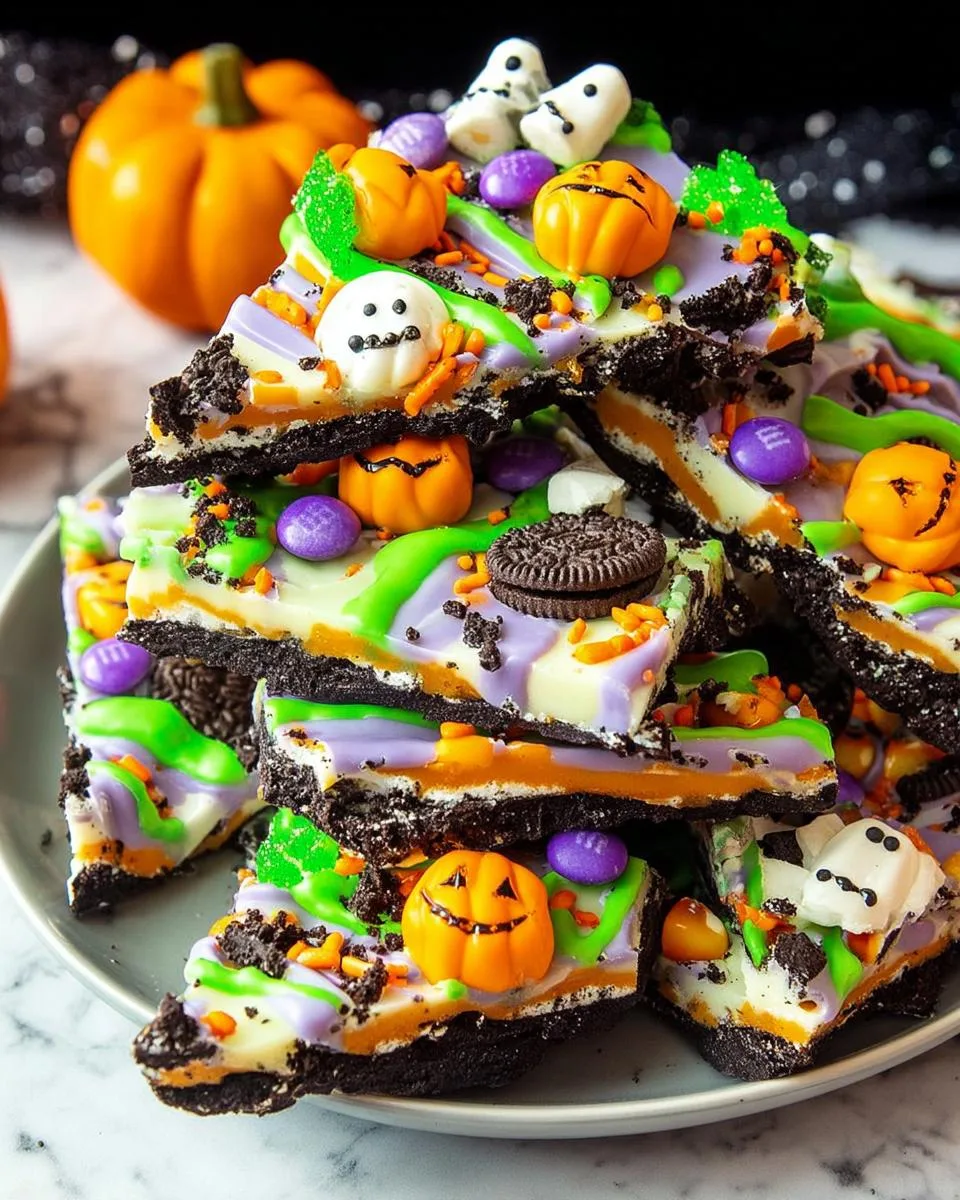
Step 3: Add Toppings and Chill
This is where your inner Halloween artist shines! Immediately sprinkle on your decorations – the sprinkles first (they stick best to wet chocolate), then candies and edible eyes. Gently press any larger candies so they don’t roll off later. Pop your creation in the fridge for at least 30 minutes – I know it’s hard to wait, but this ensures perfect snap when you break it! Pro tip: If you’re in a rush, the freezer works in 15 minutes flat.
See? Told you it was easy! Now comes the best part – breaking it into rustic pieces and watching everyone’s faces light up when they see your edible Halloween artwork.
Print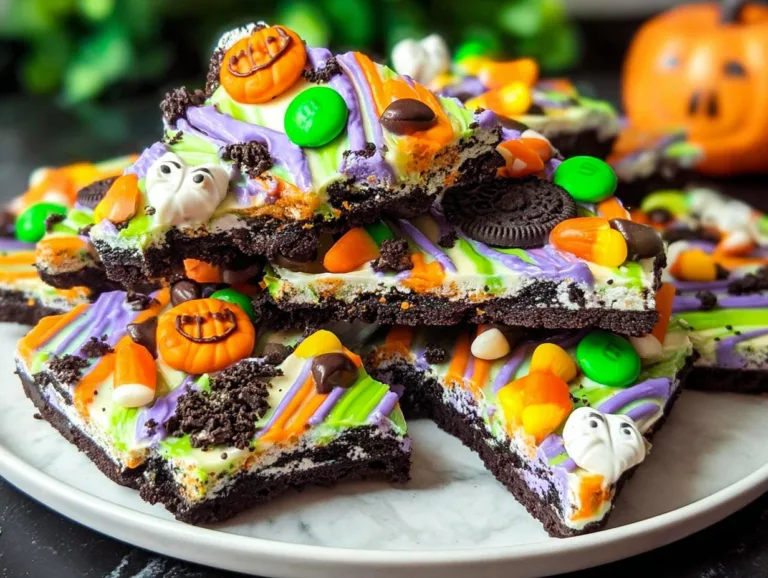
Easy 15-Minute Halloween Candy Bark Recipe Kids Adore
A festive Halloween treat featuring white chocolate, Oreos, sprinkles, and candies.
- Total Time: 15 minutes
- Yield: 20 pieces 1x
Ingredients
- 16 oz (454 g) white candy melts or white candy bark
- 3–5 drops each red, blue, and green food coloring (optional)
- 15 whole Halloween Oreo cookies
- ¼ cup (40 g) Halloween sprinkles blend
- ⅓ cup (49 g) Peanut M&Ms
- ¼ cup (29 g) Brach’s Candy Pumpkins
- 1 package Wilton Halloween Dot Matrix Decorations
Instructions
- Melt white candy melts in microwave according to package directions; stir to smooth.
- Transfer ¼ cup each of melted white chocolate to two small bowls. Add red and blue food coloring to one bowl and green food coloring to the other, stirring as needed to achieve purple and green colored candy. Reheat in microwave if necessary to thin out consistency.
- Lay cookies on a baking sheet or 9×13 baking pan lined with parchment paper. Pour white melted candy over cookies and smooth with rubber spatula.
- Drizzle colored melted candy all over white candy; immediately add sprinkles evenly, followed by M&Ms, candy pumpkins, and other Halloween candies and decorations of your choice.
- Place in fridge or freezer until solid; use a sharp chef’s knife to cut into bite-sized pieces.
Notes
- Use parchment paper for easy removal.
- Store in an airtight container for freshness.
- Prep Time: 10 minutes
- Cook Time: 5 minutes
- Category: Dessert
- Method: No-Bake
- Cuisine: American
- Diet: Vegetarian
Nutrition
- Serving Size: 1 piece
- Calories: 120
- Sugar: 10g
- Sodium: 30mg
- Fat: 6g
- Saturated Fat: 3g
- Unsaturated Fat: 2g
- Trans Fat: 0g
- Carbohydrates: 15g
- Fiber: 0g
- Protein: 1g
- Cholesterol: 5mg
Halloween Candy Bark Tips for Success
After making this bark more times than I can count, here are my foolproof secrets for perfect results every time:
- Parchment is your BFF – Skip the wax paper drama; only parchment guarantees easy peeling without sticky disasters.
- Keep chocolate happy – If your colored drizzle thickens, 5 seconds in the microwave brings it back to perfect pouring consistency.
- Press, don’t toss – Gently push candies into the warm chocolate so they don’t roll off when slicing.
- Room temp magic – Let bark sit 5 minutes after chilling – it cuts cleaner without shattering.
- Storage smarts – Layer between parchment in an airtight container to keep sprinkles from bleeding.
Follow these, and you’ll be the Halloween treat hero every time!
Halloween Candy Bark Variations
The beauty of this recipe? You can totally make it your own! Swap the white chocolate for dark or milk if that’s your jam – just know it sets softer. Out of Oreos? Crushed graham crackers or pretzels add awesome crunch. For my vegan friends, dairy-free candy melts work perfectly. And the toppings? Go wild with candy corn, chopped Reese’s pieces, or even mini marshmallow ghosts. Seriously, whatever Halloween candy you’ve got stashed will be delicious here – that’s the spooky spirit!
How to Store Halloween Candy Bark
Here’s the best way to keep your candy bark fresh and fabulous! Store it in an airtight container at room temperature – between parchment paper layers to protect those adorable decorations. It’ll stay perfect for up to 2 weeks, though let’s be real – it’ll disappear long before then! If your kitchen runs warm, 15 minutes in the fridge before serving gives it that satisfying snap. Pro tip: Hide a few pieces for yourself before the trick-or-treaters raid your stash!
Halloween Candy Bark Nutritional Information
Okay, let’s be real – we’re not eating candy bark for our health, but I know some of you like to keep track (or need to for allergies and such). Here’s the scoop on what’s in each delicious piece of this Halloween treat:
- Serving Size: 1 piece (about 1″ square)
- Calories: 120
- Sugar: 10g
- Fat: 6g (3g saturated)
- Carbohydrates: 15g
- Protein: 1g
- Sodium: 30mg
A quick heads-up – these numbers can vary based on your exact ingredients and how generous you are with those sprinkles (no judgment here!). If you’re using different candies or chocolate, the nutrition will change. My kids always beg for extra M&Ms, which adds a few more calories – but hey, it’s Halloween! Everything in moderation, right? Except maybe the fun – there’s no limit on that!
Halloween Candy Bark FAQs
Over the years, I’ve gotten tons of questions about this recipe – here are the ones that pop up most often with my tried-and-true answers:
Can I use regular chocolate chips instead of candy melts?
Absolutely! Just know that chocolate chips contain stabilizers that make them set differently – they won’t get quite as firm. For best results, add 1 teaspoon of coconut oil per cup of chips when melting to help them spread smoothly. My kids actually prefer the taste of real chocolate, though it does melt faster in little hands!
Help! My colored chocolate seized up – can I fix it?
Don’t panic! This happens when liquid meets chocolate sometimes. Stir in ½ teaspoon of vegetable oil at a time until it smooths back out. If it’s really stubborn, microwave for 5 seconds, then stir like crazy. I’ve saved many a batch this way!
How long does Halloween candy bark stay fresh?
In an airtight container at room temp, it stays delicious for about 2 weeks (though good luck keeping it that long!). The sprinkles might bleed colors slightly after a few days, but the taste remains perfect. Pro tip: Make it a day ahead so the flavors really meld together!
Can I make this nut-free for school parties?
You bet! Simply swap the Peanut M&Ms for regular M&Ms or Skittles. Check your sprinkles too – some contain trace nuts. I keep a dedicated nut-free sprinkle jar just for school treats. The Oreos are naturally nut-free, so you’re golden there!
Why did my bark crack when I cut it?
Ah, the classic “too cold” problem! Let it sit at room temp for 5-10 minutes after chilling – this slight warming prevents shattering. Also, use a sharp knife and press down firmly rather than sawing. My first batch looked like a candy crime scene until I figured this out!
Final Thoughts
There you have it – the easiest, most festive Halloween treat that’ll have everyone screaming for more! I can’t wait for you to try this candy bark and make your own spooky memories. Snap a pic of your creation and tag me – I love seeing your edible masterpieces! Happy haunting… I mean, baking!
For more delicious recipes and updates, follow us on Facebook!