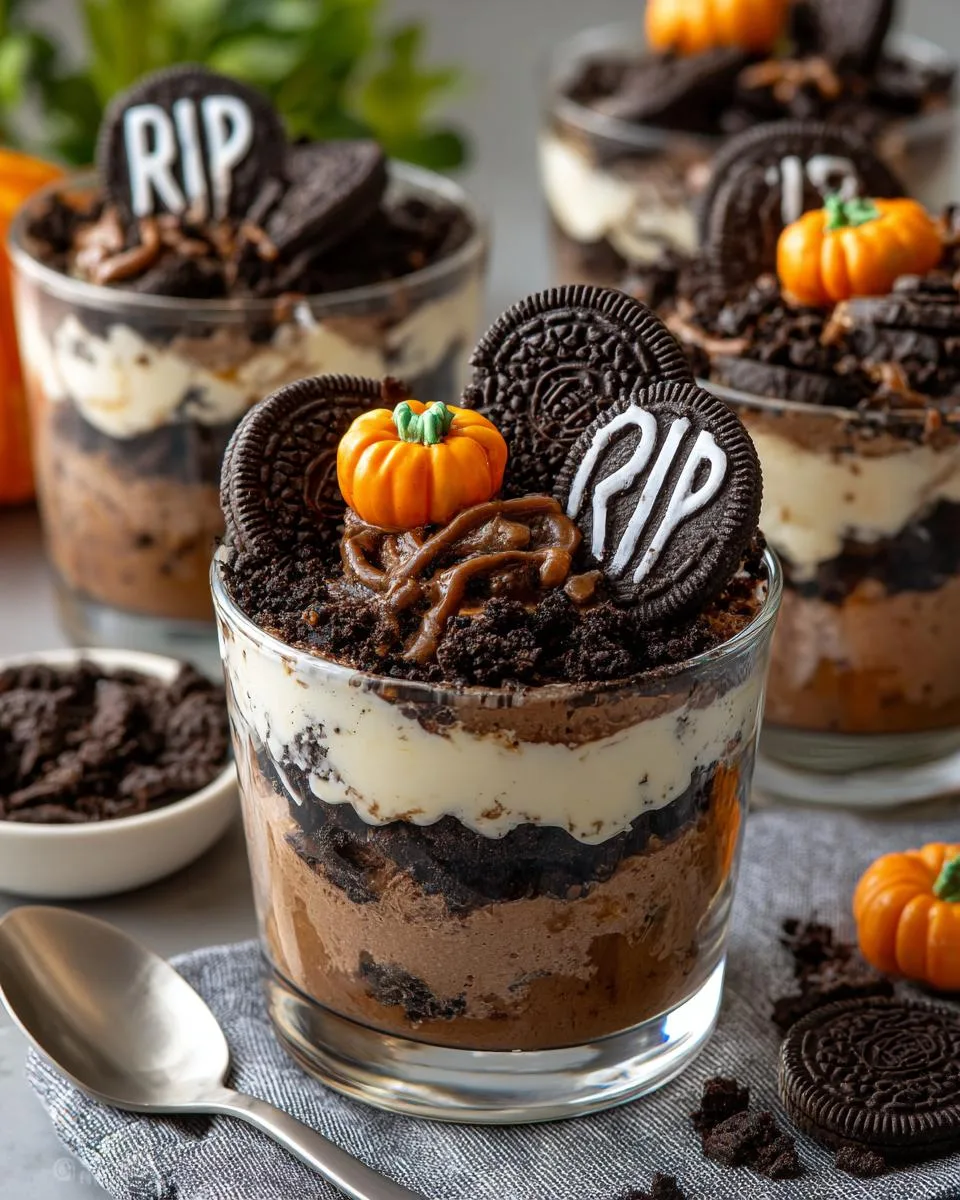
Oh my gosh, you guys – Halloween dirt cups are hands down my favorite spooky treat to make with the kids! I remember the first time we made them, my youngest screamed “EWWW REAL DIRT!” when he saw the crushed Oreos – until he took that first chocolatey, creamy bite. Now it’s our annual tradition. These no-bake cuties are perfect for classroom parties, haunted house gatherings, or just a fun Friday night dessert. The best part? They come together in about 30 minutes with zero oven time – just layer pudding, “dirt”, and spooky decorations. Even better – you can let the kids go wild decorating their own little graveyard scenes with gummy worms crawling out!

Table of Contents
Table of Contents
Why You’ll Love These Halloween Dirt Cups
Okay, I know I’m biased because these little cups have stolen my Halloween-loving heart, but let me tell you why they’re about to become your new October tradition too. Every time I make them, I fall in love all over again – and here’s why you will too:
- No-bake magic: When you’re already juggling costumes, decorations, and sugar-hyper kids, the last thing you need is oven duty. These come together with just your fridge and some stirring – my kind of dessert!
- Endlessly customizable: Out of chocolate pudding? Use vanilla or even butterscotch! Want it extra spooky? Crush some chocolate sandwich cookies instead of Oreos for “darker dirt.” The possibilities are endless.
- Kid-approved (and kid-help approved!): My two can actually help with every step – from crushing cookies to decorating. It’s one of those rare recipes where their “help” actually helps!
- Festive but foolproof: They look like you spent hours, but take 30 minutes tops. The “wow factor” to effort ratio is absolutely magical.
- Crowd-pleasing: I’ve served these to everyone from preschoolers to grandmas, and I always get recipe requests. There’s just something about that chocolate-Oreo combo that makes people happy!
Seriously, these cups are the Halloween equivalent of a kitchen hug – easy, comforting, and guaranteed to make everyone smile. And when your kids beg to make them every October like mine do? That’s just the sweetest treat of all.
Halloween Dirt Cups Ingredients
Alright, let’s dig into what you’ll need for these spooky little cups of joy! The beauty of this recipe is that you probably have most of these ingredients already – I know my pantry always seems to magically grow Oreos around Halloween. Here’s the full dirt-digging supply list:
- 12 Oreo Cookies – These get crushed into that perfect “dirt” texture. Pro tip: grab an extra pack because someone will sneak cookies while you’re not looking!
- 16 oz Cool Whip – Look for the regular size tub in your freezer aisle. Thaw it in the fridge for about 4 hours before you start.
- 1 box (3.3 oz) Instant Chocolate Pudding Mix – The small, cook-and-serve kind won’t work here, so double check it says “instant.”
- 2 cups Milk – Any kind works – whole milk makes it extra creamy, but we’ve used almond milk in a pinch!
- 8 Milano Cookies – These become our adorable little tombstones. The plain ones work best for writing on.
- Gummy Worms and Candy Pumpkins – Optional but SO fun! Let the kids pick their favorites.
- Wilton Black Writing Icing – This is key for the “RIP” on the tombstones. Find it in the baking aisle – it comes in a little tube.
See? Told you it was simple! Now let me tell you a secret – last year we ran out of gummy worms and used sour patch kids sticking out of the “dirt” like zombies. The kids thought it was hilarious, so don’t stress about being exact with decorations. Half the fun is getting creative!
How to Make Halloween Dirt Cups
Okay, time to get our hands dirty – well, not literally! These spooky cups come together so easily, and I’ll walk you through each step just like I do with my kids when we make them. The key is taking your time with those chilling steps – trust me, it makes all the difference in getting that perfect graveyard texture!
Prepare the Pudding Layer
First, grab a medium bowl and whisk together your instant pudding mix and milk. I like to use a balloon whisk because it gets rid of any lumps quickly. Keep whisking for a good 2 minutes – you’ll see it start to thicken right before your eyes! Now here’s the important part: pop it in the fridge for 10 minutes to set. Don’t skip this! I learned the hard way that rushing means your layers won’t hold their shape.
Once it’s set, fold in the Cool Whip gently with a rubber spatula. Fold – don’t stir! – until you’ve got this dreamy, fluffy chocolate cloud. Back in the fridge it goes for another 20 minutes. I know, more waiting – but this chill time helps the flavors meld and makes the perfect spoonable texture.
Assemble the Dirt Layers
While that’s chilling, let’s make our “dirt”! Toss those Oreos in a food processor and pulse until they’re fine crumbs. No processor? No problem! I’ve used a zip-top bag and rolling pin many times – just have the kids help smash them (they love this part). You want it to look like real garden soil – some tiny chunks are fine, but mostly fine crumbs.
Now the fun begins! Grab your cups (I use clear plastic ones so you can see the layers) and spoon in pudding until they’re 1/3 full. Then add a generous layer of Oreo crumbs – about 2 tablespoons per cup. Repeat the layers once more. Pro tip: tap the cups gently on the counter between layers to settle everything nicely.
Decorate Your Graveyard Scene
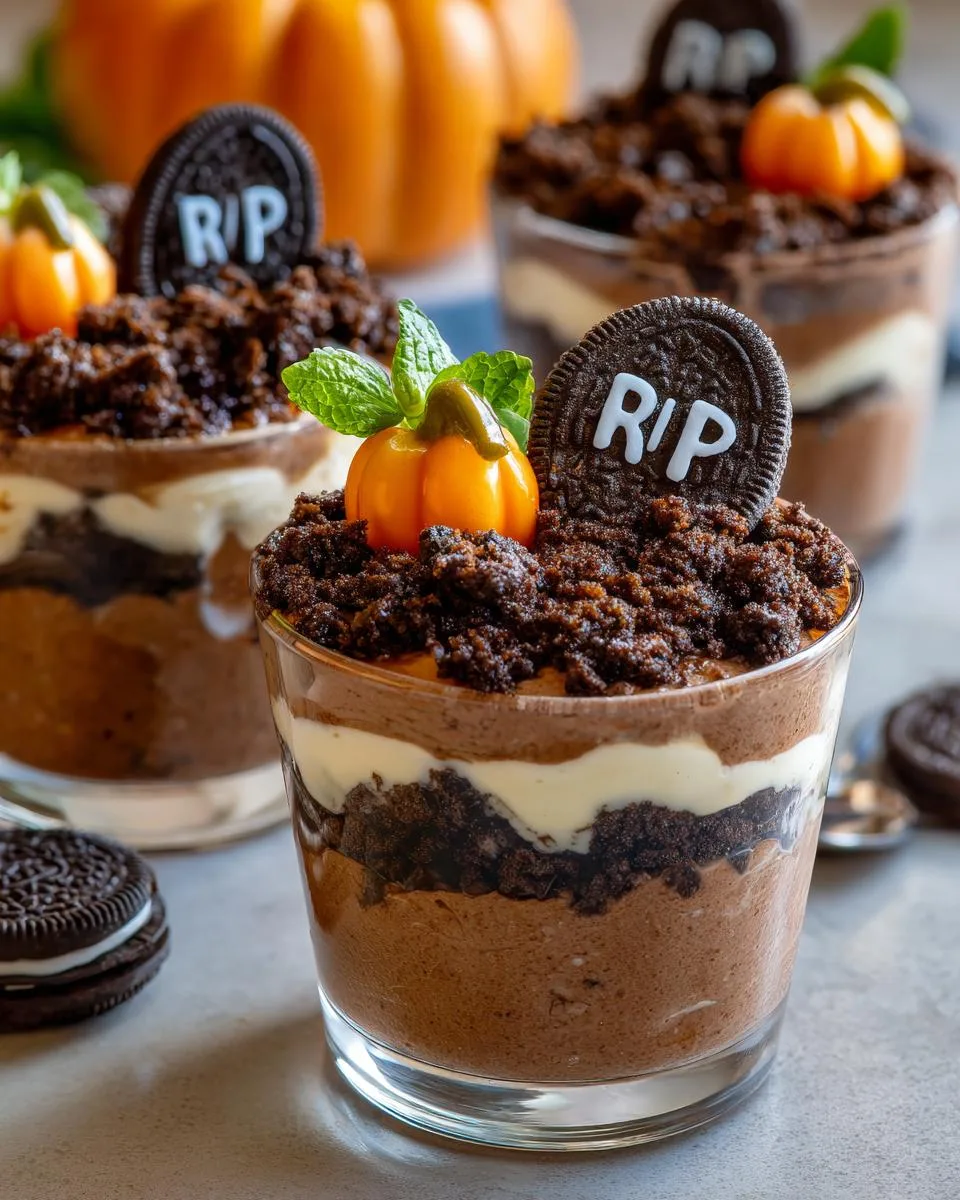
Here’s where creativity shines! Take those Milano cookies and use the black icing to write “RIP” or funny names (last year we had “Here Lies Dad’s Diet”). Stick them vertically into the cups like tombstones. Now let the kids go wild with gummy worms “crawling” out of the dirt and candy pumpkins scattered around!
My favorite trick? Right before serving, I sometimes drizzle a little extra pudding around the tombstones to look like “mud” – it gets big laughs every time. Just remember – the messier it looks, the more authentic your graveyard becomes!
Print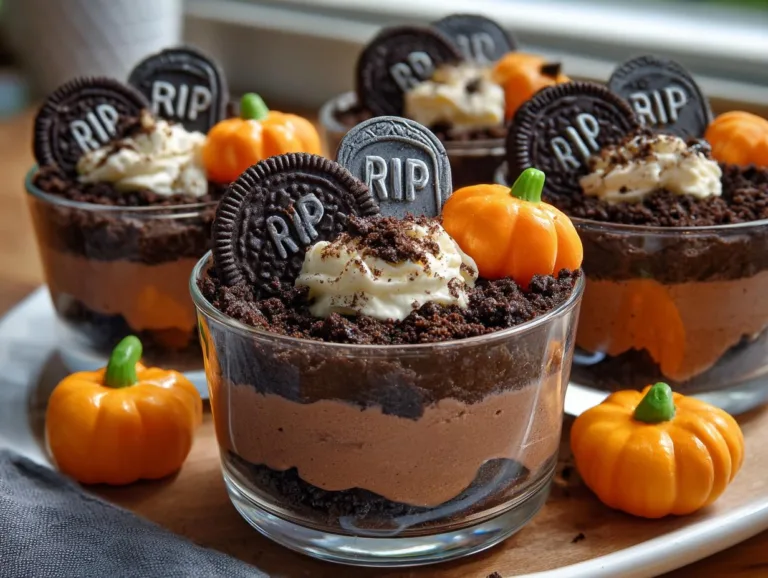
Spooky 30-Minute Halloween Dirt Cups Kids Crave
A fun and spooky Halloween treat that kids and adults will love. These dirt cups are made with layers of chocolate pudding, crushed Oreos, and decorated to look like graveyards with Milano cookie tombstones, gummy worms, and candy pumpkins.
- Total Time: 35 minutes
- Yield: 8 servings 1x
Ingredients
- 12 Oreo Cookies
- 16 oz Cool Whip
- 1 box (3.3 oz) Instant Chocolate Pudding Mix
- 2 cups Milk
- 8 Milano Cookies
- Gummy Worms and Candy Pumpkins (optional)
- Wilton Black Writing Icing
Instructions
- Whisk together the pudding mix and milk in a medium bowl. Refrigerate for 10 minutes or until set.
- Fold in the Cool Whip until well combined. Refrigerate for 20 minutes to chill.
- Crush Oreos in a food processor or blender until fine.
- Fill small cups 1/3 full with pudding mixture.
- Top with a layer of crushed Oreos.
- Repeat layers in all cups.
- Write ‘RIP’ on Milano cookies with black icing and place them in the cups as tombstones.
- Decorate with gummy worms and candy pumpkins.
- Serve and enjoy.
Notes
- Use any type of pudding flavor you prefer.
- Adjust the amount of crushed Oreos to your liking.
- Store leftovers in the fridge for up to 2 days.
- Prep Time: 15 minutes
- Cook Time: 0 minutes
- Category: Dessert
- Method: No-Bake
- Cuisine: American
- Diet: Vegetarian
Nutrition
- Serving Size: 1 cup
- Calories: 280
- Sugar: 25g
- Sodium: 180mg
- Fat: 12g
- Saturated Fat: 6g
- Unsaturated Fat: 4g
- Trans Fat: 0g
- Carbohydrates: 38g
- Fiber: 1g
- Protein: 4g
- Cholesterol: 10mg
Halloween Dirt Cups Tips & Variations
Here’s the best part about these dirt cups – they’re basically a blank canvas for your creativity! Over the years, I’ve tried every variation imaginable (sometimes out of necessity when I realize I’m out of an ingredient at 9 pm the night before a class party). Here are my favorite twists and troubleshooting tips:
Ingredient Swaps for Every Occasion
Ran out of chocolate pudding? No problem! We’ve made these with:
- Vanilla pudding + green food coloring for “alien dirt” (my son’s brilliant idea)
- Butterscotch pudding with crushed graham crackers as “sand” – perfect for a beach theme
- Gluten-free Oreos and lactose-free milk for dietary needs (tastes just as amazing)
And here’s a game-changer – swap the Cool Whip for homemade whipped cream if you prefer. Just whip 1.5 cups heavy cream with 2 tbsp powdered sugar until stiff peaks form. It’s a bit richer, but oh-so-good!
Seasonal Decoration Ideas
While these are perfect for Halloween, we make them year-round with different themes:
- Easter: Use pastel M&M’s as “eggs” and bunny Peeps poking out of the dirt
- Valentine’s Day: Pink pudding with heart sprinkles and “XO” tombstones
- Summer BBQs: Gummy bugs instead of worms with little fondue shovel decorations
My favorite non-Halloween version? “Archaeologist dig sites” for dinosaur birthday parties – we use chocolate pudding, crumbled chocolate cake as dirt, and plastic dinosaurs peeking out!
Pro Tips From My Many Kitchen Experiments
- “Dirt” texture tip: If your crumbs are too fine, add a few bigger chunks for realistic texture
- Decor timing: Add gummy worms just before serving so they don’t get too soggy
- Portion hack: Use disposable shot glasses for kid parties – perfect single-bite sizes!
- Adult version: Add a splash of coffee liqueur to the pudding for a boozy twist (just for the grown-ups!)
The most important tip? Have fun with it! Some of our best dirt cup memories came from “mistakes” – like the year we used neon gummy worms that turned the pudding green. Now it’s a requested feature every October!
Storing and Serving Halloween Dirt Cups
Alright, let’s talk about keeping these spooky treats fresh and serving them like a pro! I’ve learned a few tricks over the years – like that time I decorated all the cups the night before and woke up to saggy tombstones (oops!). Here’s how to avoid my mistakes:
These dirt cups are best stored in the fridge with just the pudding and Oreo layers for up to 2 days max. I like to cover them with plastic wrap – but here’s my secret: poke a few toothpicks in first so the wrap doesn’t smoosh your beautiful layers. The pudding stays perfect, but the cookies will start getting softer after day one.
Now for the golden rule: add your decorations right before serving! Gummy worms turn into sad, shriveled things if they sit too long, and the icing on Milano tombstones can bleed if it’s too humid. I prep everything separately – cookies iced and dried on a baking sheet, candies portioned in little bowls – then let the kids go wild with decorations when it’s party time.
For parties, I set up a “graveyard decorating station” with all the fixings. It keeps the cups looking fresh and turns dessert into an activity! Just line up your pre-layered cups, put out the decorations, and let guests create their own spooky masterpieces. Bonus? No last-minute decorating rush while you’re trying to entertain.
One more tip – if you’re transporting these, pack them in a baking dish with crumpled paper towels between cups to prevent sliding. Those little tombstones can take a tumble in the car! And whatever you do, don’t stack them unless you want pudding pancakes (learned that one the hard way).
Follow these simple steps, and your Halloween dirt cups will stay fresh, festive, and most importantly – deliciously creepy right up until the last spoonful!
Nutritional Information
Now, I’m no nutritionist (and let’s be real – these are Halloween treats, not health food!), but I know some of you like to keep track of what you’re eating. Here’s the scoop on what’s in these spooky cups – just remember these are estimates that can vary based on brands and exact measurements. All values are per serving (about 1 cup):
- Calories: 280 – Not bad for such a decadent-tasting treat!
- Sugar: 25g – Hey, it’s Halloween – live a little!
- Sodium: 180mg – Surprisingly reasonable for a dessert
- Fat: 12g (6g saturated) – The butter in those Oreos does its job
- Carbohydrates: 38g – Mostly from that delicious cookie “dirt”
- Protein: 4g – Hey, there’s milk in there – that counts, right?
- Fiber: 1g – Well… we tried
- Cholesterol: 10mg – Not too shabby
A little disclaimer from my kitchen to yours: These numbers can swing depending on whether you go heavy on the pudding or light on the Oreos, or if your kids (like mine) insist on extra gummy worms crawling everywhere. But honestly? When you see those little faces light up as they dig into their graveyard creations, every single calorie is absolutely worth it!
Well, there you have it – everything you need to create the spookiest, most delicious Halloween dirt cups this side of the graveyard! From pudding secrets to decorating disasters-turned-triumphs, I’ve shared all my hard-earned dirt cup wisdom with you. Now it’s your turn to grab those Oreos and get creating!
I’d love to see your creepy creations – tag me @FrostyRecipes when you post pictures of your dirt cup masterpieces! Bonus points if you capture your kids’ shocked faces when they see “worms” crawling out of their dessert. Nothing makes me happier than seeing these little cups become part of your family’s Halloween traditions too.
Now go forth and get dirty (in the tastiest way possible)! And remember – the messier your graveyard looks, the better it tastes. Happy haunting… I mean, baking!
Halloween Dirt Cups FAQs
I get so many questions about these spooky treats every Halloween – seems like everyone wants to put their own spin on them! Here are the answers to the questions I hear most often, straight from my kitchen to yours:
Can I use homemade whipped cream instead of Cool Whip?
Absolutely! My kids actually prefer when I make fresh whipped cream – it has this dreamy, light texture that’s just heavenly. For the best results, whip 1.5 cups of heavy cream with 2 tablespoons powdered sugar until stiff peaks form. The only catch? It doesn’t hold up quite as long in the fridge, so I’d only do this if you’re serving the dirt cups the same day. Otherwise, stick with Cool Whip for better staying power!
How far in advance can I assemble these?
Here’s my tried-and-true timeline: You can layer the pudding and Oreo crumbs up to 2 days ahead (stored in the fridge, of course). But hold off on the fun decorations until right before serving – trust me, I learned this after a disastrous batch where the gummy worms looked like they’d been buried for centuries! The tombstones can be iced a day ahead though – just let them dry completely on a baking sheet before storing in an airtight container.
Are there vegan alternatives for these dirt cups?
You bet! We’ve made these for vegan friends with just a few simple swaps: Use gluten-free Oreos (most regular ones aren’t vegan), coconut whipped topping instead of Cool Whip, and almond milk with vegan instant pudding mix. For decorations, most gummy worms aren’t vegan, but Swedish Fish work great as creepy-crawlies! The taste is nearly identical – my vegan niece couldn’t tell the difference and asked for seconds!
Got more questions? Slide into my DMs on Instagram – I’m always happy to help troubleshoot your dirt cup dilemmas! Nothing makes me happier than hearing how these little cups are becoming part of your family traditions too.
For More recipes Follow me on Facebook!