Oh my gosh, you HAVE to try these Halloween Peanut Butter Ritz Cookies! They’re the perfect mix of salty-sweet magic and spooky creativity that’ll make your kitchen feel like a haunted bakery. Every October, my kids and I turn into cookie monsters – literally – as we transform simple Ritz crackers and peanut butter into adorable ghosts, pumpkins, and bats. The best part? No oven required! Just melt, dip, decorate, and watch those little faces light up when they see their edible Halloween creations. Even my husband (who claims he doesn’t “do” cute food) couldn’t resist stealing a mummy cookie last year. Whether you’re prepping for a party or just want a fun afternoon activity, these no-bake treats are foolproof festive fun!
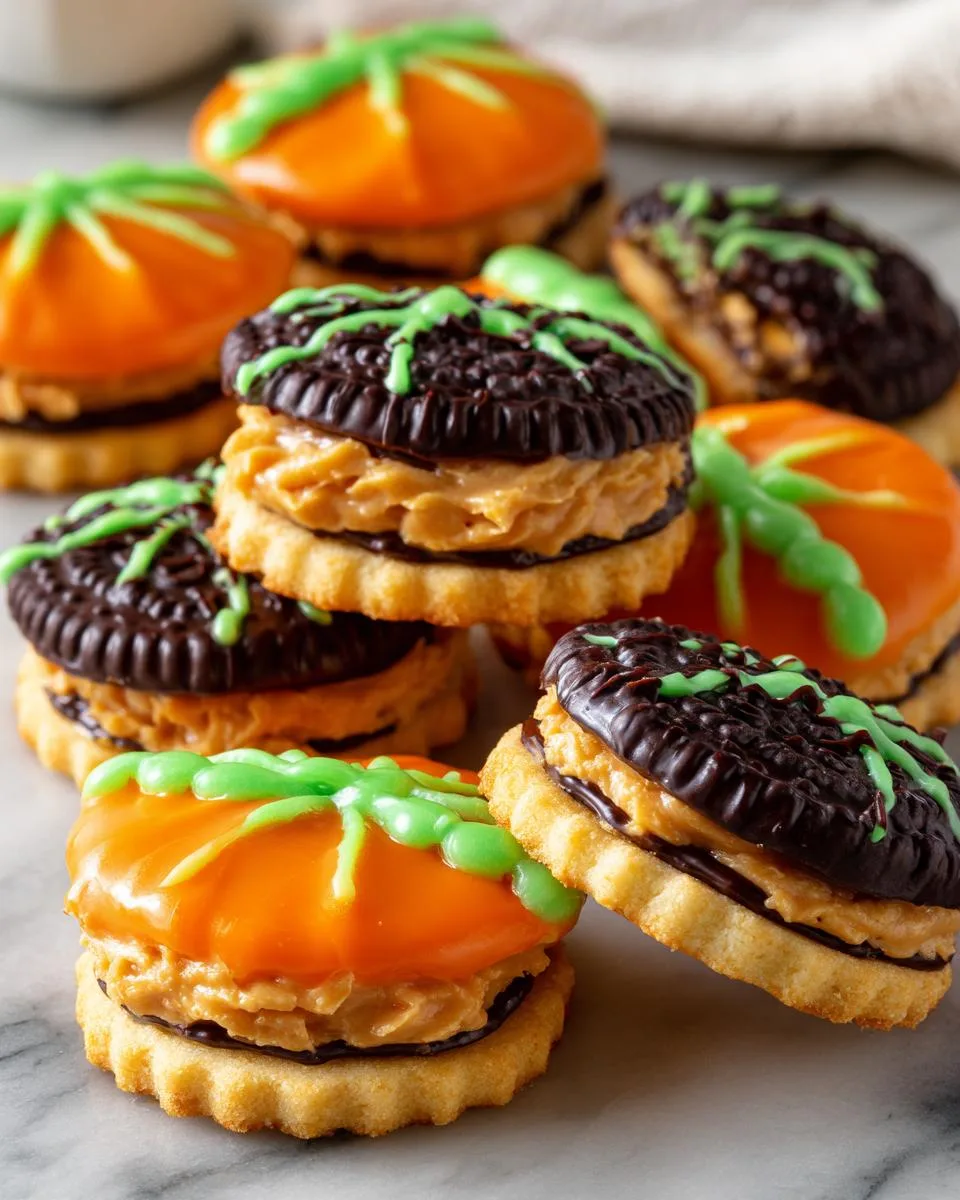
Table of Contents
Table of Contents
Why You’ll Love These Halloween Peanut Butter Ritz Cookies
Trust me, these cookies are about to become your new Halloween tradition. Here’s why:
- No-bake magic: Skip the oven—just melt, dip, and decorate! Perfect for when you’re short on time (or patience).
- Kid-approved fun: Let little hands go wild with candy eyes and spooky designs. Messy fingers = happy memories.
- Salty-sweet perfection: That crispy Ritz crunch with creamy peanut butter? *Chef’s kiss*—even before the candy coating hits.
- Insta-worthy cuteness: From goofy ghosts to punkin’ pumpkins, these treats steal the show at parties or classroom events.
Seriously, what’s not to love? Even my “I-don’t-do-cute-foods” husband sneaks them by the handful!
Ingredients for Halloween Peanut Butter Ritz Cookies
Here’s everything you’ll need to create these spooktacular treats—I’ve learned the hard way that having everything prepped makes decorating way more fun (and way less messy)!
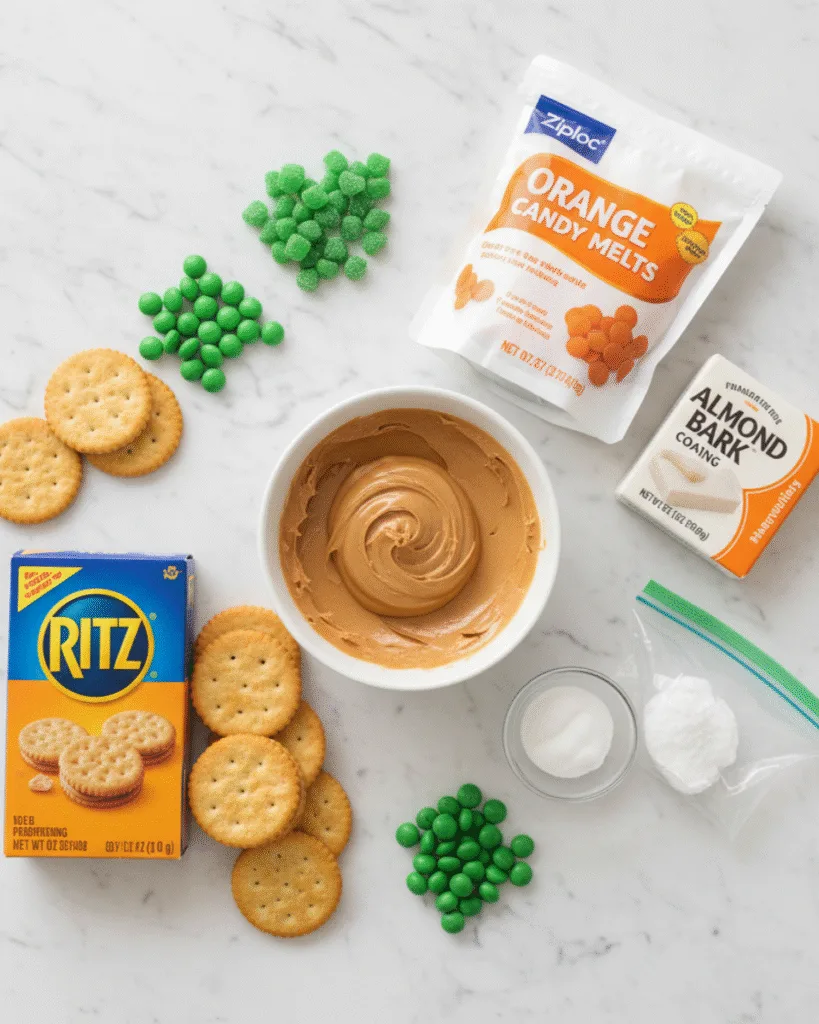
- Ritz crackers: 1 sleeve (about 24 crackers) – the salty base that makes these irresistible
- Creamy peanut butter: ½ cup (skip the natural kind—it separates!) for that perfect glue between crackers
- Candy melts or Almond Bark: 12-16 oz. packages (pick your colors! Orange for pumpkins, white for ghosts, etc.)
- Shortening: 2 tsp per candy melt package to keep the coating smooth
- Decorations galore: Candy eyes, black writing gel, green jelly beans (pumpkin stems!), licorice laces for spider legs—raid your candy stash!
Pro tip: Buy extra candy melts—trust me, you’ll want to make a second batch once the kids (and let’s be honest, you) start nibbling!
Equipment You’ll Need
Gather these trusty tools—half of them are probably already in your kitchen junk drawer! (Mine definitely are.)
- Microwave-safe bowls: One for each candy color unless you love washing dishes mid-project
- Wax paper or silicone mat: Lifesaver for sticky situations
- Craft tweezers: For placing those tiny candy eyes without cross-contaminating colors
- Toothpicks: Your magic wand for smoothing lumps and fixing oopsies
- Butter knife or offset spatula: For peanut butter spreading without cracker casualties
That’s it! Unless you count little fingers eager to “help” as equipment—those come standard in my kitchen.
How to Make Halloween Peanut Butter Ritz Cookies
Alright, let’s get spooky! These Halloween peanut butter Ritz cookies come together faster than a ghost vanishing—but here’s the step-by-step magic to make sure yours turn out perfectly creepy-cute. Pro tip: Set up all your decorations FIRST—trust me, scrambling for candy eyes with chocolate-covered fingers is a horror show you want to avoid!
Step 1: Assemble the Peanut Butter Crackers
This is where the salty-sweet magic begins! Grab your Ritz crackers and lay half of them out like little edible canvases. Now, spread about ½ teaspoon of peanut butter on each one—enough to stick but not so much that it oozes out when you press the top cracker on. (Learned that lesson the hard way—peanut butter lava is messy!) Gently sandwich another cracker on top and give it a little smoosh. Repeat until you’ve got a little army of peanut butter sandwiches ready for their Halloween makeovers.
Step 2: Melt the Candy Coating
Time to melt your candy coating—this is where things get gloriously messy! For each color, microwave 12 oz. of candy melts with 2 tsp shortening in a microwave-safe bowl. Do it in 30-second bursts, stirring well between each one. (And I mean WELL—those sneaky unmelted bits hide at the bottom!) The shortening keeps the coating silky smooth—skip it, and you’ll end up with clumpy “Franken-coating” that’s impossible to dip. Once melted, work quickly—candy coating sets faster than a vampire at sunrise!
Step 3: Decorate Your Cookies
Now for the FUN part—turning those plain sandwiches into Halloween masterpieces! Here’s how to tackle the designs:
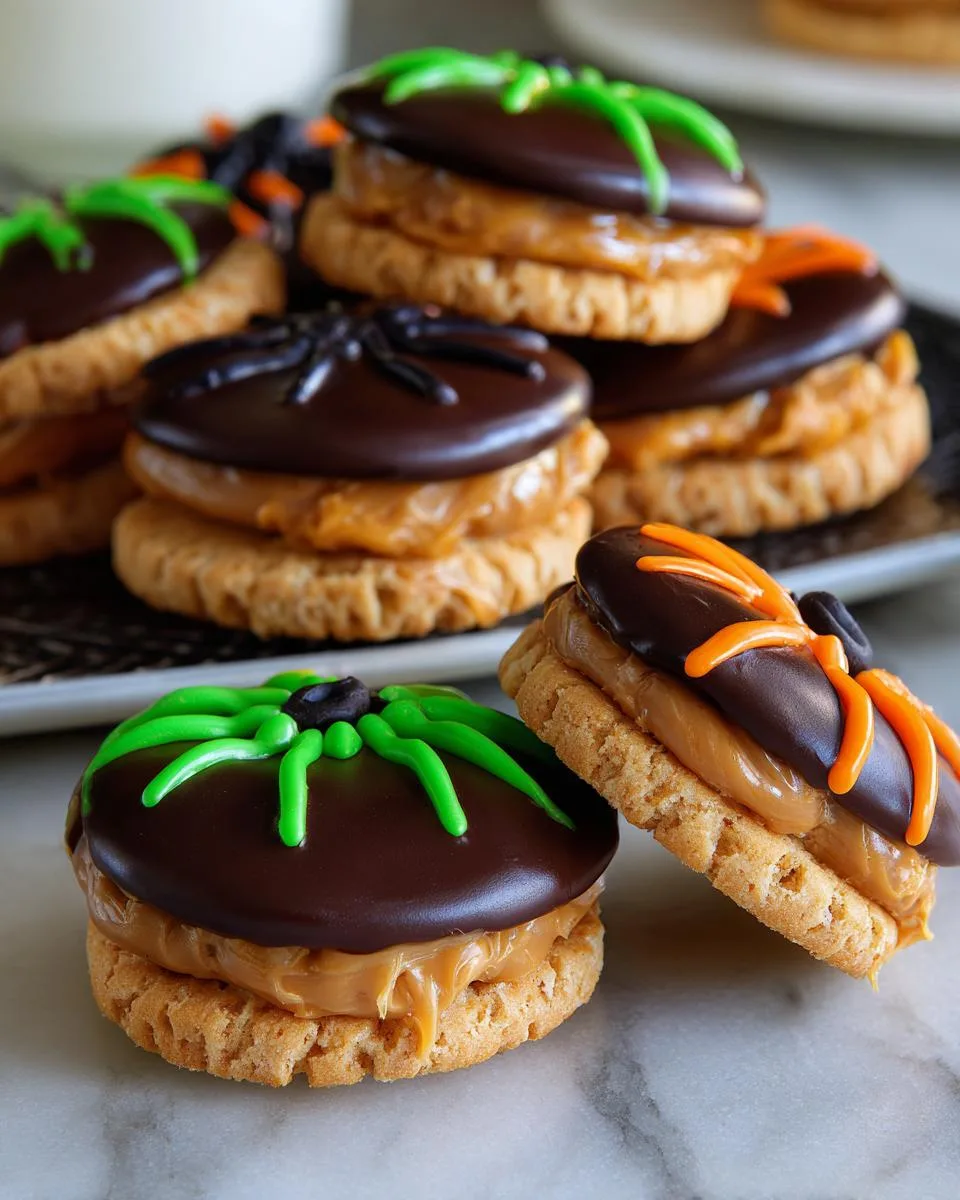
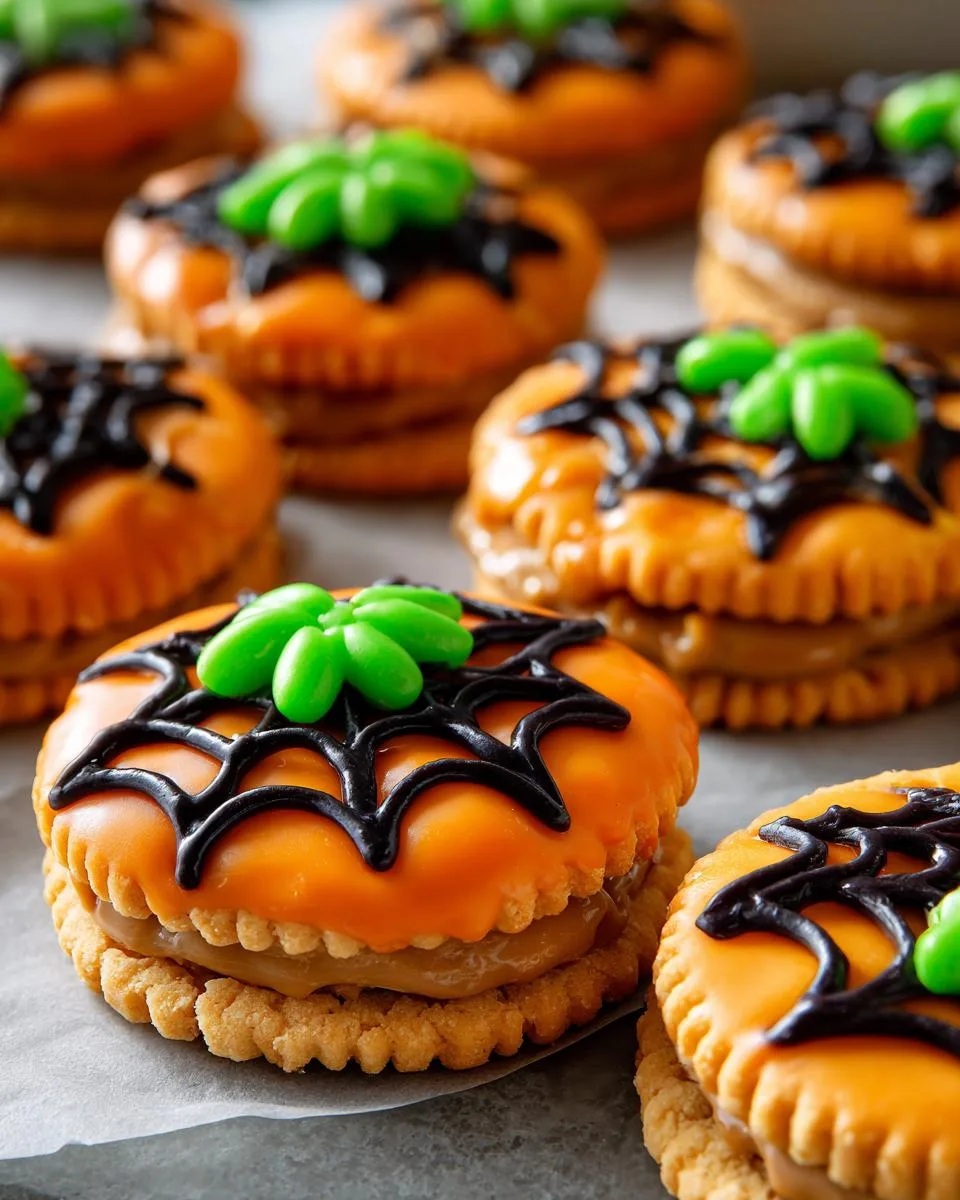
- Pumpkins (Super Easy!): Dip in orange coating, then press a green jelly bean on top while wet. Use black gel to draw a face once set.
- Mummies (Kid Favorite!): Drizzle white coating in zigzags over partially dipped cookies. Add candy eyes peeking through the “bandages.”
- Ghosts (No-Fail Cute!): Fully coat in white, then gently place two candy eyes and draw a wobbly “O” mouth with black gel.
- Spiders (Moderate): Dip in black coating, add candy eyes, and use licorice laces snipped into legs. Toothpick dots make great “hairy” texture!
Let cookies set completely—about 15 minutes at room temp or 5 minutes in the fridge if you’re impatient like me. Warning: That black gel stays sticky FOREVER, so store these guys in a single layer unless you want ghost faces stuck to pumpkin bottoms!
Tips for Perfect Halloween Peanut Butter Ritz Cookies
Okay, a few pro-tips from my many (many!) batches of trial and error! First, use those craft tweezers for placing candy eyes and tiny decorations—your fingers will thank you, and you’ll avoid smudging your perfect coating. Second, store these in a single layer with parchment between them if you stack; that black writing gel stays tacky and will gladly glue your ghost to a pumpkin! And lastly, if your coating starts to thicken, just pop it back in the microwave for 10 seconds—no one wants lumpy monster fur! Happy decorating!
Storing and Serving Suggestions
These Halloween Peanut Butter Ritz cookies are best stored in an airtight container at room temperature—they’ll stay crispy and delicious for up to 3 days. If your candy coatings are soft (especially in warmer weather), pop them in the fridge for 15 minutes before serving. Perfect for party platters or lunchbox surprises!
Halloween Peanut Butter Ritz Cookies FAQs
Got questions? I’ve got answers—from my own hilarious disasters to happy accidents that became new traditions!
Can I use almond butter instead of peanut butter?
Oh honey, I tried this last year—big mistake! Almond butter’s too runny and makes the crackers soggy. Stick with creamy regular peanut butter (the kind with stabilizers) unless you want sandwich cookie casualties.
How long until the decorations set?
Candy coating firms up in about 15 minutes at room temp (faster if you pop ‘em in the fridge!). But that pesky black gel? It stays tacky FOREVER—plan to store cookies in single layers unless you want ghost faces permanently attached to spider butts!
Help! My candy coating seized up—can I fix it?
Been there! Add teaspoons of warm shortening (not butter!) and stir gently. If it looks like lumpy monster skin, microwave for 10-second bursts until smooth again.
Can I freeze decorated cookies?
Technically yes, but the coatings might “sweat” when thawing. Better to freeze undipped sandwiches and decorate fresh—the kids get twice the fun!
Nutritional Information
Okay, full disclosure – these Halloween peanut butter Ritz cookies are definitely a treat, not health food! That said, here’s the scoop based on standard brands: Each creepy-cute cookie clocks in around 120 calories, with 6g fat (mostly from that heavenly peanut butter!) and 8g sugar. Numbers may vary slightly depending on your candy coating thickness and decoration extravagance – my spiderweb designs probably add an extra sugar gram or two!
Share Your Spooky Creations
I’d love to see your Halloween Peanut Butter Ritz Cookies! Snap a pic and tag me on Instagram @FrostyRecipes—your spooky creations might just inspire my next batch! You can also follow along for more fun recipes on Facebook.
Print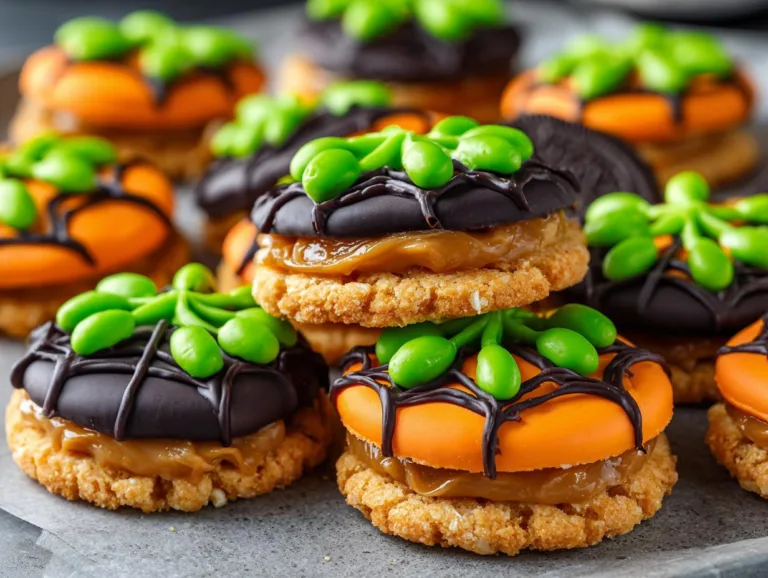
Halloween Peanut Butter Ritz Cookies – 3 Spooky No-Bake Treats
Fun and festive Halloween-themed peanut butter Ritz cookies with various spooky designs.
- Total Time: 1 hour 15 minutes
- Yield: 24 cookies 1x
Ingredients
- Ritz crackers
- Creamy peanut butter
- 12 oz. or 16 oz. package(s) of candy melts or Almond Bark coating
- 2 tsp. shortening (such as Crisco) per each 12 oz. or 16 oz. package of candy melts or Almond Bark coating
- Green jelly beans or green M&Ms (for pumpkins)
- Black writing gel (for mummies, ghosts, Dracula, devils)
- Orange candy melts (for pumpkins, candy corn)
- Yellow candy melts (for candy corn)
- Candy eyes
- Purple candy melts (for monsters)
- Black shoelace licorice (for spiders)
- Pink candy melts (for brains)
- Chocolate chips (for bats, black cats)
- White chocolate chips (for bats)
- Oreo cookies (for bats)
- Tootsie Rolls (for Dracula)
- Chocolate sprinkles/jimmies (for Dracula)
- Heart sprinkles (for black cats)
- Pink sprinkles/jimmies (for black cats)
- Red gum drops or red jelly beans (for devils)
- Purple gum drops (optional, for monsters)
Instructions
- Spread peanut butter on Ritz crackers and sandwich them together.
- Melt candy coating with shortening in the microwave in 30-second intervals, stirring in between.
- Dip each cracker sandwich into the melted coating, covering completely, and place on wax paper.
- Decorate each cookie according to the chosen Halloween design (pumpkin, mummy, candy corn, ghost, monster, spider, brain, spider web, bat, Dracula, black cat, or devil).
- Let coating set completely or chill for faster setting.
- Store in an airtight container at room temperature or in the refrigerator if coatings are soft.
Notes
- Super easy designs: Pumpkin, Mummy, Candy Corn, Ghost, Monster.
- Easy designs: Spider, Brain.
- Moderate difficulty: Spider Web, Bat, Dracula, Black Cat, Devil.
- Prepare decorations before melting coating for easier assembly.
- Use clean craft tweezers for precise decoration placement.
- Toothpicks help smooth air bubbles or adjust decorations.
- Black writing gel stays sticky; store decorated cookies in a single layer.
- Prep Time: 1 hour
- Cook Time: 15 minutes
- Category: Dessert
- Method: No-Bake
- Cuisine: American
- Diet: Vegetarian
Nutrition
- Serving Size: 1 cookie
- Calories: 120
- Sugar: 8g
- Sodium: 85mg
- Fat: 6g
- Saturated Fat: 2g
- Unsaturated Fat: 3g
- Trans Fat: 0g
- Carbohydrates: 14g
- Fiber: 1g
- Protein: 2g
- Cholesterol: 0mg