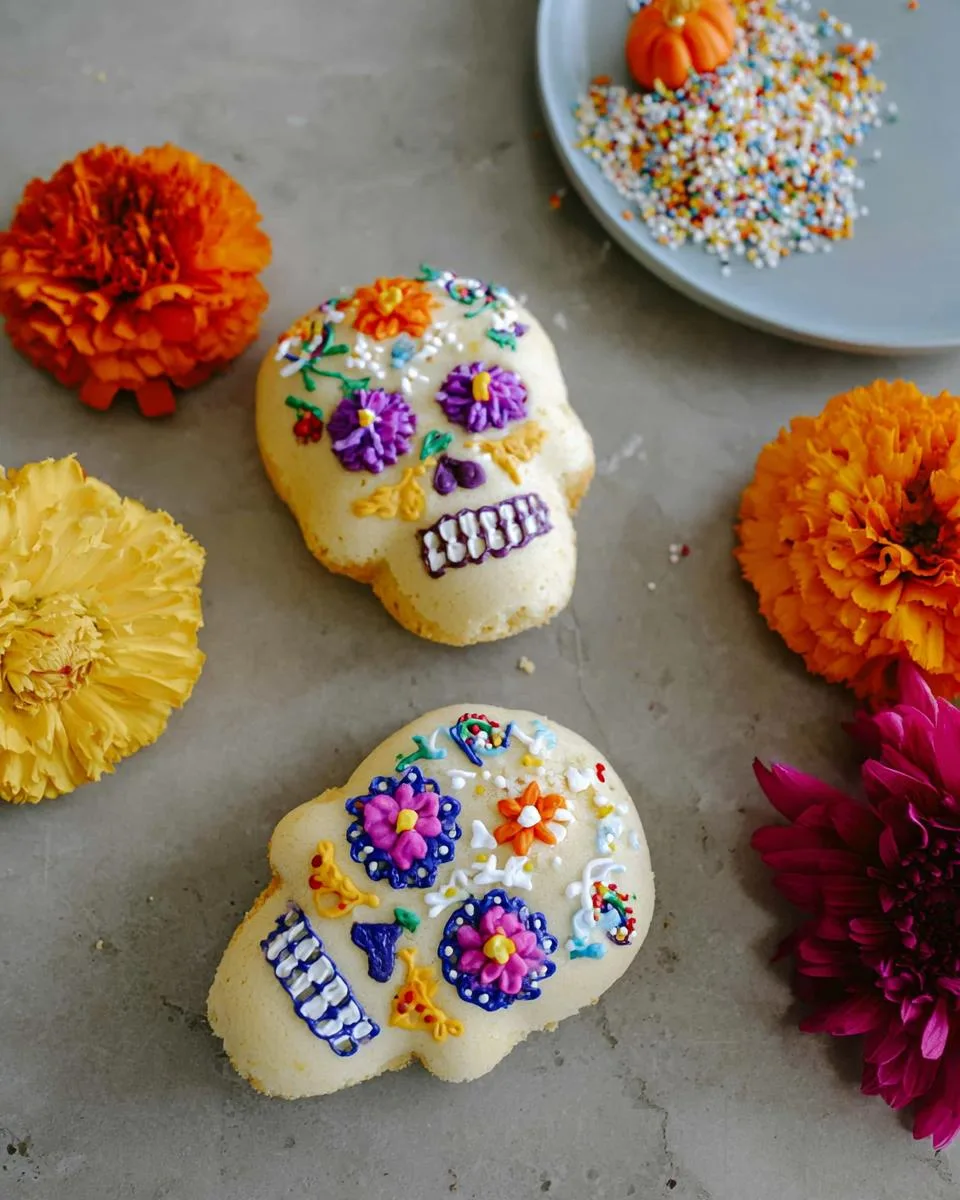
You know those desserts that make everyone stop and stare? The ones that disappear from the platter before you even finish setting them out? That’s exactly what happened the first time I made these Mini Lemon Sugar Skull Cakes for our family’s Halloween party. The second I pulled them out of the oven – golden, fragrant, and just waiting to be decorated – the whole kitchen smelled like sunshine and celebration.
I’ve been baking for years (between soccer practices and PTA meetings, mind you!), but there’s something extra special about these little cakes. They’re not just delicious – though trust me, that bright lemon flavor will have you sneaking bites – they’re tiny edible works of art. Whether it’s Dia de los Muertos, Halloween, or just a Tuesday that needs some sparkle, these mini cakes turn any occasion into something unforgettable. And the best part? That tender crumb and citrusy zing make them as fun to eat as they are to decorate!
Table of Contents
Table of Contents
Ingredients for Mini Lemon Sugar Skull Cakes
Gathering ingredients is my favorite part of baking – it’s like assembling a team of flavor superheroes! For these little citrus wonders, I stick to simple, fresh ingredients that pack a punch. Pro tip: Zest your lemons before juicing them – it’s way easier, and your fingers will thank you later. Here’s exactly what you’ll need to make these cakes as magical as they deserve to be.
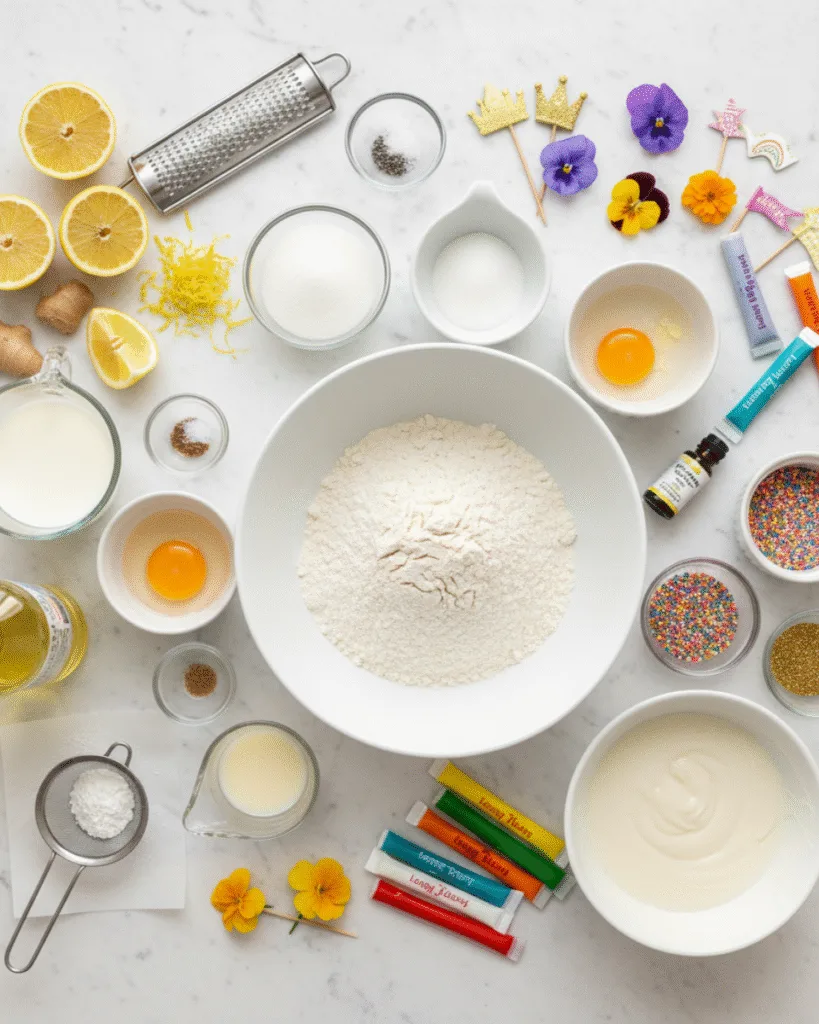
Cake Ingredients
- 2 1/2 cups all-purpose flour (spooned and leveled – no packing!)
- 1 1/2 cups granulated sugar
- 4 teaspoons baking powder (yes, tablespoons – it’s not a typo!)
- 1 teaspoon ground ginger (trust me, this makes the lemon sing)
- Pinch of salt (optional, but I always add it)
- 2 tablespoons lemon zest (from about 2 juicy lemons)
- 2 large eggs (room temperature works best)
- 1 cup buttermilk (no buttermilk? See my quick substitute in the notes)
- 2/3 cup sour cream (full-fat for maximum tenderness)
- 1/2 cup fresh lemon juice (bottled works in a pinch, but fresh is best)
- 6 tablespoons canola or vegetable oil
- 4 teaspoons lemon extract (vanilla or almond extract make tasty subs)
Toppings & Decorations
Now for the fun part – dressing up those little skulls! I keep a “cake decorating emergency kit” (as my kids call it) with these staples:
- Powdered sugar (for a simple, elegant dusting)
- Royal icing (my go-to for piping details)
- Edible writing gel (for those intricate designs)
- Sprinkles (the more colorful, the better!)
- Cupcake toppers (great if you’re short on time)
- Edible fresh flowers (optional, but so pretty – pansies work beautifully)
How to Make Mini Lemon Sugar Skull Cakes
Making these Mini Lemon Sugar Skull Cakes is like conducting a little kitchen orchestra – every step matters, but the result is pure magic! I’ve burned my fair share of cakes over the years (who hasn’t?), so I’ve perfected this method to guarantee tender, moist cakes every time. Let’s get baking!
Preparing the Batter
First things first – preheat that oven to 350°F and grab your favorite skull cake pan. Mine’s well-loved and slightly dented, but it works like a charm! Lightly grease every nook and cranny – those skull details need to show up crisp after baking.
In a big bowl, whisk together your flour, sugar, baking powder, ginger, and salt. When I say whisk, I mean really get in there – you want everything evenly distributed. Now toss in that glorious lemon zest and give it another quick mix. The scent alone will make your kitchen smell like a sunny afternoon!
In another bowl (I use my trusty 4-cup measuring cup), whisk the eggs lightly before adding buttermilk, sour cream, lemon juice, oil, and extract. Here’s my secret: pour the wet ingredients into the dry ingredients slowly while stirring gently with a spatula. Stop mixing when you still see a few flour streaks – overmixing is the enemy of fluffy cakes! The batter should be thick but pourable, with tiny bubbles popping on the surface.
Baking & Cooling
Now for the fun part – filling those skull cavities! I use a ½ cup measure (or an ice cream scoop) to portion the batter, filling each well no more than ¾ full. Tap the pan firmly on the counter 2-3 times – this gets rid of air bubbles that could cause uneven baking.
Slide the pan into the oven and set your timer for 25 minutes. Resist the urge to open the oven door! The cakes are done when they spring back lightly when touched and a toothpick comes out with just a few moist crumbs. Let them cool in the pan for 15-20 minutes – I know it’s hard to wait, but this prevents them from breaking when you flip them out onto a cooling rack.
Decorating Your Skull Cakes
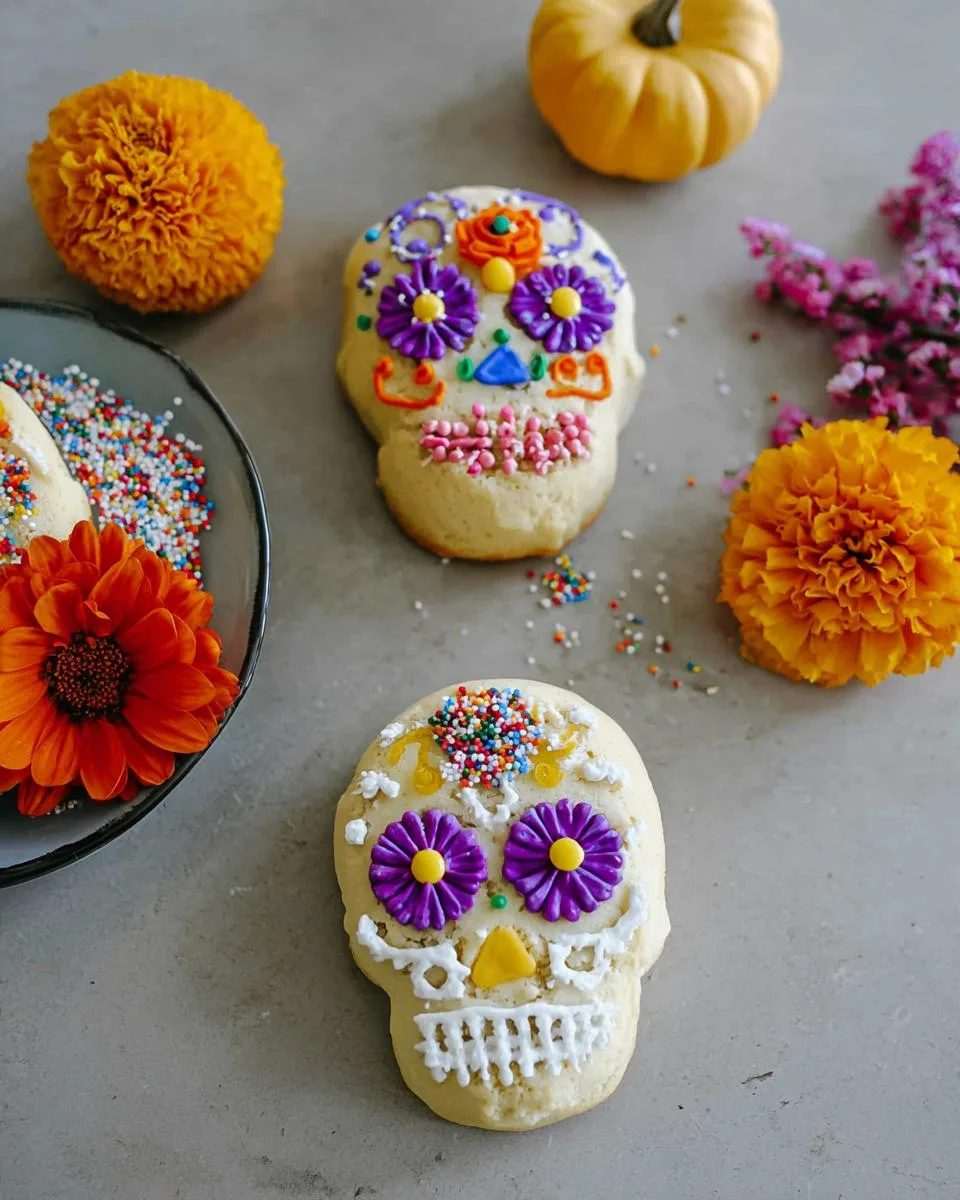
This is where your creativity shines! I like to pipe royal icing along the skull details first – the eye sockets and teeth really pop when outlined. Pro tip: add sprinkles while the icing is still wet so they stick properly. If you’re feeling fancy, edible flowers make stunning “hair” decorations. My kids love using edible markers to draw colorful sugar skull designs – no artistic skill required!
The best part? These taste even better the next day as the flavors meld. But let’s be real – they never last that long in my house!
!
Print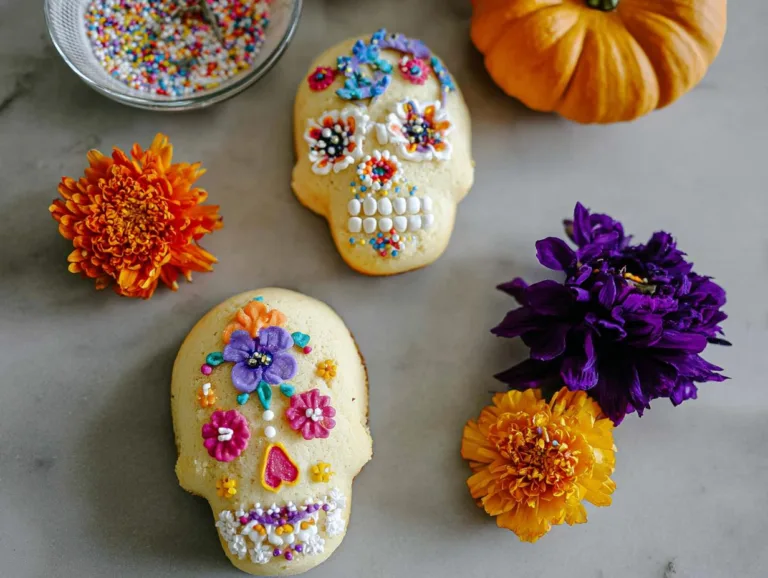
10 Irresistible Mini Lemon Sugar Skull Cakes Everyone Craves
Mini Lemon Sugar Skull Cakes are a delightful treat perfect for festive occasions. These cakes are soft, moist, and packed with zesty lemon flavor, topped with colorful decorations.
- Total Time: 40 minutes
- Yield: 12 mini cakes 1x
Ingredients
- Cake:
- 2 1/2 cups all-purpose flour
- 1 1/2 cups granulated sugar
- 4 teaspoons baking powder
- 1 teaspoon ground ginger
- Pinch salt (optional)
- 2 tablespoons lemon zest
- 2 large eggs
- 1 cup buttermilk
- 2/3 cups sour cream
- 1/2 cup lemon juice
- 6 tablespoons canola or vegetable oil
- 4 teaspoons lemon extract (vanilla or almond extract may be substituted)
- Toppings:
- Powdered sugar
- Royal icing
- Edible writing gel
- Sprinkles
- Cupcake toppers
- Edible fresh flowers (optional)
Instructions
- Preheat oven to 350 degrees F. Grease a skull cake pan.
- In a large bowl, whisk together flour, granulated sugar, baking powder, ground ginger, and salt.
- Whisk in lemon zest; set aside.
- In a separate small bowl, whisk together eggs, buttermilk, sour cream, lemon juice, oil, and lemon extract.
- Add wet mixture to dry, mixing lightly until just combined. Small lumps are fine.
- Fill each well of the skull cake pan no more than ¾ full—about ½ cup of batter each. Tap pan gently to remove air bubbles.
- Bake for about 25 minutes. Cool in pan for 15-20 minutes before inverting onto a cooling rack. Repeat with remaining batter.
- Decorate with royal icing, writing gel, sprinkles, or edible flowers.
Notes
- Substitute vanilla or almond extract if lemon extract is unavailable.
- Do not overmix the batter to keep cakes light and fluffy.
- Use fresh lemon juice and zest for best flavor.
- Prep Time: 15 minutes
- Cook Time: 25 minutes
- Category: Dessert
- Method: Baking
- Cuisine: American
- Diet: Vegetarian
Nutrition
- Serving Size: 1 cake
- Calories: 280
- Sugar: 22g
- Sodium: 150mg
- Fat: 10g
- Saturated Fat: 3g
- Unsaturated Fat: 6g
- Trans Fat: 0g
- Carbohydrates: 42g
- Fiber: 1g
- Protein: 4g
- Cholesterol: 40mg
Tips for Perfect Mini Lemon Sugar Skull Cakes
After making dozens of batches (and yes, a few flops along the way), I’ve learned all the little tricks that take these mini cakes from good to oh-my-goodness amazing. Here are my absolute must-know tips:
- Zest first, juice later: Always grate your lemon zest before cutting and juicing the lemons – trying to zest half-squeezed lemons is like wrestling a wet bar of soap!
- The tap test: Don’t skip tapping that filled pan on the counter before baking – those few firm knocks prevent air pockets that could leave your skulls with “bald spots” in the details.
- Cooling patience: I know it’s tempting, but let those cakes cool completely before decorating. Warm cakes make icing melt into sad little puddles instead of crisp designs.
- Sprinkle strategy: Keep decorations simple at first – pipe basic outlines, then add sprinkles or edible glitter while the icing’s still tacky. You can always add more details later!
- Storage smarts: These keep beautifully in an airtight container for 3 days at room temperature. If you must refrigerate (maybe you went wild with cream cheese frosting?), let them come to room temp before serving for that perfect tender texture.
Remember – even “mistakes” taste delicious! My first batch had lopsided skulls that looked more like surprised potatoes, but they disappeared just as fast as the pretty ones.
Ingredient Substitutions & Notes
Look, we’ve all been there – halfway through a recipe only to realize we’re missing an ingredient. Don’t panic! Over years of baking (and many last-minute grocery runs), I’ve found some brilliant swaps that’ll save your Mini Lemon Sugar Skull Cakes without sacrificing flavor. Here’s my cheat sheet for when the pantry rebels:
Buttermilk Blues? No Problem!
Out of buttermilk? My grandma taught me this lifesaver: mix 1 tablespoon of white vinegar or lemon juice into 1 cup of regular milk and let it sit for 5 minutes. It won’t be exactly the same, but it’ll give you that tangy kick and tender crumb. Plain yogurt thinned with a bit of milk works wonders too!
Extract Emergency Solutions
No lemon extract? Been there! Vanilla extract makes a lovely substitute – the cakes will be less citrusy but still delicious. For something different, try almond extract (use half the amount – it’s powerful stuff!). In a real pinch, an extra tablespoon of lemon zest can help boost that bright flavor.
Oil & Butter Swaps
While vegetable oil gives the best texture, melted butter works if that’s all you’ve got – just know your cakes might be slightly denser. Coconut oil adds a subtle tropical note (use refined if you don’t want coconut flavor). And hey – I once used applesauce when I ran out of oil entirely. The cakes were extra moist, if a bit cakey!
Gluten-Free Options
For my gluten-free friends, a 1:1 gluten-free flour blend works beautifully here (I like King Arthur’s). The cakes might be slightly more fragile, so handle them gently when decorating. Xanthan gum isn’t necessary since we’re using eggs and sour cream for structure.
Pro Tip: However you tweak it, always use fresh lemon juice if possible. That bottled stuff just doesn’t have the same bright, sunny flavor that makes these cakes so special. Trust me – your taste buds will thank you!
Frequently Asked Questions
I’ve gotten so many questions about these Mini Lemon Sugar Skull Cakes over the years – and hey, I had the same ones when I first started making them! Here are the answers to the ones I hear most often. Let me know if you’ve got others – I’m always happy to help!
Can I use a different pan if I don’t have a skull cake pan?
Absolutely! While the skull shape is super fun, you can bake these in a standard muffin tin or even a mini Bundt pan. Just adjust the bake time – start checking around 18 minutes for smaller cakes. The batter makes about 12 regular-sized cupcakes if you go that route. Bonus: they’re easier to decorate without all those skull details!
How long do these cakes stay fresh?
These little guys stay moist and delicious for up to 3 days when stored in an airtight container at room temperature. If you’ve used cream cheese frosting or fresh flowers, pop them in the fridge, but let them come to room temp before serving for the best texture. Pro tip: freeze undecorated cakes for up to 2 months – just thaw and decorate when you’re ready to serve!
Can I make these ahead of time for a party?
Yes, and I do this all the time! Bake the cakes a day ahead and store them undecorated at room temp. Decorate them the morning of your event – the icing will stay fresh, and you’ll avoid last-minute stress. Just keep them covered to prevent drying out. Oh, and hide them well – my family can’t resist sneaking a few before the party starts!
What’s the best way to get the cakes out of the pan without breaking them?
Patience is key here! Let the cakes cool in the pan for 15-20 minutes – they’ll firm up and release easier. Gently run a butter knife around the edges, then invert the pan onto a cooling rack. Give it a little tap if they’re stubborn. If one does break (it happens to the best of us!), just glue it back together with a bit of icing – no one will ever know!
Can I make these gluten-free or vegan?
Definitely! For gluten-free, use a 1:1 gluten-free flour blend – the cakes might be slightly more delicate, but they’ll still taste amazing. For vegan, use flax eggs (1 tablespoon ground flax + 3 tablespoons water per egg) and swap the buttermilk for plant-based milk with a squeeze of lemon. The texture changes a bit, but they’re still totally delicious!
Serving & Storing Mini Lemon Sugar Skull Cakes
Okay, confession time – I’ve been known to eat these straight off the cooling rack (who can resist that lemony aroma?), but these little cakes really shine when served at room temperature. The flavors have time to mellow, and that tender crumb reaches its absolute peak texture. If you’ve refrigerated them (maybe you went wild with cream cheese frosting – no judgment!), let them sit out for about 30 minutes before serving. That chill can make the cake a bit dense otherwise.
For storing, here’s my foolproof system:
- Airtight is everything: Tuck them into a cake carrier or plastic container with a tight-fitting lid – I’ve learned the hard way that even one loose corner can turn your moist cakes into dry little hockey pucks overnight!
- Layer with care: If stacking, place parchment between layers to protect those precious decorations. My kids call this “making cake sandwiches” – it’s become part of our baking ritual.
- Timing is key: Decorated cakes keep beautifully for 3 days at room temp. Undecorated cakes? They freeze like a dream for up to 2 months – just wrap them tightly in plastic wrap first. Thaw at room temp before decorating.
Pro tip from my many kitchen experiments: If your decorated cakes start to look a little sad, a quick dusting of powdered sugar hides a multitude of sins and gives them fresh visual pop right before serving!
Nutritional Information
Okay, let’s talk numbers – but remember, baking is about joy first, math second! These estimates are for one undecorated mini cake (because let’s be real, who’s counting sprinkles?). Your exact numbers might dance around these depending on your ingredients:
- Serving Size: 1 cake (about 2.5 oz)
- Calories: 280 (perfect for that “just one more” feeling)
- Sugar: 22g (blame that glorious lemon glaze!)
- Sodium: 150mg
- Fat: 10g (6g unsaturated – hello, healthy oils!)
- Carbohydrates: 42g (1g fiber – we’re not pretending these are health food!)
- Protein: 4g
- Cholesterol: 40mg
Important note: These numbers can change based on your specific ingredients (full-fat vs. low-fat dairy, exact sugar measurements, etc.). And psst – we didn’t calculate the icing, sprinkles, or other decorations because… well, some things are better left unknown when you’re reaching for that third cake!
There you have it – everything you need to create these showstopping Mini Lemon Sugar Skull Cakes! I can’t wait to see how yours turn out. Snap a pic of your decorated masterpieces and tag @FrostyRecipes – we absolutely adore seeing your creations and hearing about your baking adventures. Don’t forget to tell me about your favorite decorations or any clever twists you’ve added. Happy baking, friends – may your cakes be moist, your icing steady, and your sprinkles plentiful