You know that moment when you take your first bite of restaurant-style Mongolian beef and think, “I wish I could make this at home”? That was me three years ago, standing in my tiny kitchen with a takeout container in one hand and a determined look on my face. After what felt like a hundred test batches (okay, maybe twelve), I finally cracked the code to that perfect sweet-savory sauce and melt-in-your-mouth beef. Now this dish has become our family’s ultimate weeknight hero – my picky seven-year-old actually asks for seconds! The secret? A quick marinade with baking soda (trust me, it works magic) and getting that pan screaming hot before the beef hits it. Once you try this version, you’ll never look at takeout menus the same way again.
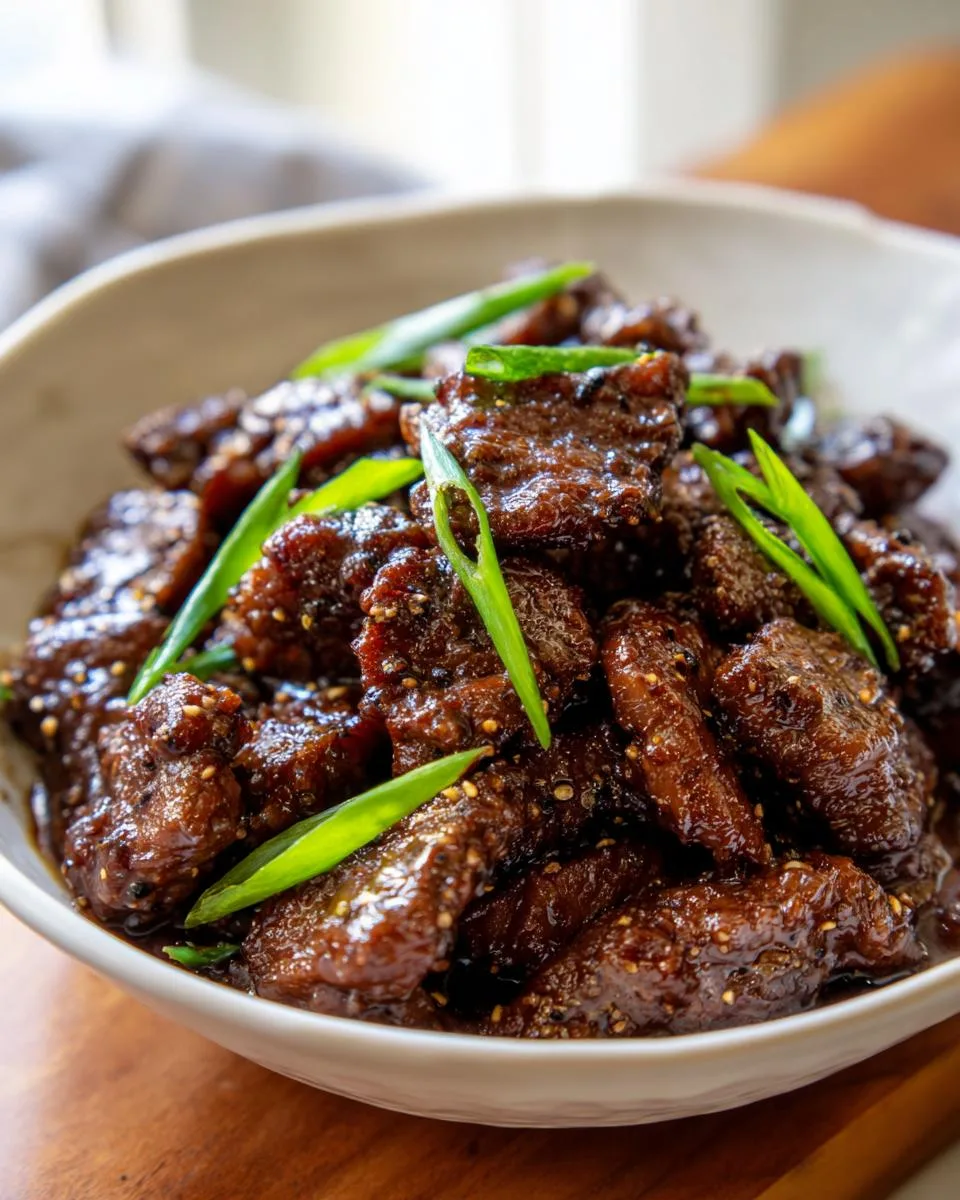
Table of Contents
Table of Contents
Why You’ll Love This Restaurant Style Mongolian Beef
Listen, I know what you’re thinking – “Homemade Mongolian beef can’t possibly be as good as takeout.” Oh honey, let me tell you why this recipe will change your mind:
- 30 minutes flat – From fridge to table faster than delivery could ever dream of
- Tender beef that melts – That baking soda marinade? Magic trick for restaurant-quality texture
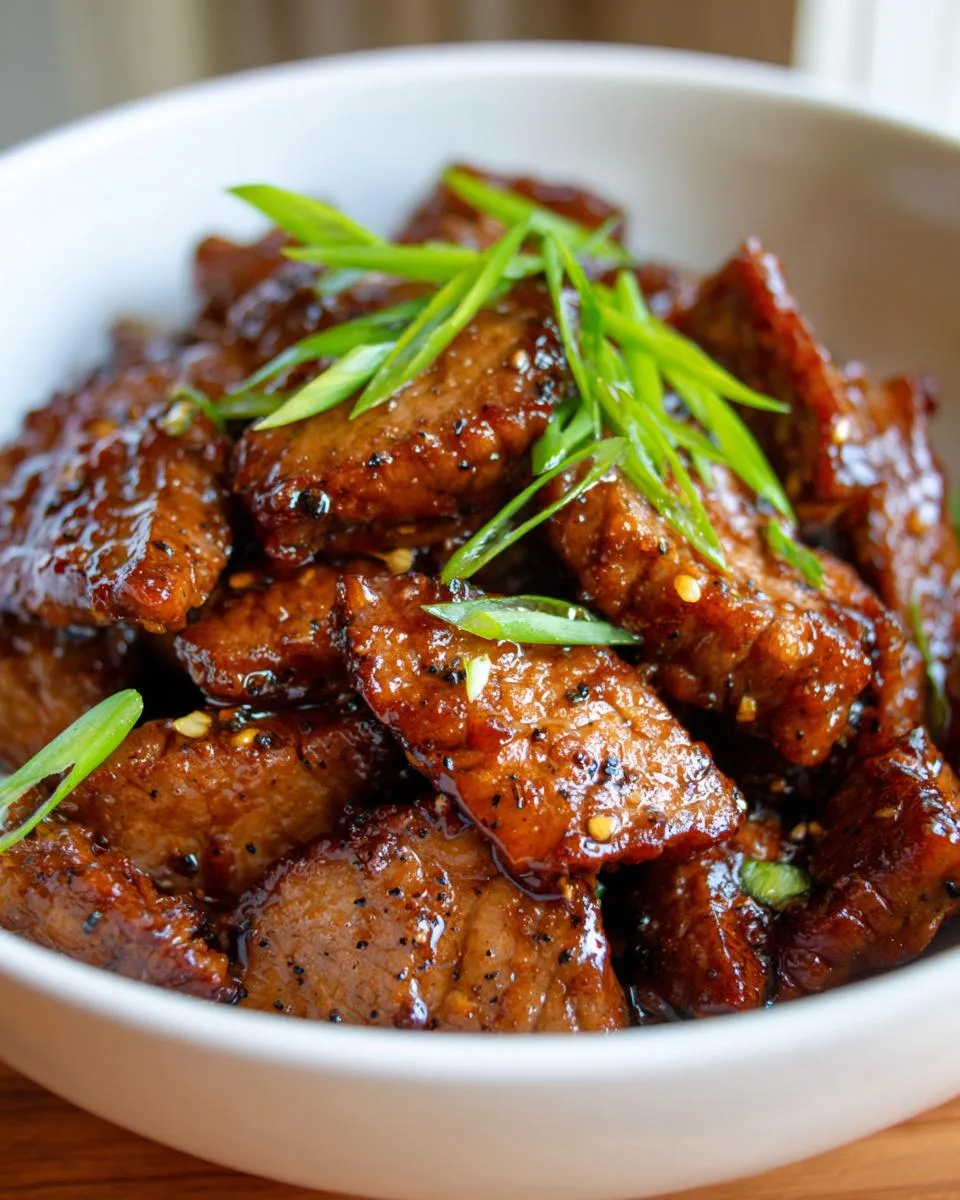
- Sweet-savory sauce – Sticky, glossy perfection that clings to every bite
- Tastes better than takeout – Fresher ingredients, bigger portions, no mystery meat
- One-pan wonder – Minimal cleanup means more time for second helpings
My kids actually cheer when they smell this cooking – and that’s saying something coming from a pair of picky eaters!
Restaurant Style Mongolian Beef Ingredients
Okay, let’s talk ingredients – and I promise, nothing too crazy here! The magic of this dish comes from simple staples transformed by technique. Here’s what you’ll need (and yes, I’m including my little prep notes because I’ve learned the hard way what works best):
- 1 pound beef flank steak, thinly sliced (between ⅛ to ¼ inch thick) – Pro tip: pop it in the freezer for 15 minutes first to make slicing easier!
- 2 tablespoons water – Just plain ol’ water works its magic in the marinade
- 2 teaspoons + 1 tablespoon Shaoxing rice wine – Divided use – the smaller amount for marinade, larger for cooking
- ½ teaspoon Kosher salt – I always use Diamond Crystal brand for consistent results
- ¼ teaspoon baking soda – The secret weapon for ultra-tender beef!
- 2 tablespoons cornstarch – Creates that perfect light coating
- 1 tablespoon neutral oil – I use avocado oil, but any high-heat oil works
- 1 teaspoon cracked black pepper – Freshly cracked makes all the difference
- 3 tablespoons granulated sugar – For that signature sweet glaze
- 2 tablespoons regular soy sauce – Not low-sodium here – we want full flavor
- 1 tablespoon minced garlic (about 2 cloves) – More is never wrong in my book
- ½ large yellow onion, sliced – Thin slices cook faster and caramelize better
- 1 bunch green onion, cut into 2-inch pieces – Separate whites and greens
- 1 ounce medium-thickness rice vermicelli (optional) – Such a fun crispy base!
- Oil as needed for cooking – About ¼ cup for frying if doing noodles
See? Nothing too exotic – just smart combinations of pantry staples. Now let’s make some magic!
How to Make Restaurant Style Mongolian Beef
Alright, let’s get cooking! I’ll walk you through each step just like I do when teaching my sister – with plenty of “why’s” and “watch out for’s” so you nail this on your first try. Trust me, once you smell that beef hitting the hot pan, you’ll understand why this recipe became my family’s obsession.
Step 1: Marinate the Beef
First things first – that magical marinade! Grab your sliced flank steak (remember, nice and thin against the grain) and toss it into a medium bowl. Here’s where the transformation begins:
Add the water, 2 teaspoons Shaoxing wine, salt, and that pinch of baking soda. Now here’s the trick – mix with your hands, squeezing gently like you’re giving the beef a little massage. You’ll actually feel the liquid getting absorbed after about 30 seconds of this. That’s when you know it’s working!
Sprinkle in the cornstarch next, tossing until every piece looks lightly coated – no dry spots! Finish with a drizzle of oil to keep things from sticking. Now walk away for at least 10 minutes (15 is better) while you prep everything else. Overnight works too if you’re planning ahead!
Step 2: Fry Vermicelli (Optional)
Okay, this step is totally optional but SO fun if you want that authentic restaurant presentation. Heat about 1-2 inches of oil in your deepest skillet (I use my little cast iron) until it’s around 350°F. No thermometer? No problem!
Test with a wooden chopstick – when tiny bubbles form rapidly around it, you’re golden. Drop in small handfuls of vermicelli and watch the magic happen! They’ll puff up instantly (like 30 seconds). Flip once if needed, then transfer to paper towels to drain. Careful – they’re hot and crispy!
Step 3: Cook the Beef
Now for the main event! Heat your wok or largest skillet over high heat until it’s smoking hot – seriously, don’t be shy here. Add about 1 tablespoon oil and swirl to coat. Working in batches (don’t crowd that pan!), add marinated beef in a single layer.
Here’s the key – DON’T TOUCH IT for 30 seconds! Let it get that gorgeous golden sear. Then flip and cook another 30 seconds until browned but still slightly pink inside. Transfer to a plate and repeat with remaining beef. The whole process should take about 3 minutes per batch.
Step 4: Finish the Dish
Same pan, lower heat to medium. Add a touch more oil if needed, then toss in garlic and onions. Stir-fry until fragrant and slightly softened – about 1 minute. Now the fun part!
Return all the beef to the pan along with any juices. Sprinkle black pepper and drizzle that remaining tablespoon of Shaoxing wine – listen for the sizzle! Stir-fry for another 30 seconds to let the flavors meld.
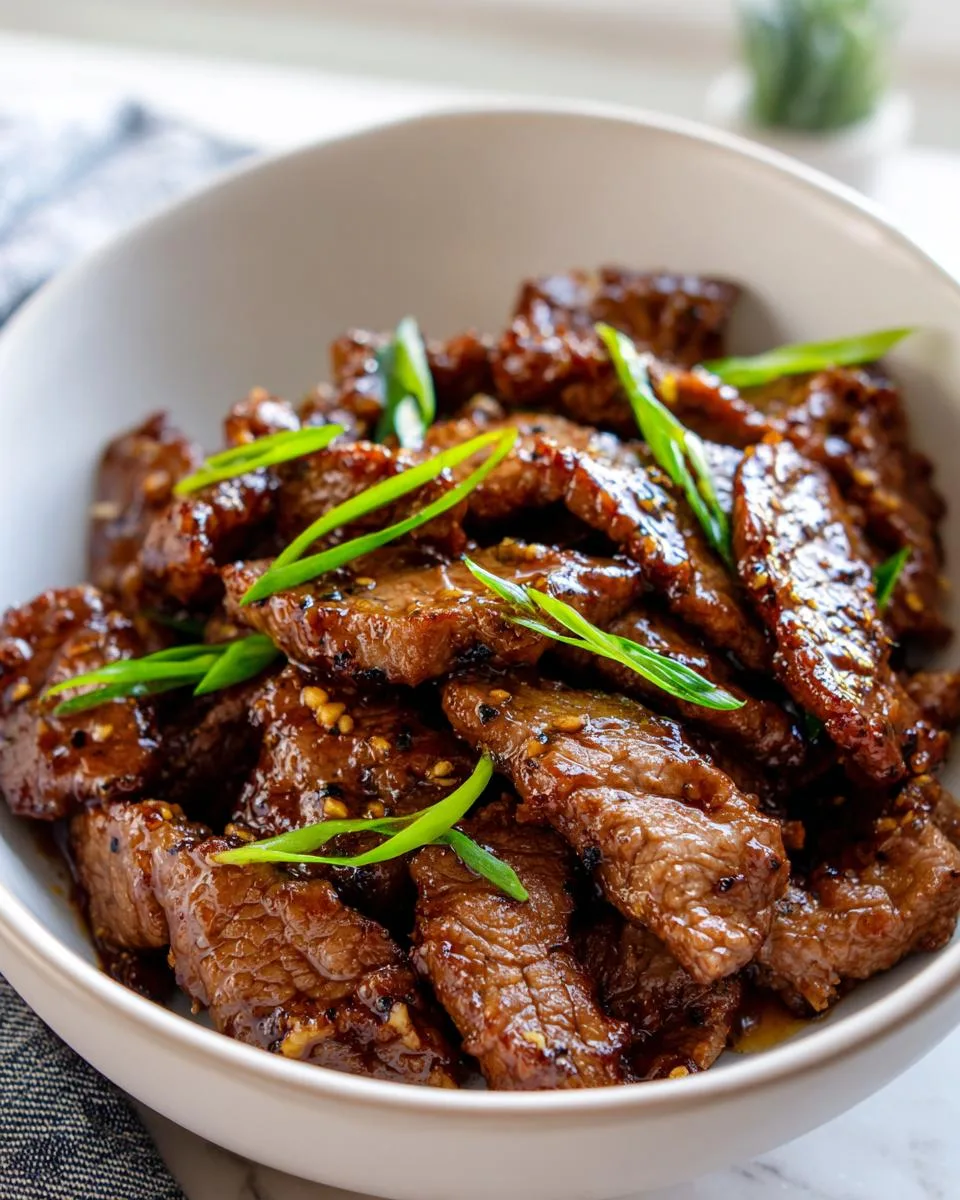
Add sugar and soy sauce, stirring constantly as the sauce turns glossy and coats the beef beautifully. Toss in green onions (save some for garnish!) and give everything one last quick stir – just 15 seconds to wilt them slightly.
Serve immediately over those crispy noodles if you made them, or with steamed rice. Watch how fast it disappears!
Expert Tips for Perfect Restaurant Style Mongolian Beef
After making this dish more times than I can count (seriously, my family won’t let me stop), I’ve picked up some game-changing tricks that’ll take your Mongolian beef from good to “order-worthy” every single time:
- Slice against the grain – Look for those long muscle fibers and cut perpendicular to them. This makes even flank steak tender enough to cut with chopsticks!
- Hot pan, small batches – Crowding = steaming instead of searing. I use my biggest skillet and cook in two batches for perfect caramelization.
- Fresh cracked pepper – Pre-ground loses its punch. Grind it fresh right into the pan for that aromatic kick.
- Prep everything first – Once that beef hits the pan, things move FAST. Have all ingredients measured and within arm’s reach.
- Don’t skip the baking soda – I know it sounds weird, but that tiny bit works miracles on tough cuts of beef.
Trust me – follow these and you’ll be getting “when are you making this again?” requests weekly!
Print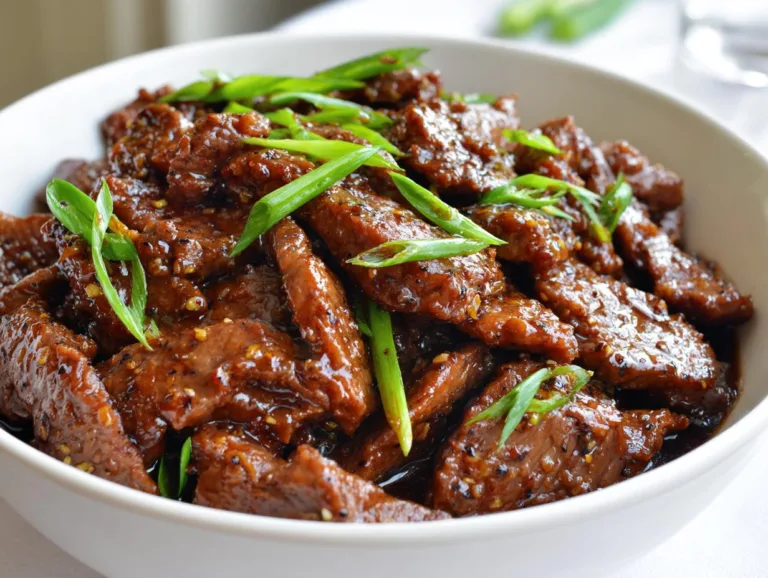
3 Secrets to Perfect Restaurant Style Mongolian Beef at Home
A quick and flavorful Mongolian beef recipe that rivals your favorite restaurant dish. Perfect for weeknight dinners with tender beef and a sweet-savory sauce.
- Total Time: 30 mins
- Yield: 4 servings 1x
Ingredients
- 1 pound beef flank steak, thinly sliced (between ⅛ to ¼ inch thick)
- 2 tablespoons water
- 2 teaspoons Shaoxing rice wine
- ½ teaspoon Kosher salt
- ¼ teaspoon baking soda
- 2 tablespoons cornstarch
- 1 tablespoon neutral oil
- 1 teaspoon cracked black pepper
- 1 tablespoon Shaoxing rice wine
- 3 tablespoons granulated sugar
- 2 tablespoons regular soy sauce
- 1 tablespoon minced garlic (about 2 cloves)
- ½ large yellow onion, sliced
- 1 bunch green onion, cut into 2-inch pieces
- 1 ounce medium-thickness rice vermicelli (optional)
- Oil as needed for cooking
Instructions
- Marinate the beef: Combine sliced flank steak, water, Shaoxing wine, salt, and baking soda in a bowl. Mix until liquid is absorbed.
- Add cornstarch and coat beef evenly. Mix in oil. Let marinate 10-15 mins or overnight.
- (Optional) Fry vermicelli: Heat 1-2 inches of oil to 350°F. Submerge noodles until puffy (30-60 secs). Drain on paper towels.
- Cook beef: Sear marinated beef in hot oil until golden brown. Remove and set aside.
- Sauté garlic, onions, and white parts of green onions in remaining oil until translucent.
- Return beef to pan. Add black pepper and drizzle Shaoxing wine. Stir-fry 30-60 secs.
- Mix in sugar and soy sauce. Coat beef until slightly caramelized.
- Add green onion parts. Stir briefly.
- Serve over fried vermicelli (if using).
Notes
- Slice beef against the grain for tenderness.
- Adjust black pepper to taste.
- Use a wooden chopstick to test oil temperature: it should sizzle rapidly.
- Cook beef in batches if needed to avoid overcrowding.
- Prep Time: 15 mins
- Cook Time: 15 mins
- Category: Main Dish
- Method: Stir-fry
- Cuisine: Chinese
- Diet: Low Lactose
Nutrition
- Serving Size: 1 serving
- Calories: 320
- Sugar: 12g
- Sodium: 980mg
- Fat: 14g
- Saturated Fat: 4g
- Unsaturated Fat: 8g
- Trans Fat: 0g
- Carbohydrates: 22g
- Fiber: 2g
- Protein: 26g
- Cholesterol: 65mg
Ingredient Substitutions
Ran out of something? No worries – I’ve tested plenty of swaps over the years when my pantry wasn’t cooperating! Here are my tried-and-true backups that still deliver amazing flavor:
- Shaoxing wine: Dry sherry works beautifully, or use chicken broth with a splash of rice vinegar
- Sugar: Honey or brown sugar add lovely depth – just reduce slightly since they’re sweeter
- Flank steak: Skirt steak works great, or even thinly sliced sirloin in a pinch
- Green onions: Shallots or leeks make a tasty alternative if you’re in a bind
- Rice vermicelli: Skip it entirely or use crispy chow mein noodles for crunch
The beauty of this dish? It’s forgiving – as long as you keep that sweet-savory balance, you’re golden!
Serving Suggestions for Restaurant Style Mongolian Beef
Oh, let me tell you how we love to serve this beauty! That glossy beef deserves the perfect stage – my family goes wild when I pile it over steaming jasmine rice (the sauce soaks in so perfectly). But here’s the fun part:
- Fluffy white rice – Classic and perfect for soaking up every drop of sauce
- Crispy rice noodles – That textural contrast is just *chef’s kiss*
- Stir-fried veggies – Broccoli or snap peas add fresh crunch
- Lettuce wraps – For a lighter, hands-on meal
My secret? Always sprinkle extra green onions on top – that pop of color makes it look straight from your favorite takeout spot!
Storage and Reheating
Leftovers? Ha – good luck having any with this dish! But if you miraculously do, here’s how to keep that Mongolian beef tasting fresh:
- Fridge: Store in an airtight container for up to 3 days – the flavors actually deepen overnight!
- Reheating: Skip the microwave – a quick stir-fry in a hot pan with a splash of water brings back that perfect texture
- Freezing: Not ideal – the beef loses its tenderness when thawed
Pro tip: If you’re meal prepping, keep the sauce separate and toss everything together right before serving for maximum freshness!
Restaurant Style Mongolian Beef Nutrition
Now, I’m no nutritionist, but here’s the scoop on what’s in this delicious dish (remember, estimates vary based on your exact ingredients and portion sizes):
- Calories: 320 per serving
- Protein: 26g – That flank steak packs a punch!
- Carbs: 22g (2g fiber)
- Sugar: 12g – Mostly from that caramelized sauce
- Fat: 14g (4g saturated)
- Sodium: 980mg – Go easy on the soy sauce if watching salt
Not too shabby for a meal that tastes this indulgent, right? Just balance it with some steamed veggies and you’re golden!
FAQs About Restaurant Style Mongolian Beef
I get asked these questions ALL the time – so let me save you the trial and error with my hard-earned Mongolian beef wisdom!
Can I use a different cut of beef?
Absolutely! While flank steak is my go-to for its perfect balance of flavor and tenderness, skirt steak works beautifully too. In a pinch, I’ve even used thinly sliced sirloin – just be extra careful not to overcook it. The key is always slicing against the grain, no matter what cut you choose. My butcher once suggested flap meat, and wow – that became our new favorite!
Is baking soda necessary?
Okay, I know it sounds weird, but YES – that tiny bit of baking soda is a game-changer! It tenderizes the beef by raising its pH, giving you that melt-in-your-mouth texture restaurants achieve. Without it, your beef might turn out chewy. Trust me, I skipped it once thinking “how much difference could it make?” – my husband still teases me about that rubbery disaster!
How do I prevent soggy beef?
Three words: HOT PAN, FAST! Soggy beef happens when the pan’s not hot enough or you overcrowd it (guilty of both!). Get that skillet smoking hot, cook in batches, and don’t move the beef for the first 30 seconds – that sear locks in juices. Also, make sure your marinade isn’t too wet before adding cornstarch. If your beef looks watery going into the pan, pat it gently with paper towels first.
Try This Restaurant Style Mongolian Beef Tonight!
There you have it – my foolproof path to Mongolian beef bliss that’ll have your family begging for seconds! I can’t wait for you to experience that first bite of tender beef coated in sticky-sweet sauce, just like your favorite restaurant but made with your own two hands. The best part? You probably have most ingredients already waiting in your pantry.
Don’t forget to snap a photo when you make it – I love seeing your kitchen creations! Tag me @FrostyRecipes so I can cheer you on. Now grab that wok and get cooking – dinner’s gonna be legendary tonight!