Halloween treats don’t have to be complicated—trust me, I learned that the hard way after one too many Pinterest fails! Last year, my kids and I were scrambling for a last-minute spooky snack when we stumbled on the magic of strawberry ghosts. Just fresh strawberries, white chocolate, and a little chocolate drizzle for faces—simple, adorable, and seriously delicious. The best part? They come together in under 20 minutes, which is a lifesaver when you’ve got little ones buzzing with candy-fueled energy. Now, these sweet little ghosts are a must-make every October in our house. Their silly faces always steal the show at parties, and I love that they’re a sneaky way to add fruit to the Halloween spread. Pro tip: Let the kids pipe the faces—their wobbly, uneven eyes just make them even cuter!
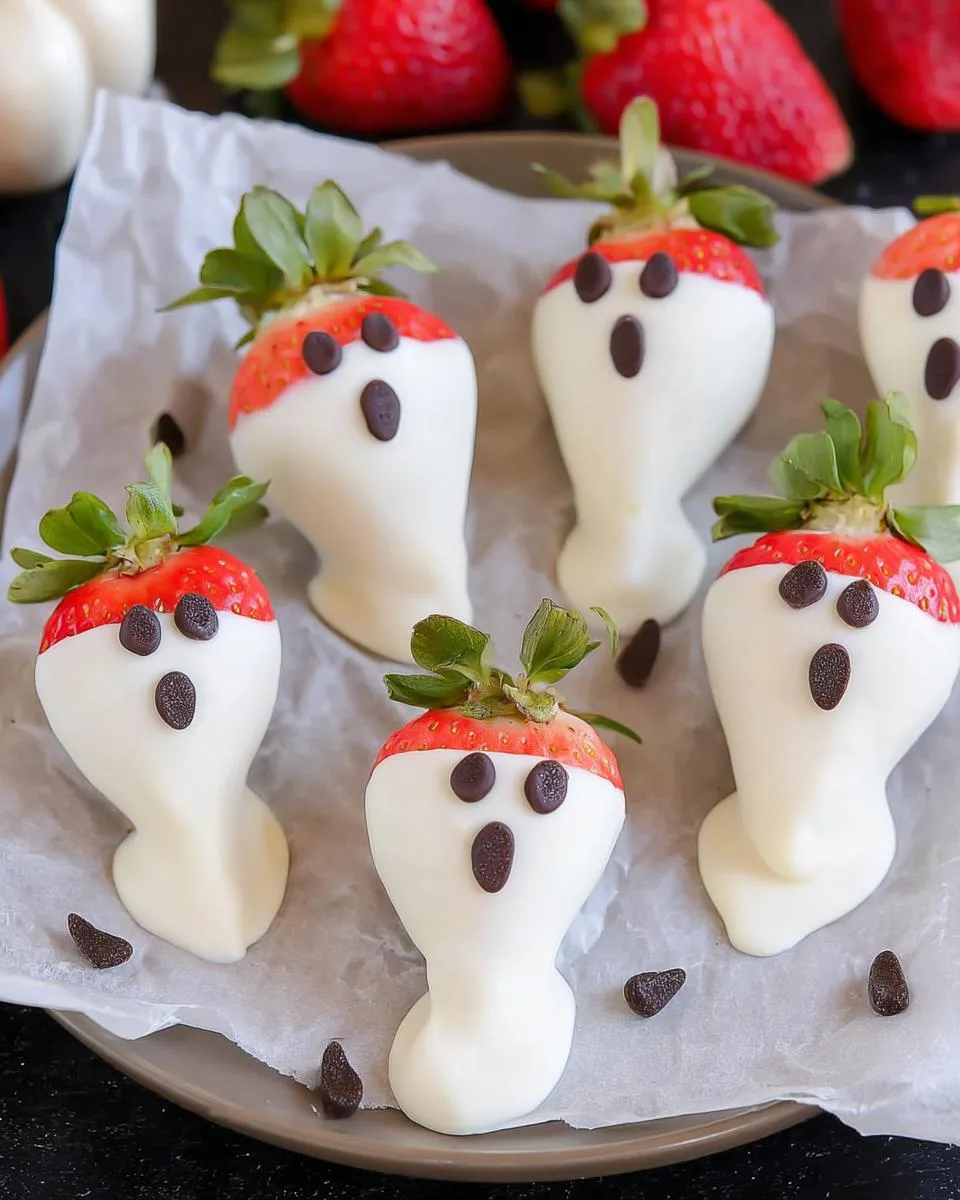
Table of Contents
Table of Contents
Ingredients for Strawberry Ghosts
One of the things I love most about these strawberry ghosts? You probably already have most of what you need in your kitchen right now. Well—except maybe the strawberries, but those are worth running to the store for! Let me walk you through exactly what you’ll need to make these adorable little spooks.
Essential Ingredients
- 1 pint fresh strawberries – Look for ones with a nice pointed tip (that’ll be your ghost’s head!) and make sure they’re firm without soft spots. Pro tip: The redder the strawberry, the spookier the ghost looks peeking through!
- 8 oz white melting chocolate – I swear by high-quality melting wafers (not chocolate chips!) because they coat beautifully without tempering. The cheap stuff tends to seize up on me.
- 1 oz chocolate melting chocolate – For the faces! Dark chocolate makes creepy expressions, but milk chocolate gives friendlier ghosts.
Important: When I say “dried strawberries” in the instructions, I mean thoroughly patted dry with paper towels—not dehydrated! Even a drop of water can make your chocolate clump up.
Equipment Needed
- Small pot – For melting chocolate. I use my smallest saucepan because less surface area means less chance of burning.
- Parchment paper – Non-negotiable! Wax paper sticks, trust me—I learned that the messy way.
- Ziploc bag – The lazy baker’s piping bag! Just snip a tiny corner when you’re ready to draw faces.
That’s seriously it—no fancy gadgets needed. Though if you’ve got a silicone baking mat, that works great too!
How to Make Strawberry Ghosts
Okay, here comes the fun part—transforming those ordinary strawberries into adorable little ghosts! I’ll walk you through each step, just like I do with my kids when we’re making these together. The process is simple, but there are a few tricks that’ll make all the difference between “spooky cute” and “spooky mess.” Don’t worry—I’ve made all the mistakes so you don’t have to!
Step 1: Prep the Strawberries
First things first: give your strawberries a good rinse under cool water. I like to leave the stems on—they make perfect little handles for dipping later. Now, here’s the critical part: dry them like your life depends on it! Water and chocolate are mortal enemies. I pat each berry gently with paper towels, then let them air-dry for 5 minutes just to be safe. If you’re in a hurry (hello, Halloween party in 20 minutes?), a quick once-over with a clean kitchen towel works too.
Step 2: Melt the White Chocolate
Now for the magic potion! Pour your white chocolate wafers into a small saucepan and melt them over low heat—I’m talking the lowest setting your stove has. Stir constantly with a rubber spatula (those corners love to hide unmelted bits!). You’ll know it’s ready when it’s smooth as melted ice cream, about 5 minutes. Warning: If you see even a whiff of smoke, pull it off the heat immediately—burnt chocolate is the saddest kitchen smell.
Step 3: Dip and Shape the Ghosts
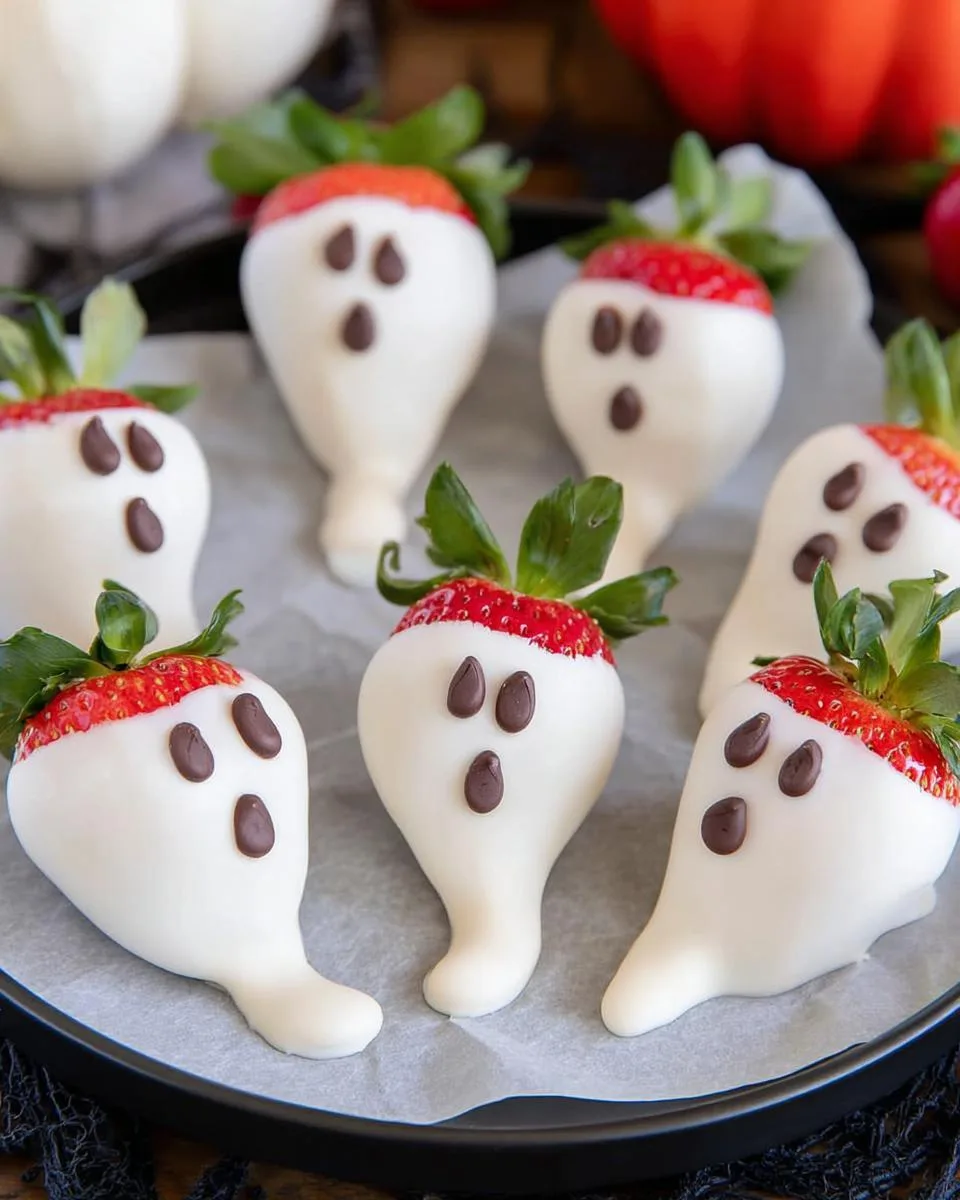
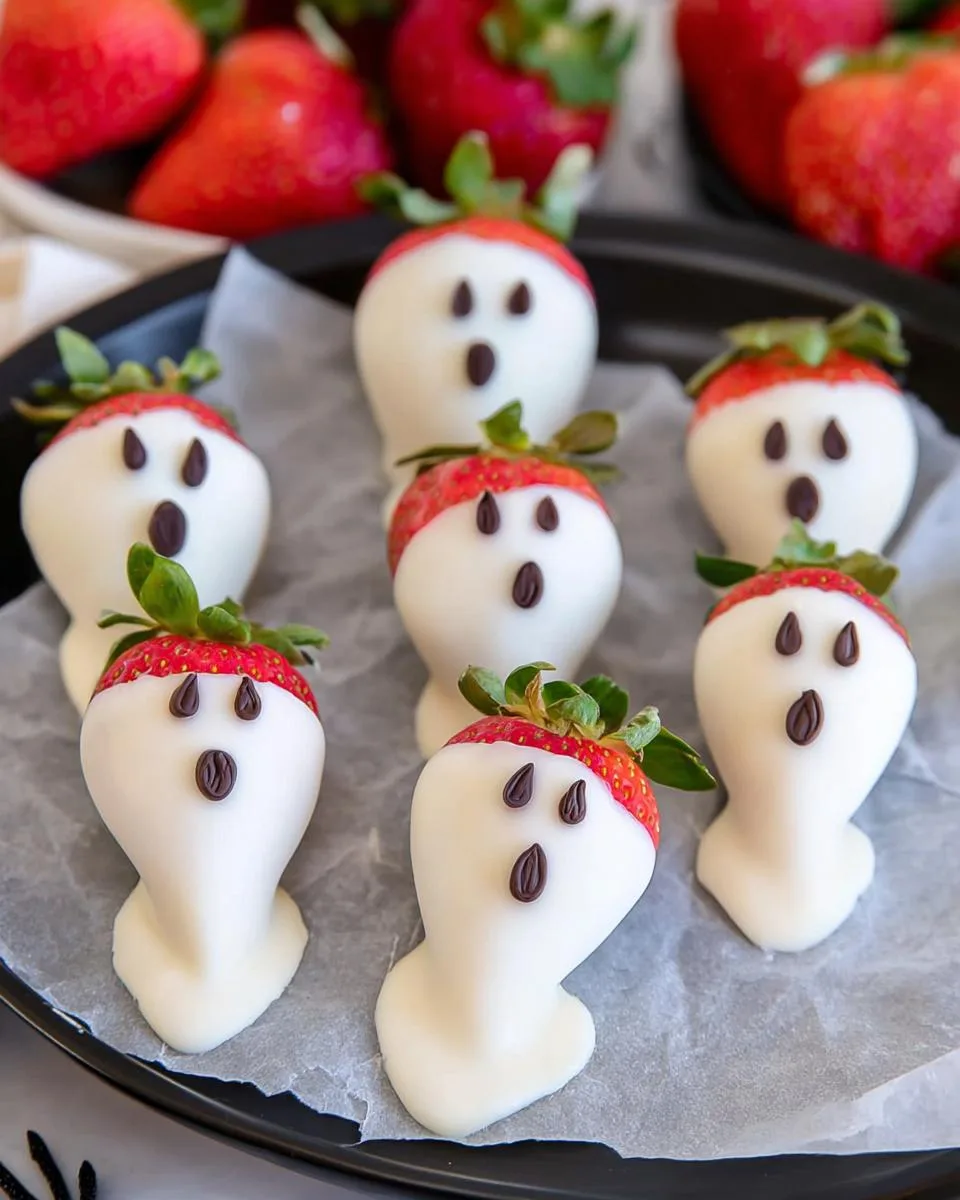
Here’s where the ghostly shapes come to life! Tilt your saucepan slightly, then grab a strawberry by its stem and dunk it about 3/4 of the way into the chocolate. Let the excess drip off for a second, then place it on your parchment-lined tray. Now for my favorite trick: give it a tiny drag as you set it down—that’ll create a wispy “tail” at the bottom that looks just like a floating ghost! Repeat with all your berries, spacing them about an inch apart so they don’t stick together.
Step 4: Add the Faces
While your ghosts are setting (about 10 minutes at room temp), melt that dark or milk chocolate in the microwave or another small pot. Scoop it into a Ziploc bag, snip the tiniest corner off—like, smaller than you think!—and pipe on silly faces. My kids love making some ghosts smile and others look scared. Pro tip: If your hand slips (been there!), just wipe it off with a toothpick and try again before the chocolate fully hardens.
Print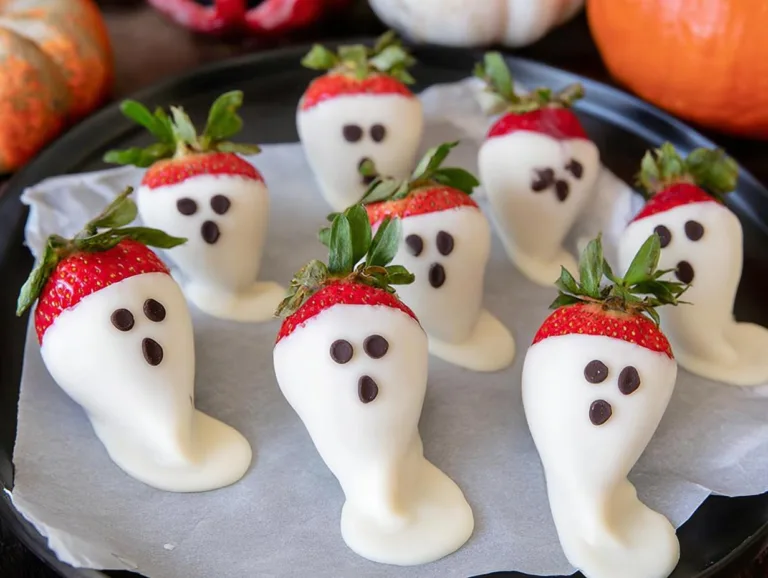
Spooky Strawberry Ghosts: A 20-Minute Halloween Delight
Simple and fun strawberry ghosts made with white chocolate and a chocolate face for a spooky treat.
- Total Time: 20 minutes
- Yield: 1 pint 1x
Ingredients
- 1 pint strawberries, rinsed and dried
- 8 oz white melting chocolate
- 1 oz chocolate melting chocolate (for face)
- Parchment paper
Instructions
- Rinse strawberries and dry them on a paper towel.
- Line a baking sheet with parchment paper and place strawberries nearby. Use a little cooking spray to keep the parchment in place if needed.
- Melt white chocolate in a small pot on low heat, stirring constantly until smooth (about 5 minutes). Remove from heat.
- Hold the pot at an angle, dip strawberries in chocolate, and place them on the parchment, dragging slightly to create a ghost tail.
- Let chocolate set on the counter until hard.
- Melt milk chocolate, pipe eyes and mouths using a Ziploc bag, and let set. Chill in the fridge to speed up setting.
Notes
- Stir chocolate constantly to prevent burning.
- Use a rubber spatula for even melting.
- Work quickly while dipping strawberries to keep chocolate smooth.
- Prep Time: 15 minutes
- Cook Time: 5 minutes
- Category: Dessert
- Method: No-Bake
- Cuisine: American
- Diet: Vegetarian
Nutrition
- Serving Size: 1 strawberry
- Calories: 50
- Sugar: 6g
- Sodium: 5mg
- Fat: 3g
- Saturated Fat: 2g
- Unsaturated Fat: 1g
- Trans Fat: 0g
- Carbohydrates: 7g
- Fiber: 1g
- Protein: 0.5g
- Cholesterol: 0mg
Tips for Perfect Strawberry Ghosts
After making these strawberry ghosts more times than I can count (seriously, my kids request them year-round!), I’ve picked up some foolproof tricks to ensure yours turn out perfectly spooky every time. Here are my hard-earned secrets:
- Chocolate too thick? Stir in 1/2 teaspoon of coconut oil at a time until it flows like warm honey. This saves more batches than I’d like to admit!
- Strawberries sweating? If your kitchen’s warm, pop them in the fridge for 10 minutes before dipping—condensation is the enemy of smooth chocolate.
- Ghosts not standing proud? Make sure your drag technique is quick and confident. Hesitation makes flat-bottomed ghosts (still tasty, but less floaty).
- Faces smudging? Let white chocolate set completely before piping. I test by gently touching one ghost’s “tail”—if it doesn’t leave a fingerprint, you’re golden.
- Short on time? Skip the fridge! Room temp setting works fine unless your kitchen is a sauna. The fridge can cause condensation spots.
My biggest tip? Embrace the imperfections! Some of our favorite ghosts have lopsided eyes or wobbly mouths—they’ve got character. After all, real ghosts probably aren’t perfect either, right?
Strawberry Ghosts Variations
Once you’ve mastered the basic strawberry ghosts, the fun really begins! I love playing with different versions—sometimes to match a party theme, sometimes just because my kids beg for “fancy ghosts.” Here are our favorite twists that keep this simple recipe feeling fresh year after year.
Spooky Swirl Ghosts
For an extra-creepy effect, try swirling in a teaspoon of black food coloring gel into your melted white chocolate. Not too much—just enough to create a marbled, ghostly effect. The kids call these our “haunted mansion ghosts,” especially when we pair them with chocolate graveyard cupcakes!
Glow-in-the-Dark Ghosts
Special occasions call for special ghosts! Mix a pinch of edible luminous powder (find it at craft stores) into your white chocolate for ghosts that actually glow under blacklight. We used these for my son’s Halloween birthday party last year—total showstoppers!
Candy Eyes vs. Chocolate Faces
While I adore the classic chocolate-drawn faces, sometimes we swap in mini candy eyeballs for bigger, bolder expressions. The tiny ones (about 1/8-inch) stick perfectly to freshly-dipped ghosts. Warning: They make the berries slightly less “healthy,” but hey—it’s Halloween!
Dipped-and-Drizzled Ghosts
For ghosts with extra dimension, let your white chocolate set completely, then drizzle with melted dark chocolate using that same Ziploc bag technique. Zigzags make great “spooky ectoplasm” trails! Or go festive with orange candy melts for a Day of the Dead twist.
The beauty of these variations? They all start with that same simple base recipe. Whether you’re making classic strawberry ghosts or experimenting with new ideas, the hardest part is still just not eating them all before your guests arrive!
Storing Your Strawberry Ghosts
Here’s the thing about strawberry ghosts—they’re so delicious, they rarely last long enough to store! But if you’re one of those ultra-prepared folks (unlike me last Halloween when I was dipping berries 20 minutes before trick-or-treaters arrived), here’s how to keep them fresh and spooky.
The fridge is your best friend here, but with a few rules. First, always layer them with parchment paper between tiers if stacking. I learned the hard way that ghost faces melt into each other without that barrier—turns into a chocolatey horror show! A single layer on a plate works great too.
They’ll keep beautifully for about 2 days in the fridge, though the strawberries might get slightly softer after day one. Pro tip: If your kitchen is cool (below 70°F), you can leave them out covered with a tea towel for up to 8 hours—perfect for party prep!
Important: Don’t freeze them! The strawberries turn to mush when thawed, and the chocolate gets that weird cloudy look. Ask me how I know… (Let’s just say last year’s “make-ahead freezer experiment” became compost bin ghosts.)
If you do need to transport them, use a shallow container with parchment and pack it snugly so they don’t roll around. A little baking sheet with a lid works miracles for classroom parties—just keep it flat in your car so your ghosts don’t end up doing somersaults!
Strawberry Ghosts Nutrition
Okay, let’s be real—these strawberry ghosts are still a treat, but they’re one of the healthier Halloween options out there! Here’s the breakdown per ghost (because let’s face it, no one eats just one). Just remember: Nutritional values are estimates and vary by ingredient brands. I’m sharing what my trusty kitchen scale and nutrition app tell me after years of making these!
- Serving Size: 1 strawberry ghost (about 1 oz coated)
- Calories: 50 – Basically a guilt-free bite!
- Sugar: 6g – Mostly from the strawberry’s natural sugars
- Fat: 3g – Thank the chocolate for that rich mouthfeel
- Protein: 0.5g – Not exactly a protein bar, but hey—it’s dessert!
- Fiber: 1g – More than most Halloween candy can claim
Now, here’s where it gets interesting: Compared to typical Halloween treats, each ghost gives you a whole strawberry’s worth of vitamin C—about 7mg! That’s like a tiny immune boost with your spooky snack. The darker your chocolate faces, the more antioxidants you’re getting too.
Want to lighten them up? Try using dark chocolate for the faces (more antioxidants!) or reducing the chocolate coating by just dipping the tops. But honestly? Halloween comes once a year—I say enjoy every melty, chocolatey bite!
Frequently Asked Questions
Over the years, I’ve gotten so many questions about these strawberry ghosts—usually while frantically texting with friends who are mid-recipe panic! Here are the answers to the ones that come up most often:
Can I use frozen strawberries?
Oh honey, no—I tried this once during a strawberry shortage and learned the hard way! Frozen berries release way too much water as they thaw, making your chocolate seize up into a grainy mess. Fresh is absolutely the way to go here. If your store only has massive containers, just wash what you need and store the rest loosely wrapped in paper towels—they’ll keep for a day or two.
How long do they take to set?
At room temperature (around 70°F), your ghosts will be ready for faces in about 15-20 minutes. You’ll know they’re set when you can gently touch the “tail” without leaving fingerprints. In humid climates or warm kitchens, it might take closer to 30 minutes. Impatient? A quick 5-minute chill in the fridge speeds things up—just don’t leave them too long or they’ll sweat when they come out!
Can I make these ahead?
Absolutely! I often dip my ghosts the night before a party, then add the faces in the morning. Store them uncovered in the fridge overnight (this helps prevent condensation), then let them sit at room temp for 10 minutes before piping faces. They’re best within 24 hours—after that, the strawberries start to soften—but let’s be honest, they never last that long!
Got more questions? Slide into my DMs @FrostyRecipes—I love troubleshooting kitchen adventures!
I can’t wait to see your adorable strawberry ghosts! Tag us @FrostyRecipes if you make these spooky treats—nothing makes my day more than seeing your kitchen creations. Bonus points if your little helpers got messy with the chocolate faces (those are always my favorite photos!). Happy haunting… I mean, baking!