Oh my gosh, you have to try this Sweet Chili Chicken – it’s my family’s absolute favorite weeknight lifesaver! As a busy mom of two, I need recipes that come together fast but still pack massive flavor, and this one delivers every single time. Imagine crispy golden chicken pieces tossed in that perfect sweet-spicy sauce – the kind that makes your kids lick their plates clean (mine do!). I’ve been perfecting this easy Asian-inspired dish for years in my chaotic-but-loved kitchen, and trust me, once you taste that crunchy-saucy bite, you’ll be hooked just like we are.
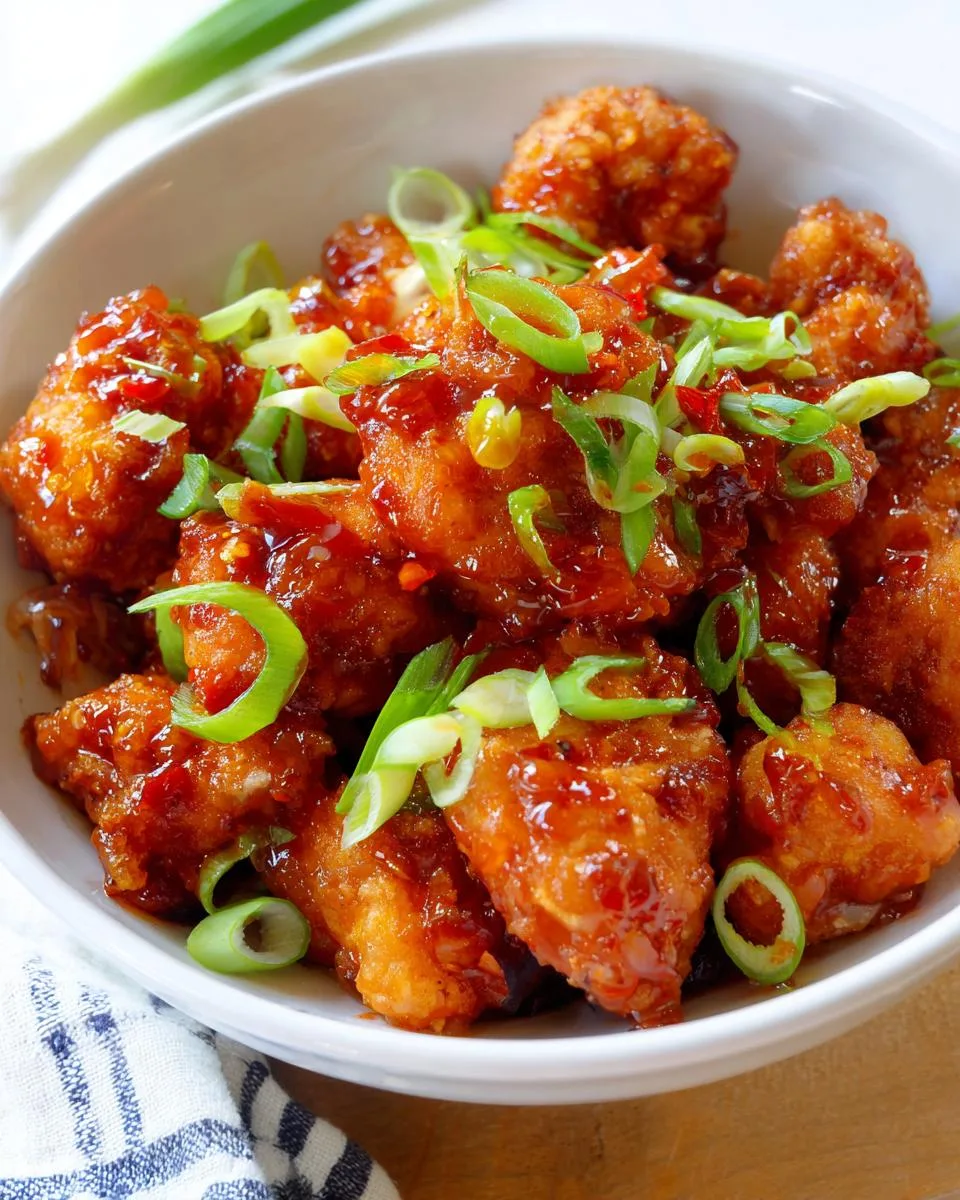
Table of Contents
Table of Contents
Why You’ll Love This Sweet Chili Chicken Recipe
This recipe has become my go-to for so many reasons – let me tell you why it’ll be your new favorite too:
- Crazy fast: From fridge to table in 30 minutes flat – perfect for those “what’s for dinner?!” panic moments
- That addictive crunch: The flour-cornstarch combo gives each piece that perfect crispy coating that stays crunchy even with the sauce
- Sweet heat magic: Just the right balance of sugary and spicy – enough kick to excite your tastebuds but still kid-friendly
- Weeknight hero: Uses simple ingredients you probably already have (except maybe the chili sauce – but trust me, it’s worth buying!)
Ingredients for Sweet Chili Chicken
Okay, let’s gather our kitchen squad! Here’s everything you’ll need to make this flavor bomb happen – I promise it’s all super simple stuff. Just wait until you see how these basic ingredients transform into something magical!
- 1 1/2 pounds boneless, skinless chicken breasts – cut into those perfect 1-inch bite-sized pieces (pro tip: slightly frozen chicken is easier to cut neatly!)
- 2 large eggs – lightly beaten (that means just whisked until yolks and whites are combined – no need to go crazy)
- Salt and pepper – to taste (I’m generous with both – especially the pepper for that extra oomph)
- 1/2 cup all-purpose flour – the trusty standard works best here
- 1/2 cup cornstarch – this is our crispy-coating secret weapon!
- Oil for frying – I use vegetable or canola oil – you’ll need enough for about 3 inches in your pot
- 3/4 cup sweet chili sauce – Mae Ploy is my favorite brand, but use what you can find
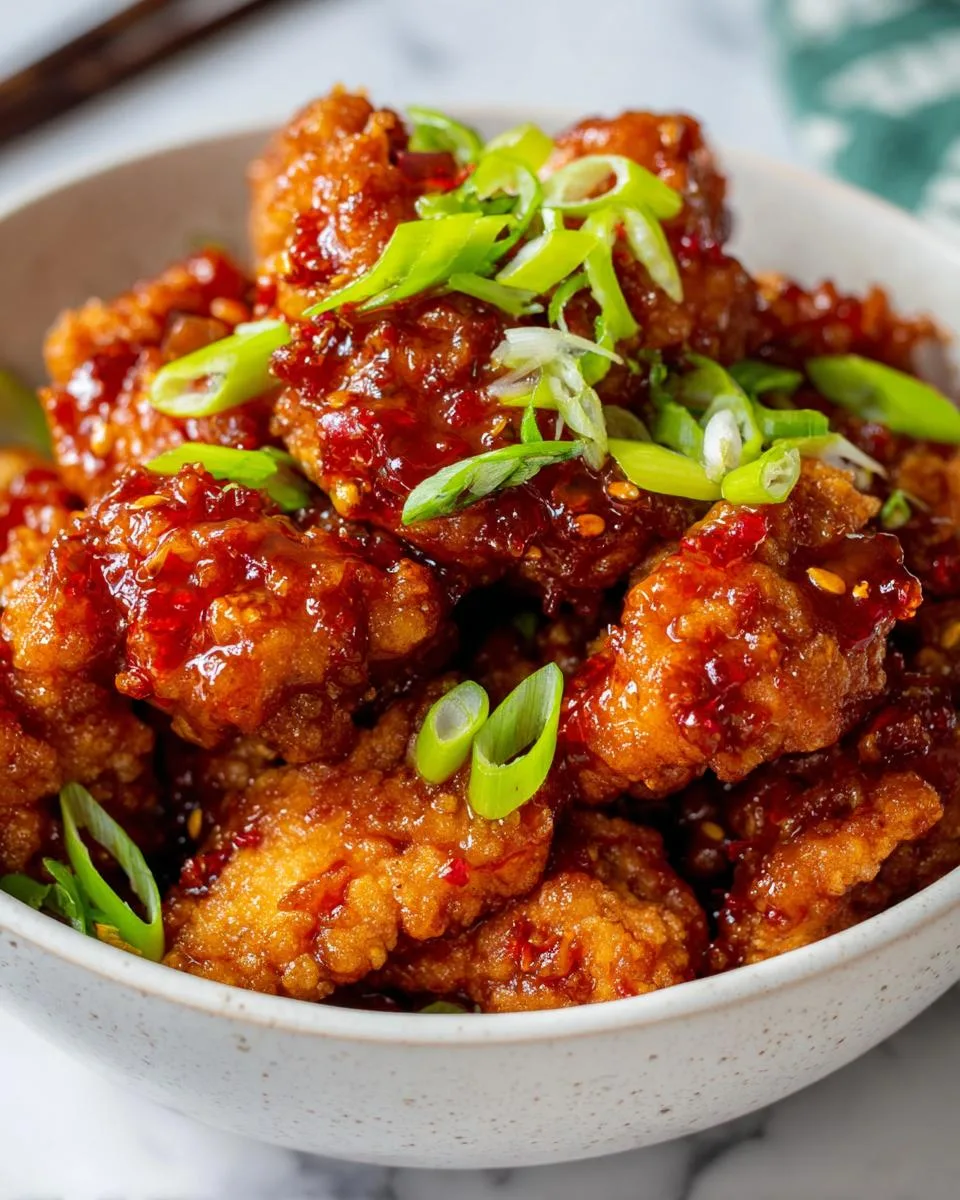
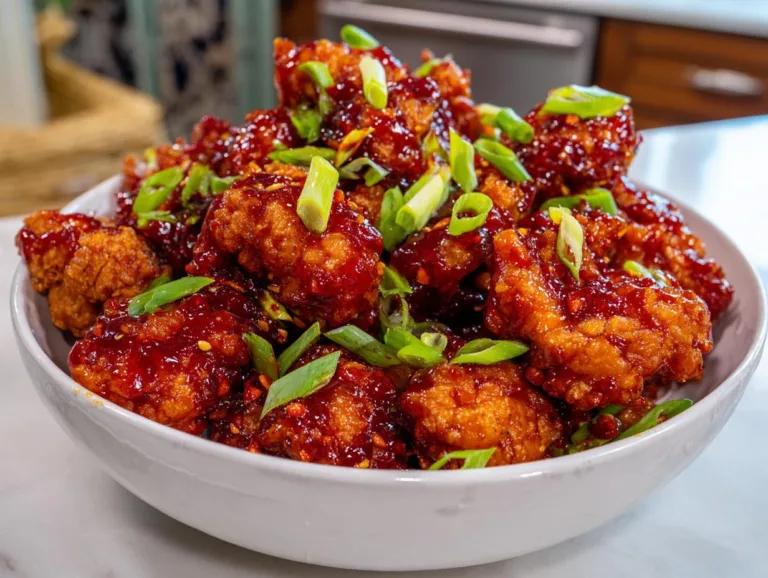
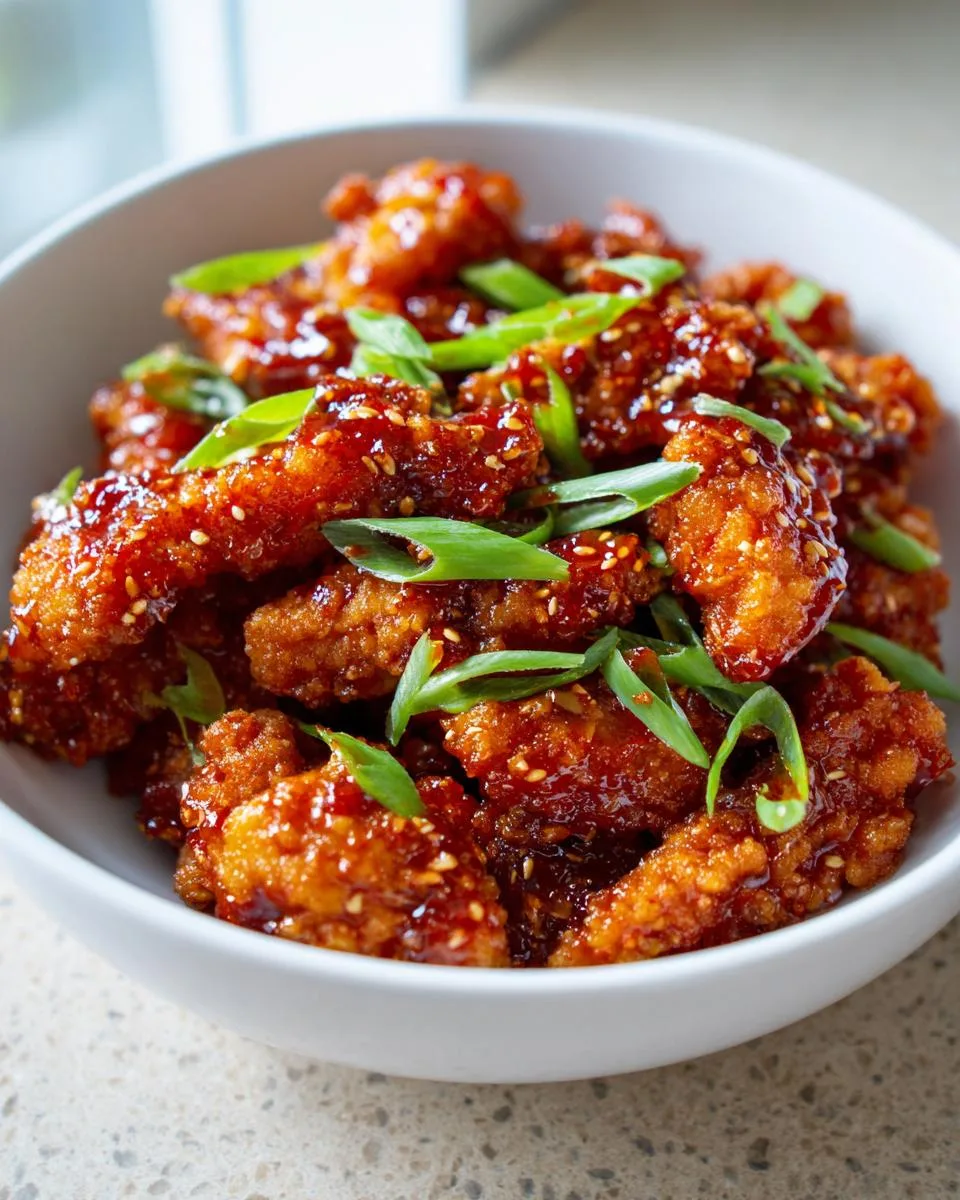
- 1/3 cup sliced green onions – for that fresh pop of color and flavor at the end
See? Nothing fancy or complicated – just good, honest ingredients that come together to create something way greater than the sum of their parts. Now let’s get cooking!
Step-by-Step Sweet Chili Chicken Instructions
Okay, let’s get down to business! I’ll walk you through each step of making this crispy, saucy masterpiece – just like I do when teaching my kids (who now beg to help with the coating part!). Follow these simple steps and you’ll have restaurant-quality sweet chili chicken in no time.
Preparing the Chicken
First things first – let’s get our chicken prepped and coated. In my early days, I used to rush this part, but trust me, taking your time here makes all the difference!
Start by seasoning those beaten eggs generously with salt and pepper – this is where the flavor foundation begins. Then mix your flour and cornstarch together in a shallow bowl (I use a pie plate – perfect width for rolling!). Now comes the fun part: dip each chicken piece in the egg mixture, letting any excess drip off, then roll it in the flour mixture until fully coated. I like to give each piece a little shake to remove loose flour – this prevents clumping later.
Frying to Crispy Perfection
Here’s where the magic happens! Pour enough oil into your deepest pot to reach about 3 inches up the sides and heat it to 350°F. No thermometer? No problem! Drop in a tiny bit of flour – if it sizzles immediately, you’re good to go.
Now, here’s my golden rule: don’t overcrowd the pot! I fry about 7-8 pieces at a time – any more and the temperature drops too much, leaving you with soggy chicken (been there!). Each batch takes about 5 minutes to turn beautifully golden brown. You’ll know they’re ready when they float to the top and sound hollow when tapped. Transfer them to paper towels to drain – this keeps them crispy while you fry the rest.
Coating with Sweet Chili Sauce
The moment we’ve all been waiting for! Once all your chicken is fried and drained, pop it into a large bowl. Pour that gorgeous sweet chili sauce over the top – start with about 3/4 cup, but feel free to add more if you’re a sauce lover like me!
Gently toss everything together – I use two big spoons in a folding motion so each piece gets evenly coated without losing its crispiness. Finish with a generous sprinkling of sliced green onions for that fresh pop of color and flavor. And voila! You’ve just created sweet chili chicken perfection that’ll have everyone at your table reaching for seconds.
Expert Tips for the Best Sweet Chili Chicken
After making this recipe more times than I can count, here are my can’t-live-without tips for absolute perfection:
- Oil thermometer is key: That 350°F sweet spot makes all the difference between soggy and spectacularly crispy
- Double-dip for extra crunch: After the first egg-flour coat, do it again for chicken that stays crispy under all that sauce
- Sauce to taste: Start with 3/4 cup sauce, then add more by the tablespoon until it’s just right for you
- Fry in small batches: I know it’s tempting to rush, but overcrowding will steam your chicken instead of frying it
4 Irresistible Sweet Chili Chicken Secrets for Perfect Crispiness *Note: 56 characters including spaces*
A simple and delicious sweet chili chicken recipe with crispy fried chicken pieces coated in a sweet and tangy chili sauce.
- Total Time: 30 minutes
- Yield: 4 servings 1x
Ingredients
- 1 1/2 pounds boneless skinless chicken breasts, cut into 1 inch pieces
- 2 eggs, lightly beaten
- salt and pepper to taste
- 1/2 cup all purpose flour
- 1/2 cup cornstarch
- oil for frying
- 3/4 cup sweet chili sauce
- 1/3 cup sliced green onions
Instructions
- Place the eggs in a bowl, add salt and pepper to taste.
- Mix the flour and cornstarch together and place in a shallow bowl or on a plate.
- Heat 3 inches of oil in a deep pot to 350 degrees F.
- Dip each piece of chicken into the egg, then roll into the flour mixture. Repeat with all of the chicken.
- Fry 7-8 pieces of chicken at a time for 5 minutes or until golden brown. Drain on paper towels. Repeat the process with all of the chicken.
- Toss the chicken with the chili sauce. Sprinkle with green onions and serve.
Notes
- Adjust the amount of sweet chili sauce to your taste.
- Serve with rice or noodles for a complete meal.
- Prep Time: 15 minutes
- Cook Time: 15 minutes
- Category: Main Course
- Method: Frying
- Cuisine: Asian
- Diet: Low Lactose
Nutrition
- Serving Size: 1 serving
- Calories: 450
- Sugar: 15g
- Sodium: 600mg
- Fat: 20g
- Saturated Fat: 4g
- Unsaturated Fat: 12g
- Trans Fat: 0g
- Carbohydrates: 40g
- Fiber: 2g
- Protein: 30g
- Cholesterol: 150mg
Serving Suggestions for Sweet Chili Chicken
Now that you’ve got this gorgeous, crispy-saucy chicken ready, let’s talk about how to serve it up like a pro! I’ve tried this dish with practically every side imaginable over the years – these are my family’s top picks that turn this chicken into a complete, drool-worthy meal.
Steamed jasmine rice is our absolute must-have. That fluffy, fragrant rice soaks up every last drop of sauce – my kids literally fight over who gets to scrape the bottom of the bowl! For something different, try cloaking rice noodles instead – their smooth texture plays beautifully against the crispy chicken.
When I’m feeling extra fancy (or have veggies threatening to go bad in the fridge), I’ll whip up a quick stir-fried vegetable medley – bell peppers, snap peas, and carrots add such great color and crunch. Just toss them in a screaming hot pan for about 90 seconds with a splash of sesame oil.
For those nights when we want the full takeout experience at home, I’ll grab frozen egg rolls to bake while the chicken fries – the crispy contrast is heavenly! And my husband swears by serving it with a cool cucumber salad (just sliced cukes tossed with rice vinegar, sugar, and sesame seeds) to balance the heat.
Honestly though? Some nights it’s just me, the chicken straight from the bowl, and zero regrets. I won’t tell if you don’t!
Sweet Chili Chicken Variations
One of the best things about this recipe? It’s like a blank canvas for your cravings! Over the years I’ve played around with all sorts of twists – here are my favorite ways to mix things up when we’re feeling adventurous:
- Pineapple party: Toss in some fresh pineapple chunks when coating with sauce – the sweet-tart fruit cuts through the richness beautifully
- Seafood swap: Use shrimp instead of chicken (just reduce frying time to 2-3 minutes) for an easy surf-and-turf vibe
- Heat adjuster: Can’t handle the spice? $1 store brand mild sweet chili sauce works great too (I use this when my mother-in-law visits!)
- Crunch upgrade: Add crushed peanuts or sesame seeds right before serving for extra texture
- Vegetarian flip: Swap chicken for fried cauliflower florets – my meatless Monday secret weapon!
The beauty is that no matter what variation you try, that magical sweet-spicy-savory combo always shines through. My kids actually beg for “experiment nights” now – last week’s pineapple version disappeared before I could even take photos!
Storing and Reheating Sweet Chili Chicken
Okay, let’s be real – leftovers rarely happen with this dish in my house! But when they do (or when I deliberately make extra because meal prep), here’s exactly how I keep that crispy-saucy magic alive:
First – store the chicken and sauce separately if you can. I learned this the hard way after one too many soggy microwave surprises! Pop the plain fried chicken pieces in an airtight container (I love glass lock-top ones) and they’ll stay crispy in the fridge for up to 3 days. Keep the sauce in a little jar or squeeze bottle – it lasts even longer.
Now, for the best reheating method: toss those cold chicken pieces in your air fryer at 375°F for about 3-4 minutes until piping hot and re-crisped. No air fryer? No problem! Spread them on a baking sheet and into a 400°F oven for 5-7 minutes works almost as well. Then just drizzle with room-temp sauce – the residual heat will warm it perfectly.
Pro tip: If everything’s already sauced together (we’ve all been there!), reheating in a single layer in the oven at 375°F for 8-10 minutes can salvage some crispness. Just expect it to be a bit softer – still delicious though!
One last thing – never microwave unless you’re okay with rubbery chicken (ask my husband about his infamous “sad lunch” incident). Trust me, those extra few minutes with proper reheating make all the difference between “meh” and “MORE!”
Sweet Chili Chicken Nutritional Info
Okay, let’s talk numbers – but remember, these are just estimates! Depending on how much oil your chicken absorbs or which brand of sweet chili sauce you use, your exact counts might vary a bit. Here’s the nutritional breakdown per serving (about 1/4 of the recipe) based on my standard preparation:
- Calories: About 450 – it’s fried chicken after all, but we’re keeping portions reasonable!
- Protein: 30g – hello, muscle fuel!
- Carbs: 40g – mostly from that delicious sauce and coating
- Sugar: 15g – the sweet in sweet chili comes from somewhere
- Fat: 20g – hey, that’s where the flavor lives
- Sodium: 600mg – so maybe go easy on the soy sauce with your rice
Now, before anyone panics about numbers – remember this is meant to be an occasional treat, not health food! I balance it out with lighter meals earlier in the day when we’re having this for dinner. And if you’re watching specific macros, you can always tweak things like using less sauce or baking instead of frying (though I’ll always vote for the crispy original version!).
The main thing? Enjoy every flavorful bite – life’s too short not to!
Sweet Chili Chicken FAQs
Over the years, I’ve gotten so many great questions about this recipe – let me share the answers to the ones that pop up most often. These are the little tidbits that took me from “okay” to “oh wow!” with this dish!
Can I bake instead of fry?
Absolutely! While frying gives that unbeatable crunch, I’ve had success baking at 425°F on a wire rack (so air circulates) for about 15 minutes, flipping halfway. Just know the texture will be different – still delicious, but more like a sticky glaze than that classic crispy takeout feel.
What’s a gluten-free substitute for flour?
My gluten-free friends swear by a 50/50 blend of rice flour and cornstarch – gives that same light crispiness! Just be sure your sweet chili sauce is GF too (most are, but always check labels).
How spicy is this really?
Most store-bought sweet chili sauces are mild-medium – think more sweet than heat. If you’re nervous, start with half the sauce and add more to taste. My kiddos handle it fine (and they won’t touch spicy foods normally!). For extra kick, add a teaspoon of sriracha to the sauce.
Can I use chicken thighs instead of breasts?
You bet! Thighs actually stay juicier – just trim excess fat and cut into slightly smaller pieces since they take longer to cook through. Dark meat lovers unite!
What if I don’t have cornstarch?
No worries! Just use all flour – you’ll lose a bit of that ultra-crisp texture, but the flavor will still be amazing. If you have potato starch or arrowroot powder, those work too in a pinch.
Share Your Sweet Chili Chicken Experience
You know what makes me happiest about sharing this recipe? Hearing all the ways you’ve made it your own! Whether it’s your first time trying it or you’ve already added it to your weekly rotation (like my neighbor Sarah who texts me every Thursday with “Sweet Chili Chicken night again!”), I’d love to hear how it turned out in your kitchen.
Did your kids gobble it up like mine do? Found an amazing new variation we should try? Maybe you discovered the perfect side dish pairing? Drop a comment below – I read every single one while sipping my morning coffee (and often end up scribbling new ideas in my stained recipe notebook!).
And if you snapped a photo of your crispy-saucy masterpiece, tag me @FrostyRecipes on Instagram – nothing makes my day like seeing your creations pop up in my feed! It’s like having a virtual potluck with friends from all over. Who knows – your version might just inspire someone else’s new favorite dinner!
If you want to see more behind-the-scenes kitchen chaos, feel free to follow along on Facebook!
However you choose to share, just know I’m cheering you on from my flour-dusted kitchen. Happy cooking, friends!