Mornings in my house are pure chaos – backpacks flying, juice spills, and at least one missing shoe. That’s why these apple peanut butter bars became my secret weapon. They’re the perfect grab-and-go breakfast that actually keeps everyone full until lunch (and trust me, that’s saying something with my kids!).

I stumbled on this recipe one desperate school morning when we were down to just a few apples and some peanut butter. Now? These sweet, hearty bars have become our weekday staple. The best part? You probably have everything you need in your pantry right now – rolled oats, eggs, milk, and those apples languishing in your fruit bowl.
What I love most is how these bars feel like a treat but pack serious nutrition. The peanut butter gives them protein, apples add fiber, and oats keep you energized. Plus, they smell amazing while baking – like a cozy fall morning, even in July!
Table of Contents
Table of Contents
Why You’ll Love These Apple Peanut Butter Bars
Let me count the ways these bars will make your mornings better:
- Quick magic: You can mix the batter faster than it takes to find matching socks (we’ve all been there!)
- Pantry heroes: Uses basic ingredients you likely have right now – no special trips to the store
- Kid-approved: My picky eaters think they’re getting dessert for breakfast (shhh!)
- Meal-prep dream: Make a batch Sunday night and grab all week – they actually get better as they sit
- Perfect texture: Chewy from the oats, soft from the apples, with just the right peanut butter punch
Seriously, these bars solve so many morning problems I should patent them! You can see more of our favorite quick recipes over on our Facebook page!
Ingredients for Apple Peanut Butter Bars
Here’s everything you’ll need to make these magical breakfast bars. I’ll bet half these ingredients are already in your kitchen!
- 2 large eggs: Room temperature works best – they mix into the batter more smoothly
- 1/3 cup peanut butter: Creamy or crunchy both work (I’m team creamy for these bars)
- 1/3 cup packed brown sugar: Dark brown sugar gives the best molasses flavor
- 1 cup milk: Any kind you have – whole milk makes them extra rich
- 2 cups rolled oats: Not instant! Old-fashioned oats give perfect texture
- 1 cup finely diced apple: I love Honeycrisp or Granny Smith – peel left on for extra fiber
- 1 teaspoon cinnamon: The warm spice that makes the apples sing
- 1 teaspoon baking powder: Our little lift secret!
Quick swap: Almond butter works great if you prefer it – just use the same amount. And if you’re out of brown sugar? White sugar plus 1 tsp molasses does the trick in a pinch!
How to Make Apple Peanut Butter Bars

Okay friends, let’s get baking! These apple peanut butter bars couldn’t be simpler, but I’ve got some tricks to make them perfect every time. First rule of breakfast baking club? Preheat that oven! Set it to 350°F (175°C) right now and grease your 8×8 baking dish while you’re at it. I like to use butter or cooking spray – just enough to make sure our bars pop right out later.
Step 1: Mix Wet Ingredients
Grab your favorite mixing bowl (mine’s the blue speckled one my grandma gave me) and let’s make magic. Whisk together the eggs, peanut butter, brown sugar, and milk until it’s smooth as silk. No lumps allowed! You’ll know it’s ready when the mixture looks like creamy caramel and falls off the whisk in ribbons. Pro tip: If your peanut butter is stubbornly clumpy, microwave it for 10 seconds first – just don’t let it get hot!
Step 2: Add Dry Ingredients
Here’s where gentle hands win the race. Dump in your oats, cinnamon, and baking powder all at once, then fold them in with a rubber spatula. I make about 15 slow, sweeping motions – enough to combine everything but stop before the oats lose their personality. Overmixing makes tough bars, and nobody wants hockey pucks for breakfast!
Step 3: Fold in Apples
Now for the star of the show! Add those gorgeous diced apples and fold them in just until evenly distributed HUGE flavor tip: Save a handful of apple pieces to sprinkle on top before baking for extra texture and presentation points. The apples should peek through the batter like little treasures waiting to be discovered.
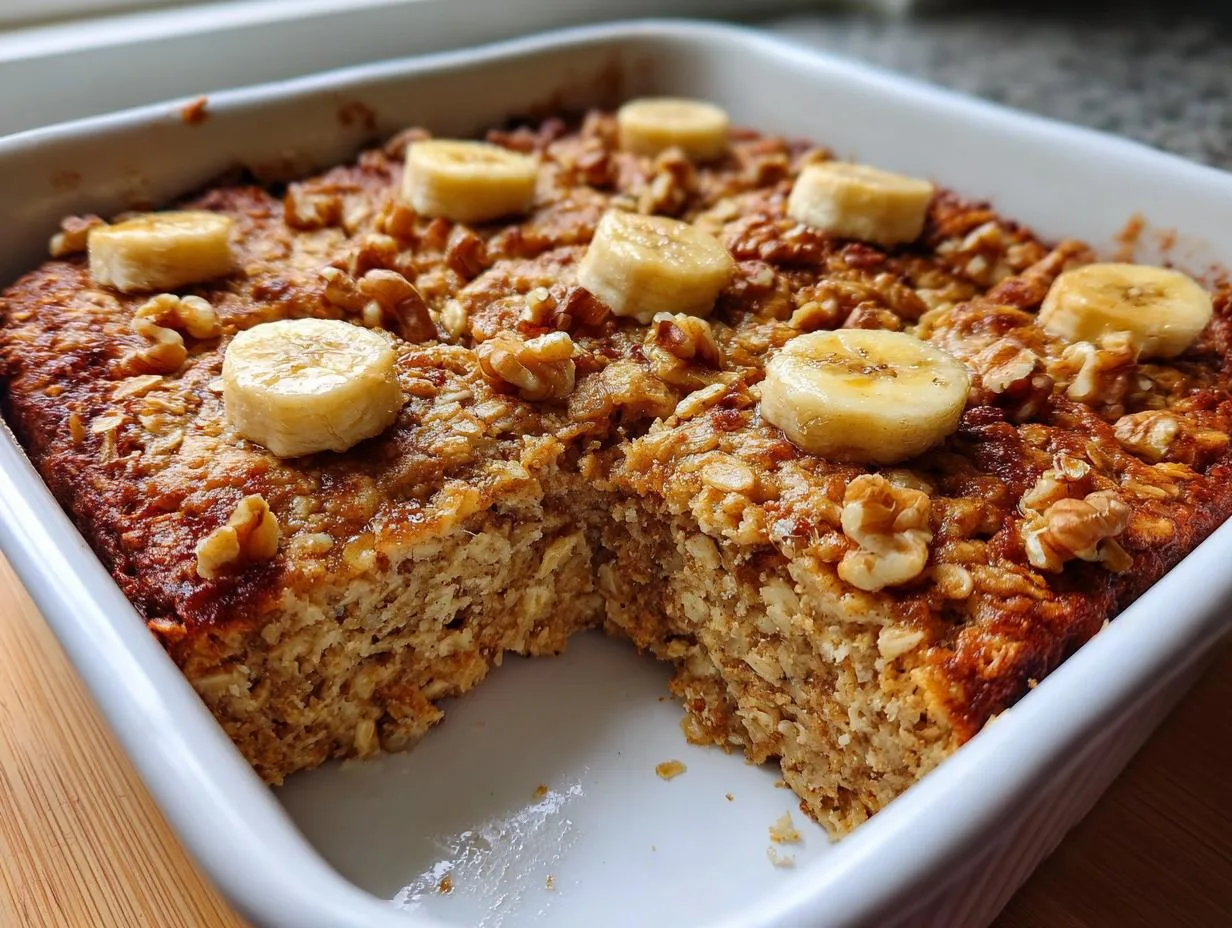
Step 4: Bake and Cool
Pour your batter into the prepared pan, smoothing the top with your spatula. Bake for 35-40 minutes until the edges pull away slightly and the top turns golden brown. Your kitchen will smell like autumn paradise! Here’s the hard part – let it cool COMPLETELY (about 30 minutes) before slicing. I know it’s tempting, but rushing this step leads to crumbly disasters. Promise me you’ll wait!
Tips for Perfect Apple Peanut Butter Bars
After making dozens of batches (my kids beg for these weekly!), I’ve learned a few tricks:
- Apple choice matters: Crisp varieties like Honeycrisp hold their shape better than softer apples – trust me, mushy apple bits ruin the texture!
- Oven thermometer check: Since ovens lie, use a thermometer to ensure 350°F. Too hot = dry bars, too cool = soggy middles.
- Storage smarts: Layer cooled bars between parchment in an airtight container – they’ll stay fresh for 3 days (if they last that long!).
- Freezer hack: Wrap individual bars in foil and freeze for up to a month – perfect for emergency breakfasts!
Bonus tip: For extra decadence, drizzle melted peanut butter on top before serving. You’re welcome!
Print
10-Minute Apple Peanut Butter Bars: Secret Morning Bliss
Sweet and hearty breakfast bars with apples and peanut butter, perfect for busy mornings.
- Total Time: 45-50 minutes
- Yield: 12 bars 1x
Ingredients
- 2 large eggs
- 1/3 cup peanut butter
- 1/3 cup brown sugar
- 1 cup milk
- 2 cups rolled oats
- 1 cup diced apple
- 1 teaspoon cinnamon
- 1 teaspoon baking powder
Instructions
- Preheat your oven to 350°F (175°C) and grease a square baking dish.
- In a medium bowl, whisk together the eggs, brown sugar, milk, and peanut butter until smooth.
- Gently fold in the rolled oats, cinnamon, and baking powder.
- Stir in the diced apples.
- Pour the mixture into the greased baking dish, spreading it evenly.
- Bake for 35 to 40 minutes, or until set and lightly golden.
- Allow to cool slightly before slicing.
Notes
- Store in an airtight container for up to 3 days.
- Substitute almond butter for peanut butter if preferred.
- Prep Time: 10 minutes
- Cook Time: 35-40 minutes
- Category: Breakfast
- Method: Baking
- Cuisine: American
- Diet: Vegetarian
Nutrition
- Serving Size: 1 bar
- Calories: 180
- Sugar: 10g
- Sodium: 80mg
- Fat: 6g
- Saturated Fat: 1.5g
- Unsaturated Fat: 3.5g
- Trans Fat: 0g
- Carbohydrates: 25g
- Fiber: 3g
- Protein: 6g
- Cholesterol: 35mg
Variations on Apple Peanut Butter Bars
One of my favorite things about this recipe is how easily you can mix it up! Here are some delicious twists we’ve tried:
- Crunch time: Add 1/4 cup chopped walnuts or pecans for extra texture – my husband loves this version!
- Sweet swap: Replace brown sugar with pure maple syrup (use 1/4 cup) for deeper flavor
- Chocolate fix: Stir in 1/3 cup mini chocolate chips because… well, chocolate!
- Spice it up: Add 1/4 teaspoon nutmeg or cardamom with the cinnamon
The possibilities are endless – make them your own! If you enjoy baking with apples, you might also love this apple crumb cake recipe.

Storing and Reheating Apple Peanut Butter Bars
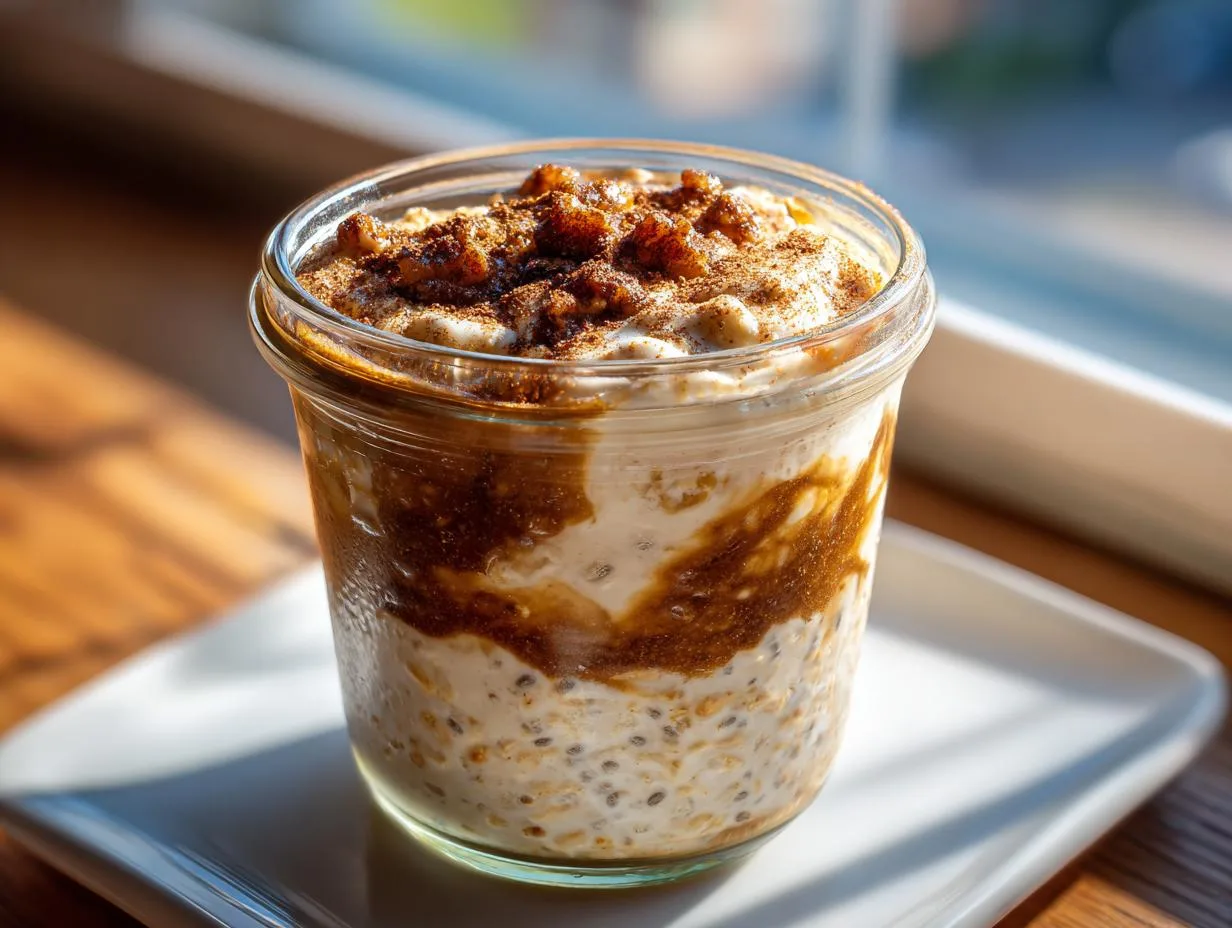
Here’s how to keep these bars tasting fresh – if they last that long in your house! Once completely cooled, store them in an airtight container at room temperature for up to 3 days. I like layering them between parchment paper so they don’t stick together. For longer storage, wrap individual bars tightly in foil and freeze for up to a month – they’re perfect straight from the freezer for an instant breakfast!
Want that fresh-from-the-oven warmth? Pop a bar in the microwave for 15-20 seconds or toast it lightly in a dry skillet. The edges get delightfully crisp while the center stays soft and chewy. My kids swear they taste even better the next day!
Nutritional Information for Apple Peanut Butter Bars
Each of these hearty bars packs serious nutrition while tasting like a treat! Here’s the breakdown per serving (about 1 bar):
- 180 calories – perfect fuel to start your day
- 6g protein – thanks to peanut butter and eggs
- 25g carbs – with 3g fiber from oats and apples
- 6g fat – the good kind that keeps you full
Note: Values are estimates and may vary slightly based on ingredient brands and exact measurements. For precise counts, I recommend using a nutrition calculator with your specific ingredients.
FAQs About Apple Peanut Butter Bars
I get asked about these bars all the time! Here are answers to the most common questions:
Can I Make These Bars Vegan?
Absolutely! Swap the eggs for flax eggs (1 tbsp ground flax + 3 tbsp water per egg) and use your favorite plant-based milk. The texture comes out slightly denser but still delicious. I’ve used almond milk with great success!
How Do I Prevent Soggy Bars?
Two secrets: First, dice your apples small (about 1/4 inch pieces) so they distribute moisture evenly. Second – and this is crucial – let the bars cool completely before slicing. I know it’s hard to wait, but that cooling time lets everything set up properly.
Are These Gluten-Free?
They can be! Just make sure your oats are certified gluten-free (oats are naturally GF but often processed in facilities with wheat). All other ingredients are naturally gluten-free, so you’re good to go!
Can I Use Almond Butter Instead?
You bet! Any nut or seed butter works here. Almond butter gives a slightly milder flavor, while sunflower seed butter makes them school-safe for nut-free zones. The texture stays perfect with any swap.
Now it’s your turn – try this recipe and tag me with your creations! I love seeing how you make these bars your own.