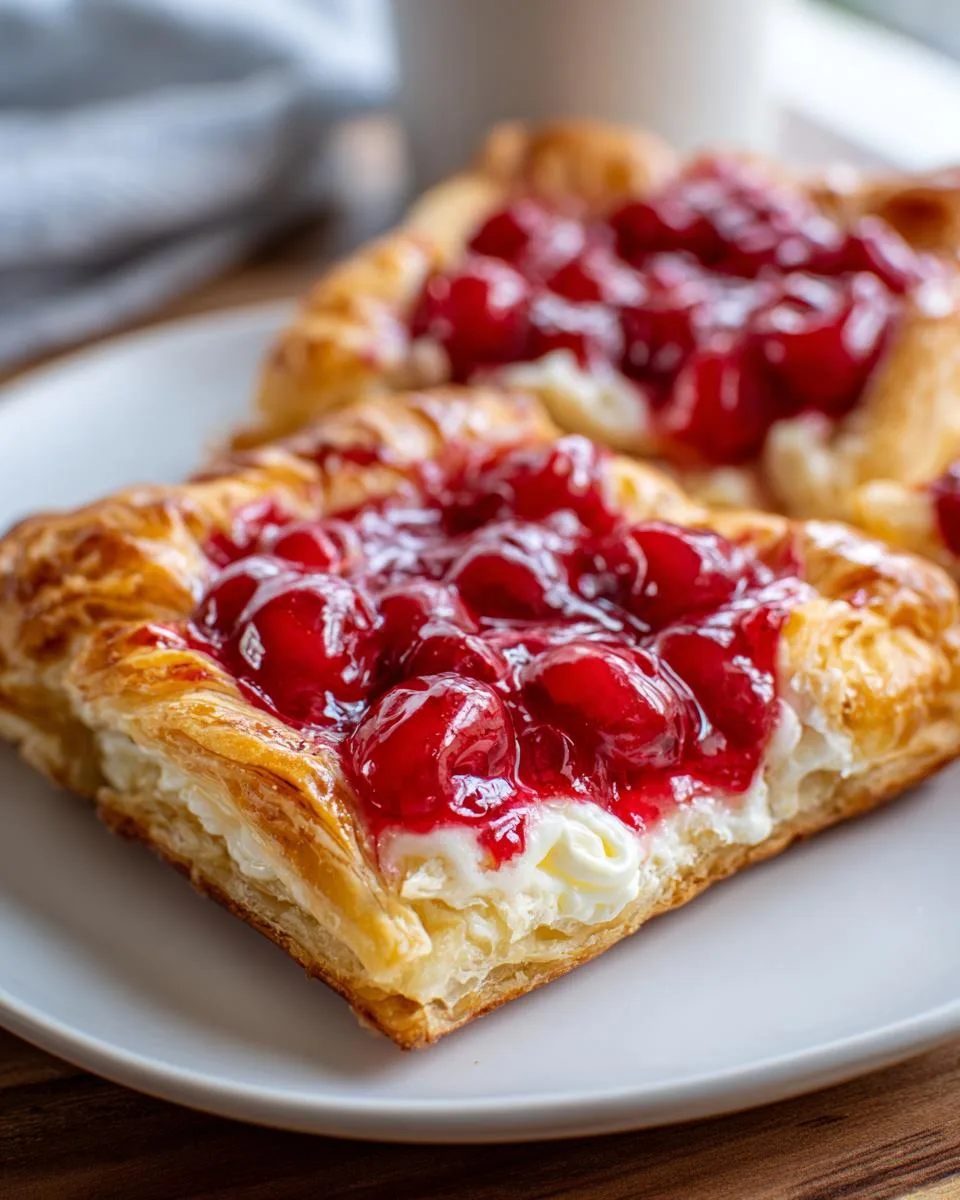
Oh my goodness, have I got a treat for you today! This Cherry Cheese Danish recipe is my go-to when I need something quick, delicious, and just a little bit fancy. Picture this: flaky puff pastry hugging a creamy cheesecake filling, topped with sweet cherry pie filling—it’s like a little bite of heaven! My kids go absolutely wild for these, and honestly? So do I. There’s something magical about pulling these golden beauties out of the oven on a lazy weekend morning. The best part? They’re ridiculously easy to make. Just a few simple ingredients and about 40 minutes stand between you and the most impressive breakfast (or snack… or dessert… who’s judging?) you’ll make all week.

Table of Contents
Table of Contents
Why You’ll Love This Cherry Cheese Danish Recipe
Let me count the ways this recipe will become your new baking best friend:
- Crazy simple: We’re talking 4 main ingredients and about 15 minutes of hands-on time. Even my 7-year-old can help make these!
- Perfect for any occasion: Fancy enough for holiday brunches (hello, Christmas morning!), but easy enough for lazy Sundays in your PJs.
- That wow factor: The golden, flaky pastry with that gorgeous cherry center looks like you spent hours – our little secret!
- Customizable: Swap the cherry filling for whatever fruit you love – I’ve used everything from apple to blueberry with equal success.
Seriously, once you taste that buttery pastry with the sweet-tart cherry and creamy cheese filling, you’ll be hooked. These disappear faster than cookies at my house!
Ingredients for Cherry Cheese Danish Recipe
Gather these simple ingredients – I bet you might already have most in your kitchen right now!
- 1 sheet puff pastry (thawed): That frozen magic in your freezer becomes golden, flaky perfection
- 8 oz cream cheese (softened): Leave it out for 30 minutes – no lumps in our creamy filling!
- 1/4 cup granulated sugar: Just enough sweetness to balance the tart cherries
- 1 tsp vanilla extract: My secret for that “bakery-quality” flavor
- 1 cup cherry pie filling: The star of the show – I like the canned kind for convenience
- 1 egg (for egg wash): That beautiful golden shine is just one beaten egg away
See? Nothing fancy – just pantry staples that transform into something extraordinary!
Equipment You’ll Need
Don’t worry – no fancy gadgets required here! Just grab these basic tools from your kitchen:
- Baking sheet: Any standard size will do – no parchment needed if it’s nonstick
- Mixing bowl: For that dreamy cream cheese filling
- Pastry brush: Makes applying the egg wash a breeze (a clean paintbrush works in a pinch!)
- Knife or pizza cutter: For dividing the puff pastry into perfect squares
That’s it – you’re officially equipped for danish-making greatness!
How to Make Cherry Cheese Danish Recipe
Alright, let’s get baking! This is where the magic happens – turning those simple ingredients into golden, flaky pockets of joy. Trust me, it’s easier than you think!
Preparing the Pastry and Filling
First, crank that oven to 375°F (190°C) – we want it nice and hot when our danishes go in. While it heats, unroll your puff pastry on a lightly floured surface. Give it a gentle roll with your rolling pin just to smooth out any creases – no need to go crazy thin! Cut it into four perfect squares (I use a pizza cutter – so easy!).
Now for the filling: beat together that softened cream cheese, sugar, and vanilla until it’s smooth as silk. Pro tip: If your cream cheese isn’t quite soft enough, zap it in the microwave for 10-second bursts – just don’t let it melt!
Assembling the Danishes
Here comes the fun part! Spoon about a tablespoon of cream cheese mixture onto the center of each pastry square. Top with a dollop of cherry pie filling – about a teaspoon does the trick. Now, fold two opposite corners toward the center to make cute little pockets – don’t worry if they don’t meet perfectly!
Pinch the seams gently to seal everything in. If they won’t stay put, dip your finger in water and moisten the dough before pinching. See? No fancy pastry skills required!
Baking to Perfection
Transfer your little masterpieces to a baking sheet (no parchment needed if it’s nonstick). Brush each one lightly with beaten egg – this gives them that gorgeous golden glow. Pop them in the oven for 20-25 minutes until they’re puffed up like little golden pillows and the bottoms are crisp.
Resist the urge to eat them immediately (I know, it’s hard!) – let them cool for about 5 minutes. That filling gets lava-hot! Now take your first bite and prepare to be amazed at what you’ve created.
Tips for the Best Cherry Cheese Danish Recipe
Oh honey, let me share my hard-earned secrets for danish perfection! First, always thaw puff pastry overnight in the fridge – never at room temp (it gets sticky!). When assembling, don’t overfill those squares or you’ll have cherry explosions – trust me, I’ve been there! And that egg wash? Apply it lightly – too much makes things soggy. The biggest tip? Let them cool just 5 minutes before diving in. That cream cheese filling needs a moment to set up, but wait too long and you’ll miss that magical warm, flaky bite!
Print
Irresistible Cherry Cheese Danish Recipe in Just 40 Minutes
A simple and delicious Cherry Cheese Danish made with puff pastry, cream cheese, and cherry pie filling. Perfect for breakfast or a sweet snack.
- Total Time: 40 mins
- Yield: 4 danishes 1x
Ingredients
- 1 sheet puff pastry (thawed)
- 1 cup cherry pie filling (canned)
- 8 oz cream cheese (softened)
- 1/4 cup granulated sugar
- 1 tsp vanilla extract
- 1 egg (for egg wash)
Instructions
- Preheat the oven to 375°F (190°C).
- Roll out the thawed puff pastry on a floured surface and cut into four 4×4-inch squares.
- In a bowl, mix softened cream cheese, sugar, and vanilla until smooth.
- Place a spoonful of cream cheese mixture in the center of each square and add a dollop of cherry pie filling on top.
- Fold the corners of the pastry over the filling to create pockets and pinch to seal.
- Brush each danish with beaten egg for a golden finish.
- Bake for 20-25 minutes or until golden brown.
Notes
- Let the danishes cool slightly before serving.
- Store leftovers in an airtight container for up to 2 days.
- Use fresh puff pastry for best results.
- Prep Time: 15 mins
- Cook Time: 25 mins
- Category: Breakfast
- Method: Baking
- Cuisine: American
- Diet: Vegetarian
Nutrition
- Serving Size: 1 danish
- Calories: 320
- Sugar: 18g
- Sodium: 210mg
- Fat: 19g
- Saturated Fat: 8g
- Unsaturated Fat: 9g
- Trans Fat: 0g
- Carbohydrates: 32g
- Fiber: 1g
- Protein: 5g
- Cholesterol: 75mg
Ingredient Substitutions and Variations
One of my favorite things about this recipe is how easily you can switch it up! Swap the cherry filling for blueberry or apple pie filling – they’re equally delicious. Feeling fancy? Try almond extract instead of vanilla for a subtle nutty flavor. For a citrus twist, mix in some lemon zest with the cream cheese. And if you’re dairy-free, vegan cream cheese works surprisingly well here (just add an extra tablespoon of sugar). The possibilities are endless!
Serving and Storing Cherry Cheese Danish Recipe

Oh, these danishes are absolute heaven when served warm – that flaky pastry practically melts in your mouth! I always let them cool just long enough so nobody burns their tongue (learned that lesson the hard way). If you’ve got leftovers (unlikely in my house!), pop them in an airtight container for up to 2 days. They’ll lose some crispness, but a quick 10-second zap in the microwave brings back that fresh-baked magic. Pro tip: Store them single-layer – stacking makes the bottoms soggy!
Cherry Cheese Danish Recipe FAQs
Can I use homemade cherry pie filling?
Absolutely! Homemade filling works beautifully – just make sure it’s not too runny or it’ll leak out during baking. My grandma’s secret? Add a teaspoon of cornstarch to thicken it up perfectly.
Why did my danishes puff up unevenly?
Don’t panic! This happens when the pastry folds aren’t sealed tightly enough. Next time, press those edges firmly and use a dab of water to help them stick. Even lopsided danishes taste amazing!
Can I make these ahead of time?
You sure can! Assemble them the night before, cover tightly with plastic wrap, and refrigerate. In the morning, just brush with egg wash and bake – fresh danishes with zero morning hassle!
What’s the best way to reheat leftovers?
Pop them in a 350°F oven for 5-7 minutes to revive that flaky texture. The microwave works in a pinch, but they’ll lose some crispness. Honestly? They rarely last long enough to need reheating at my house!
Nutritional Information
Just so you know what you’re biting into, each delicious danish comes in at about 320 calories – totally worth it if you ask me! They’ve got 19g of fat (that flaky pastry goodness), 32g carbs, and 5g protein per serving. Keep in mind these numbers are estimates since ingredients can vary. My philosophy? Life’s too short to stress over every calorie when you’re enjoying homemade treats this good! If you want to see more of our recipes, check out our Facebook page!
Share Your Cherry Cheese Danish Creations
I’d love to hear how your danishes turned out! Did you stick with classic cherry or try a fun variation? Drop a comment below – your baking adventures might just inspire someone else!