There’s something magical about a stack of old-fashioned pancakes on a lazy Sunday morning. That golden-brown perfection, the way they soak up maple syrup just right—it’s pure comfort food at its finest. I still remember standing on a chair as a kid, helping my mom flip pancakes while the kitchen filled with that sweet, buttery smell. Now, I get to share that same joy with my own little ones.
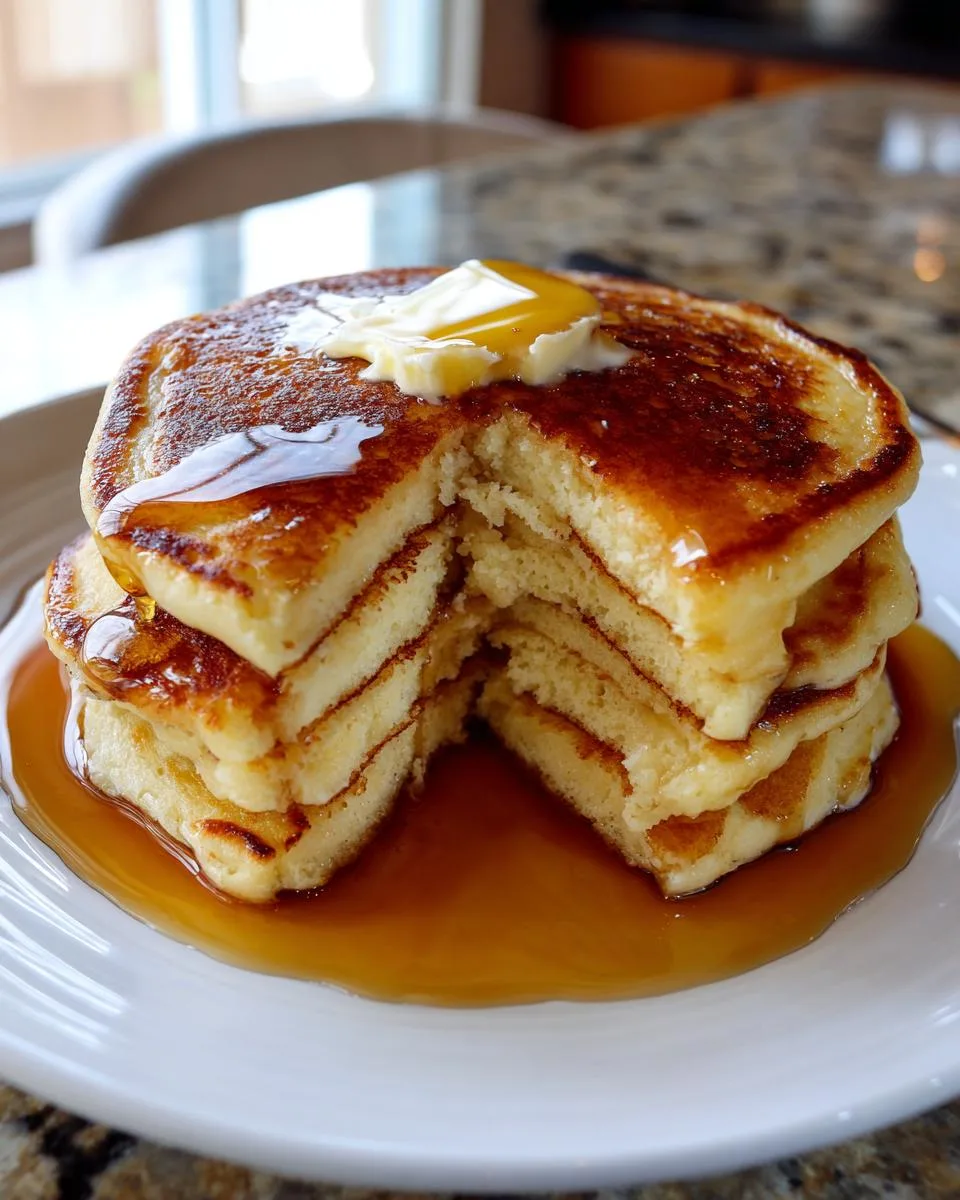
These aren’t just any pancakes—they’re the kind your grandma would make, with that perfect fluffy texture and just a hint of vanilla. Simple ingredients come together to create something truly special, the kind of breakfast that turns ordinary mornings into little celebrations. Whether it’s a special occasion or just because, old-fashioned pancakes always feel like love on a plate.
Table of Contents
Table of Contents
Ingredients for Old-Fashioned Pancakes
What I love most about these pancakes is how simple the ingredients are—you probably have everything in your pantry right now! But don’t let that simplicity fool you. Each one plays a special role in creating that perfect fluffy texture we all crave.
The dry team (aka the structure squad)
- 1½ cups all-purpose flour – The backbone of our pancakes
- 3½ teaspoons baking powder – Our magic fluff-maker (yes, that extra half teaspoon matters!)
- 1 tablespoon sugar – Just enough to balance the flavors
- ½ teaspoon salt – The flavor booster that makes everything pop
The wet team (the moisture masters)
- 1¼ cups milk – Whole milk makes them extra rich, but any kind works (see my buttermilk note below!)
- 1 egg – Lightly beaten before mixing in
- 3 tablespoons melted butter – Plus extra for cooking (because butter makes everything better)
- 1 teaspoon vanilla extract – Optional, but adds that special something
A quick tip from my kitchen to yours—measure your flour by spooning it into the cup and leveling it off. Too much flour is the #1 reason pancakes turn out dense. And if you’re feeling fancy, swap the milk for buttermilk—it gives the pancakes this incredible tang and tenderness that’s absolutely worth trying!
How to Make Old-Fashioned Pancakes

Now comes the fun part—turning those simple ingredients into golden, fluffy perfection! I’ve made these old-fashioned pancakes more times than I can count, and I’ve learned a few tricks along the way that make all the difference. Follow these steps, and you’ll be flipping like a pro in no time.
Mixing the Batter
First things first—grab two bowls. In the larger one, whisk together all your dry ingredients (that’s the flour, baking powder, sugar, and salt). Give them a good mix—this helps distribute the baking powder evenly so every bite rises beautifully.
In the second bowl, whisk together your wet ingredients—the milk, egg, melted butter, and vanilla if you’re using it. Here’s my little secret: I like to whisk the egg first before adding the other liquids. It just blends smoother that way.
Now, pour the wet mixture into the dry ingredients and stir gently with a wooden spoon or rubber spatula. Here’s where most people go wrong—they overmix! Stop when you’ve just combined everything, even if there are still a few lumps. Those lumps will disappear as the batter rests, and overmixing makes tough pancakes. Trust me on this one!
Cooking the Pancakes
Heat your griddle or frying pan over medium heat—this is crucial. Too hot, and they’ll burn before cooking through; too cool, and they won’t get that gorgeous golden color. I test mine by flicking a few drops of water—when they dance across the surface, you’re ready.
Add just a pat of butter—enough to coat the pan lightly but not so much that it pools. Pour about ¼ cup of batter per pancake (I use a measuring cup for perfect circles). Now here’s the hardest part—waiting! Don’t touch them until you see bubbles forming across the surface and the edges look set, about 2 minutes.
When it’s time to flip, do it confidently with one smooth motion. They’ll need another minute or two on the second side—you’ll know they’re done when they’re golden brown and puffed up beautifully. Stack them high, and serve immediately with all your favorite toppings!
Tips for Perfect Old-Fashioned Pancakes
After years of flipping pancakes (and yes, a few pancake disasters along the way), I’ve learned these little tricks make all the difference between good pancakes and wow pancakes. Here are my can’t-live-without tips:
- Let the batter rest – That 5-minute pause after mixing gives the flour time to hydrate and the baking powder to start working its magic. You’ll notice the batter thickens slightly – that’s when you know it’s ready to make those extra-fluffy pancakes.
- Buttermilk is your secret weapon – Swap the regular milk for buttermilk if you have it. The acidity reacts with the baking powder to create the most tender, slightly tangy pancakes. No buttermilk? No problem! Stir 1 tablespoon lemon juice or vinegar into your milk and let it sit for 5 minutes.
- Control your heat – Medium heat is the sweet spot. If your pancakes are browning too fast outside but staying raw inside, turn it down. First pancake a pale disappointment? Bump the heat up slightly. Every stove is different, so adjust as you go.
- Don’t press them down! – I know it’s tempting to flatten those puffy cakes with your spatula, but resist! Those air pockets are what make them light and fluffy. Just flip once and let them be.
- Keep them cozy – If you’re making a big batch, keep finished pancakes warm in a single layer on a baking sheet in a 200°F oven. They’ll stay perfect while you cook the rest.
One last piece of advice? The first pancake is always the “test” pancake – don’t stress if it’s not perfect! Even my grandma used to say the first one was for the cook to snack on while making the rest.
Print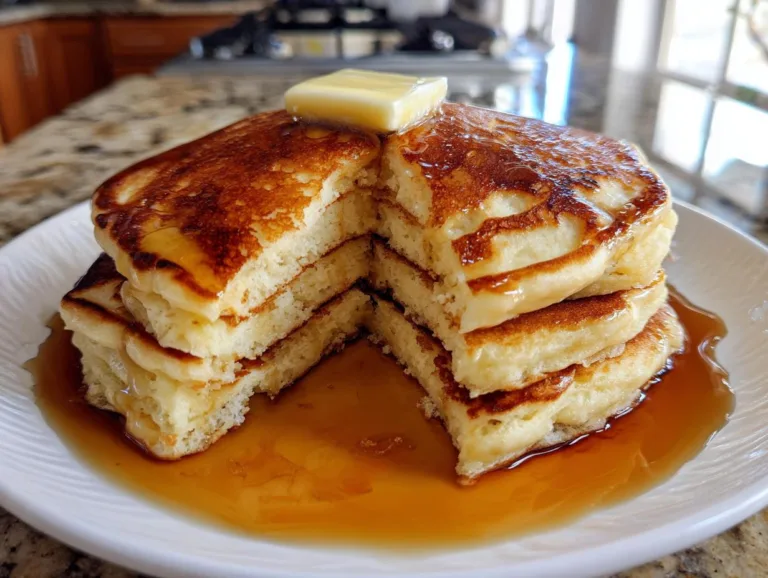
Fluffy Old-Fashioned Pancakes Recipe with 3 Secret Tips
Classic old-fashioned pancakes, fluffy and golden, perfect for a family breakfast.
- Total Time: 15 minutes
- Yield: 8–10 pancakes 1x
Ingredients
- 1½ cups all-purpose flour
- 3½ teaspoons baking powder
- 1 tablespoon sugar
- ½ teaspoon salt
- 1¼ cups milk (or buttermilk)
- 1 egg
- 3 tablespoons melted butter (plus more for cooking)
- 1 teaspoon vanilla extract (optional)
Instructions
- In a large bowl, whisk the flour, baking powder, sugar, and salt together.
- In a separate bowl, whisk the egg, milk, and melted butter. Add vanilla extract if using.
- Pour the wet mixture into the dry ingredients. Stir gently until just combined (a few lumps are fine).
- Heat a nonstick pan or griddle over medium heat. Lightly butter the surface.
- Pour ¼ cup batter per pancake onto the pan. Cook until bubbles form and edges set (about 2 minutes).
- Flip and cook the other side for 1-2 minutes until golden brown.
- Serve warm with butter, maple syrup, or fresh fruit.
Notes
- For fluffier pancakes, let the batter rest for 5 minutes before cooking.
- Use buttermilk for a tangier flavor and extra tenderness.
- Adjust heat as needed to prevent burning.
- Prep Time: 5 minutes
- Cook Time: 10 minutes
- Category: Breakfast
- Method: Stovetop
- Cuisine: American
- Diet: Vegetarian
Nutrition
- Serving Size: 2 pancakes
- Calories: 220
- Sugar: 5g
- Sodium: 380mg
- Fat: 8g
- Saturated Fat: 4.5g
- Unsaturated Fat: 2.5g
- Trans Fat: 0g
- Carbohydrates: 30g
- Fiber: 1g
- Protein: 6g
- Cholesterol: 55mg
Ingredient Substitutions
Life happens, and sometimes you’re missing an ingredient or need to accommodate dietary needs. Don’t worry—I’ve tested plenty of swaps over the years! Here are my favorite substitutions that still deliver delicious old-fashioned pancakes (with a heads-up about how they might change things).
When you’re out of milk
That carton of milk suddenly empty? Been there! For every cup of milk, you can use:
- Buttermilk – Makes them extra tender with a lovely tang (reduce baking powder to 2 tsp and add ½ tsp baking soda)
- Almond milk or oat milk – Works great, though pancakes may brown faster (I like vanilla almond milk for subtle sweetness)
- Plain yogurt thinned with water – About ½ cup yogurt + ½ cup water per cup of milk
Butter alternatives
If you’re short on butter or avoiding dairy, try:
- Applesauce – Use equal parts (3 tbsp) but expect slightly denser, cake-like texture
- Coconut oil – Melted and cooled works beautifully (just a hint of tropical flavor)
- Vegetable oil – Direct 1:1 swap, though you’ll miss some richness
Egg replacements
For our vegan friends or egg-free mornings:
- Flax egg – 1 tbsp ground flax + 3 tbsp water (let sit 5 mins first)
- Mashed banana – About ¼ cup per egg (adds sweetness and moisture)
- Applesauce – ¼ cup per egg (works best with an extra ½ tsp baking powder)
A quick word of wisdom—every substitution changes the texture slightly. Dairy-free versions might not brown as deeply, and eggless batters often benefit from an extra minute of resting. But the most important thing? They’ll still taste wonderful, especially when topped with maple syrup and shared with people you love!
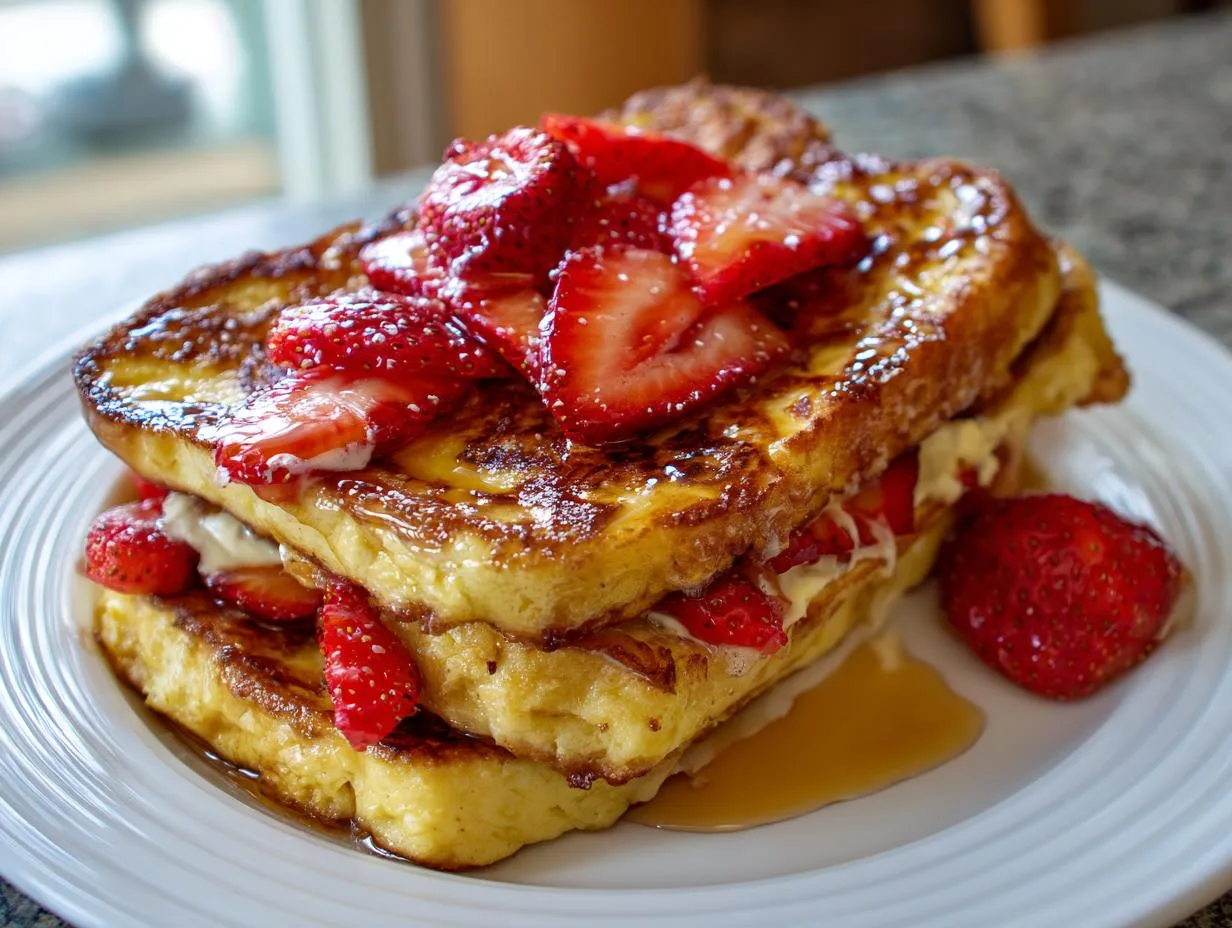
Serving Suggestions for Old-Fashioned Pancakes
Now comes the best part—dressing up those gorgeous golden pancakes! I love how old-fashioned pancakes become a blank canvas for all sorts of delicious toppings. Whether you’re team sweet or prefer a savory twist, here are my favorite ways to serve them up.
The Classic Sweet Treatment
You can’t go wrong with these timeless combos:
- Maple syrup and butter – The OG pairing! Use real maple syrup if you can—that deep caramel flavor makes all the difference. Pro tip: warm the syrup slightly before serving.
- Fresh berries and whipped cream – Strawberries, blueberries, or raspberries add brightness. I like to macerate them with a little sugar first to create a juicy syrup.
- Bananas and peanut butter – Slice bananas on top and drizzle with warm peanut butter. My kids go nuts for this combo!
- Cinnamon sugar dusting – Simple but magical. Mix 2 parts sugar to 1 part cinnamon and sprinkle generously.
Fun Twists for Special Mornings
When I want to make breakfast feel extra festive:
- Lemon curd and powdered sugar – The tartness cuts through the richness beautifully.
- Chocolate chips and marshmallow fluff – Basically dessert for breakfast (worth it!).
- Apple compote and caramel sauce – Like apple pie in pancake form.
- Coconut flakes and mango – Tropical vibes that transport you somewhere sunny.
Savory Pancake Love
Not everyone has a sweet tooth first thing! Try these savory options:
- Crispy bacon and maple syrup – The salty-sweet combo is legendary for good reason.
- Fried egg and hot sauce – Runny yolk over pancakes? Trust me, it works.
- Cheese and chives – Fold shredded cheddar into the batter and top with fresh herbs.
- Avocado and everything bagel seasoning – Surprisingly delicious with a squeeze of lemon.
My biggest serving tip? Set up a pancake topping bar with small bowls of all the fixings. It turns breakfast into an interactive experience—kids especially love customizing their stacks. And don’t forget the coffee! A hot cup of joe is the perfect partner to these old-fashioned pancakes, no matter how you top them.
Storing and Reheating Old-Fashioned Pancakes
Let’s be real—sometimes we make way too many pancakes (not that I’m complaining!). The good news? These old-fashioned beauties save beautifully, so you can enjoy them all week long. Here’s exactly how I store and revive leftover pancakes so they taste just-made.
Keeping Them Fresh
For short-term storage, I stack cooled pancakes with small squares of parchment between each one—this keeps them from sticking together like glue. Toss them in an airtight container or zip-top bag, and they’ll stay fresh in the fridge for 2-3 days. Want to peek inside? Look for condensation—that’s your cue they’re getting soggy and need eating pronto!
Freezing Like a Pro
Freezing pancakes is one of my favorite kitchen hacks! Here’s my foolproof method:
- Cool pancakes completely (hot pancakes create ice crystals = soggy mess)
- Layer between parchment paper—this is non-negotiable unless you want a pancake brick
- Pop them in a freezer bag, squeeze out alllll the air, and label with the date
They’ll keep for about 2 months this way. Need just one or two? Freeze them individually first on a baking sheet, then transfer to a bag—no more chiseling apart frozen stacks!
Reheating Magic
Here’s how I bring those pancakes back to life:
- Toaster – My go-to for single servings! Just pop frozen pancakes straight in (no thawing needed) on medium setting. Perfect crisp edges in minutes.
- Oven – Great for batches. Arrange on a baking sheet at 350°F for 5-8 minutes if refrigerated, 10-12 if frozen. Spritz with water first to prevent drying out.
- Skillet – A pat of butter in the pan over medium-low heat revives them beautifully. Cover briefly to warm through without overcooking.
Microwave tip? Only if you’re desperate! 20 seconds per pancake with a damp paper towel on top helps, but they’ll never be quite as perfect. My kids swear by reheating them with a handful of chocolate chips sandwiched between—the chips melt into gooey perfection while warming the pancakes. Breakfast genius!
One last storage secret—freeze leftover batter too! Portion it into a muffin tin (¼ cup per slot), freeze solid, then transfer to a bag. Thaw overnight in the fridge when pancake cravings strike. Stir gently before cooking—you might need to add a splash of milk if it thickens too much.
Old-Fashioned Pancakes Nutritional Information
Now, I’m no nutritionist—just a pancake-loving mom who likes to know what’s going into our family breakfasts! These numbers are estimates based on standard ingredients, but remember—your actual results might vary depending on exact measurements and toppings (and let’s be honest, who measures syrup perfectly?). Here’s the breakdown for two pancakes, which is usually what my kids gobble up in one sitting:
- Calories: 220 – Not bad for a satisfying breakfast!
- Fat: 8g (4.5g saturated) – That’s the butter doing its delicious work
- Carbohydrates: 30g – Mostly from the flour and that touch of sugar
- Fiber: 1g – Whole wheat flour would bump this up if you’re feeling healthy
- Protein: 6g – The egg and milk team up nicely here
- Sugar: 5g – Mostly natural from the milk
- Sodium: 380mg – The salt and baking powder contribute here
A little nutrition pro tip from my kitchen—pair these with some protein like eggs or Greek yogurt to balance things out. And if you’re watching sugar intake, try topping with fresh fruit instead of syrup. But hey, it’s breakfast—sometimes you just need those cozy carbs to start the day right!
FAQs About Old-Fashioned Pancakes
Over the years, I’ve gotten so many great questions about making perfect old-fashioned pancakes. Here are the ones that pop up most often in my kitchen (and my honest answers after countless pancake experiments!):
Why did my pancakes turn out flat?
Oh honey, we’ve all been there! Flat pancakes usually mean your baking powder has gone stale (it loses its power after about 6 months). Test it by mixing 1 tsp with hot water—if it doesn’t bubble vigorously, toss it. Also check that you’re not overmixing the batter—those little lumps are actually your friends!
Can I freeze the pancake batter?
Absolutely! I freeze batter in mason jars or muffin tins all the time. Just leave about an inch of space at the top because it expands when frozen. Thaw overnight in the fridge and give it a gentle stir—you might need to add a splash of milk if it thickens too much. Works great for those “I want pancakes NOW” mornings!
Why do my pancakes burn outside but stay raw inside?
This drives me nuts too! It usually means your heat is too high. Old-fashioned pancakes like a nice medium heat—think “golden patience” not “blackened hurry.” Try turning your burner down slightly and letting the pan preheat properly. Cast iron is the best for even cooking if you have it!
Can I make the batter the night before?
You can, but the pancakes won’t be quite as fluffy. The baking powder starts working right away, so it loses some oomph overnight. If you must prep ahead, mix the dry and wet ingredients separately, then combine in the morning. Or better yet—mix dry ingredients at night and just add the wet ones when you wake up!
What’s the secret to perfectly round pancakes?
My grandma’s trick? Use a ¼ cup measuring cup and pour quickly from about 6 inches above the pan. The higher pour helps the batter spread evenly into a circle. And resist the urge to “fix” the shape with your spatula—imperfect pancakes taste just as good, promise!
Final Thoughts
There’s something about flipping a stack of old-fashioned pancakes that feels like wrapping your family in a warm hug. Whether it’s sleepy-eyed kids in their pajamas or friends gathered around the table after a sleepover, these golden beauties have a way of turning ordinary mornings into something special.
I’d love to hear your pancake stories! Did your grandma have a secret ingredient she swore by? Maybe you’ve got a funny pancake-flipping fail to share (we’ve all been there!). Share your memories in the comments below—or better yet, snap a photo of your pancake masterpiece and tag me on Instagram. There’s nothing I love more than seeing your kitchen adventures! Follow along on Facebook for more behind-the-scenes fun!
Now go forth and make some memories—one delicious, syrup-drizzled bite at a time. And remember… the secret ingredient is always love (and maybe just a little extra butter). Happy flipping, friends!