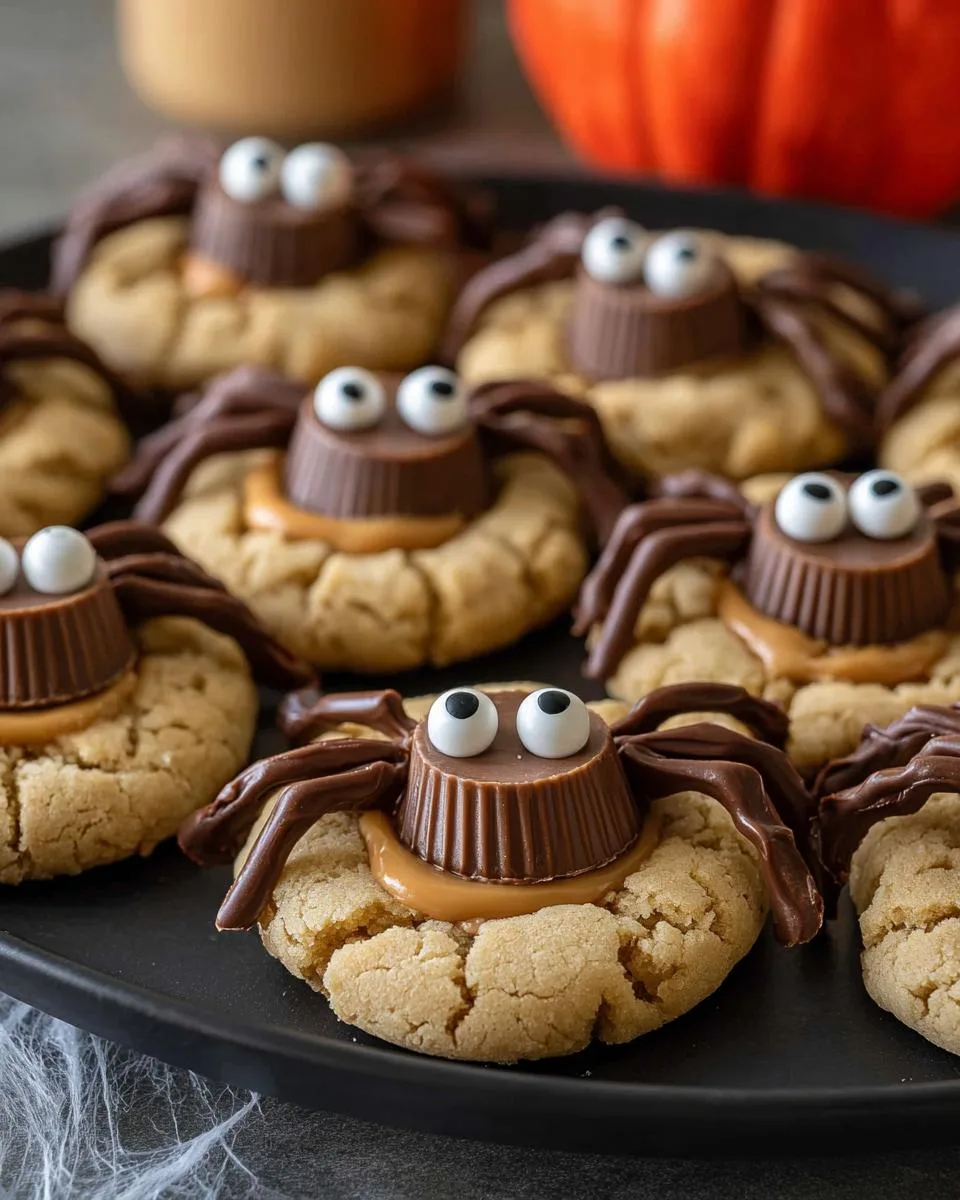
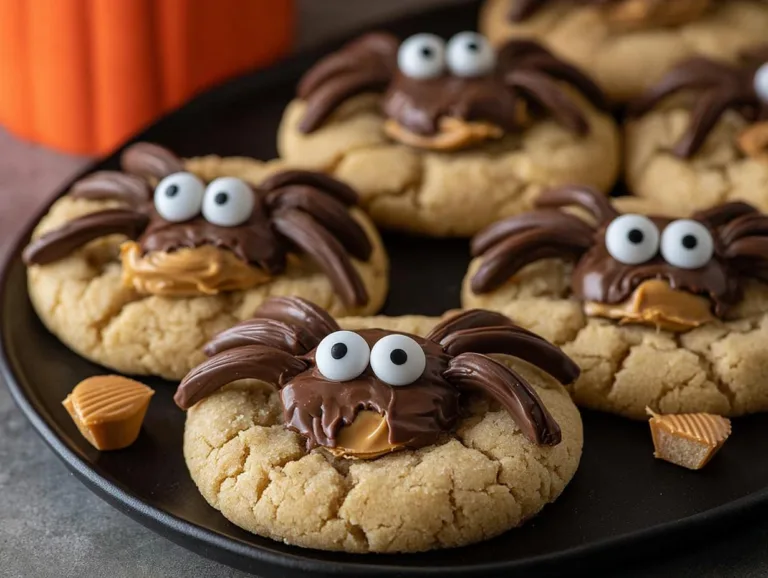
Oh my goodness, you have to try these Peanut Butter Spider cookies! Every Halloween, my kitchen turns into a mini bakery as my kids and I whip up batches of these adorable little critters. Last year, we accidentally made some with five legs – oops! – but honestly? That just made them extra special. There’s something magical about combining classic peanut butter cookies with playful chocolate legs and googly eyes. They’re the perfect mix of delicious and spooky-cute, and they always disappear faster than you can say “trick or treat!” Whether you’re hosting a Halloween party or just want to surprise your family, these cookies are guaranteed to be a hit.
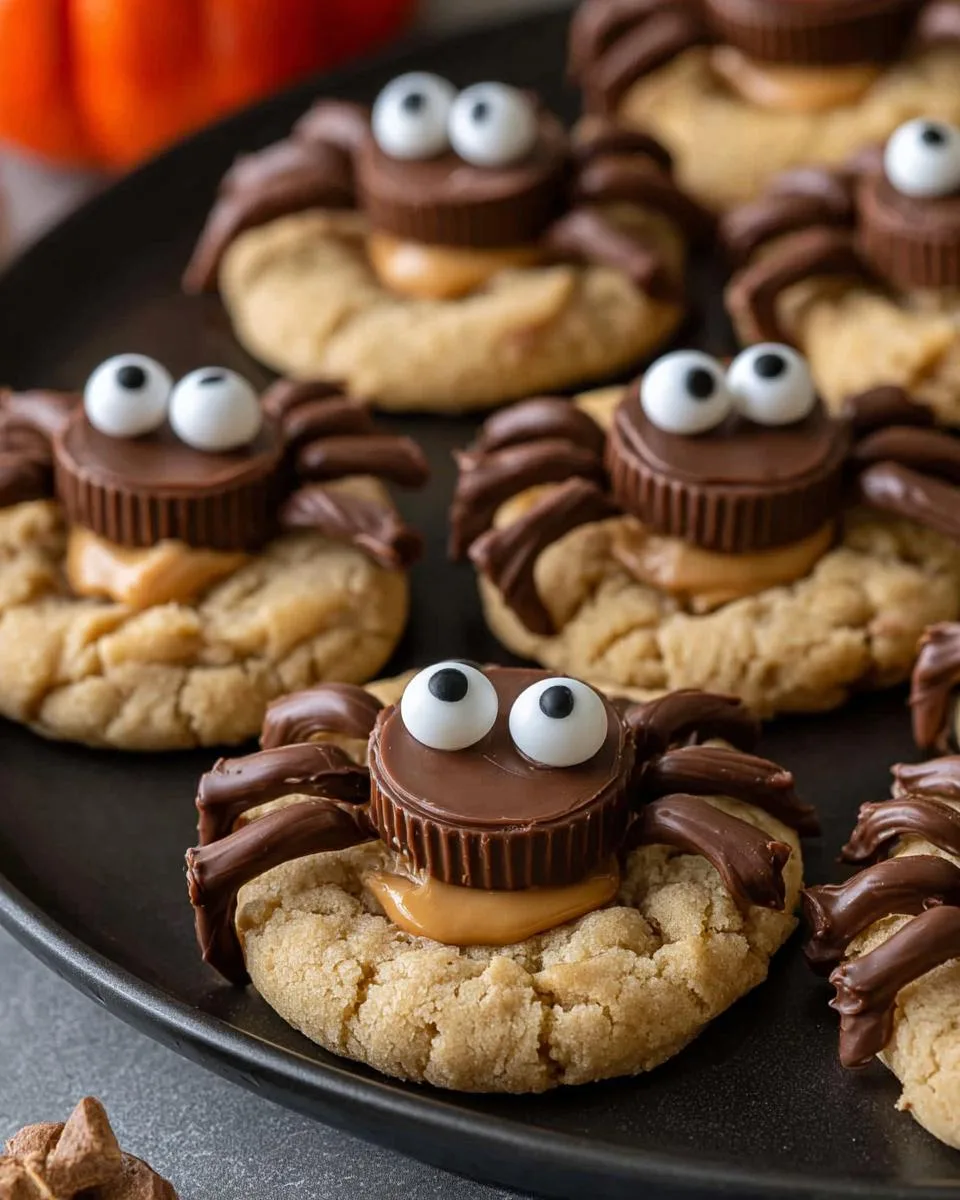
Table of Contents
Table of Contents
Why You’ll Love These Peanut Butter Spider Cookies
Trust me, these cookies are a total win – here’s why:
- So easy – The dough comes together in one bowl (less dishes, yay!)
- Kid-approved fun – My littles go wild decorating their own “spiders” every time
- Halloween magic – They look fancy but take barely any more effort than regular PB cookies
- That peanut butter hug – The combo of soft cookie + melty Reese’s cup? Pure bliss
- Total crowd-pleaser – I bring these to every fall gathering and they vanish instantly!
Ingredients for Peanut Butter Spider Cookies
Here’s everything you’ll need to create these adorable (and delicious!) creepy-crawlies. I’ve learned through plenty of kitchen experiments that using the right ingredients makes all the difference with these cookies. Pro tip: Measure everything before you start – it makes the whole process so much smoother when you’re in the baking zone!
- Wet Ingredients:
- ½ cup (113g) unsalted butter, 1 stick, room temperature (soft but not melted)
- ½ cup (107g) brown sugar – the molasses gives that perfect chew
- ⅓ cup (66g) granulated sugar – for rolling and sweetness
- ¾ cup (201g) creamy peanut butter – skip the natural kind here, we need that smooth texture
- 1 large egg – helps bind everything together
- 1 tsp vanilla extract – my secret flavor booster
- Dry Ingredients:
- 1 ½ cups (180g) all purpose flour – spoon and level to measure!
- 1 tsp baking soda – for the perfect rise
- ½ tsp baking powder – just a little extra lift
- ½ tsp salt – balances all that sweetness
- For Decorating:
- 24 mini Reese’s Peanut Butter Cups – freeze them first (trust me!)
- ½ cup (85g) semi-sweet chocolate chips – for those spooky legs
- Candy eye balls – because spiders need personality!
See? Nothing too fancy – just good, simple ingredients that create something magical. Now let’s get baking!
Equipment You’ll Need
No fancy gadgets required here – just the basics from your kitchen! Here’s what I grab every time I make these peanut butter spider cookies:
- Large mixing bowl – my trusty glass one works perfectly
- Electric mixer – or strong arms and a wooden spoon if you’re feeling old-school
- Baking sheets – two if you want to bake in batches
- Silicone baking mats or parchment paper – no sticking disasters!
- Cookie scoop or tablespoon – for perfectly portioned dough balls
- Microwave-safe bowl – for melting that chocolate
- Squeeze bottle or plastic bag – to pipe those spider legs with ease
That’s it! Now let’s make some deliciously creepy cookies.
How to Make Peanut Butter Spider Cookies
Okay, let’s get to the fun part – making these adorable peanut butter spider cookies! I’ve made this recipe dozens of times (sometimes with little helpers), and these are all my tried-and-true tricks for perfect cookies every time. Don’t worry if your first few spiders look a bit wonky – mine did too! They’ll still taste amazing.
Preparing the Dough
First things first – that peanut butter cookie dough needs to be just right. Here’s how I do it:
- In your mixing bowl, combine the room-temperature butter (not melted – it should leave a slight indent when pressed), brown sugar, and granulated sugar. Beat with an electric mixer for about 1 minute until it’s all fluffy and light. This creaming step is crucial for that perfect cookie texture!
- Add in the peanut butter, egg, and vanilla extract. Beat again just until combined – maybe 30 seconds max. Overmixing here can make cookies tough.
- Now sprinkle in your dry ingredients – flour, baking soda, baking powder, and salt. Mix on low speed or fold with a spatula just until no white streaks remain. The dough should be soft but not sticky. If it seems too wet, add a tablespoon more flour.
Baking the Cookies
Now for the magic transformation from dough to cookies:
- Grab your frozen Reese’s cups – this is why we froze them! They’ll hold their shape better when we press them into the hot cookies later.
- Roll tablespoon-sized dough balls between your palms, then roll each in granulated sugar for a pretty sparkle and slight crunch.
- Place cookies 2-3 inches apart on your lined baking sheet – they’ll spread! Bake at 350°F for 8-11 minutes until the edges start turning golden.
- Immediately after pulling them from the oven, gently press one Reese’s cup into each cookie’s center. Don’t wait too long or they won’t stick properly!
- Let cool completely on the baking sheet – about 15-20 minutes. Rushing this step means your Reese’s cups might slide right off. Patience pays off!
Adding the Spider Details
Time for the best part – bringing our spiders to life!
- Melt chocolate chips in the microwave at 50% power, stirring every 30 seconds until smooth. Transfer to a squeeze bottle or plastic bag with a tiny corner snipped off.
- Pipe four legs on each side of the cookie – they don’t have to be perfect! Wobbly legs make them look extra spooky.
- Use a tiny dab of melted chocolate to attach candy eyes to the Reese’s cup. Let set completely before serving – about 15 minutes.
And voila! You’ve got a batch of adorable peanut butter spider cookies ready to delight everyone. The hardest part? Not eating them all yourself before sharing!
Tips for Perfect Peanut Butter Spider Cookies
After making these peanut butter spider cookies more times than I can count (and learning from plenty of happy accidents), here are my absolute must-know tips for cookie success:
- Freeze those Reese’s cups! I can’t stress this enough – 20 minutes in the freezer keeps them from melting into puddles when you press them into the hot cookies.
- Room temp butter is key – Too cold and it won’t cream properly, too warm and your cookies will spread too much. It should dent slightly when pressed.
- Don’t overmix the dough – Once you add the flour, mix just until combined. Overworking it makes tough cookies instead of tender ones.
- Let cookies cool completely before moving them or adding legs. I know it’s tempting, but patience prevents Reese’s cup disasters!
- Microwave chocolate carefully – Short bursts at 50% power with frequent stirring prevents burning. Burnt chocolate legs = sad spiders.
Follow these simple tricks, and your peanut butter spider cookies will turn out picture-perfect every time!
Variations for Peanut Butter Spider Cookies
Want to put your own spin on these peanut butter spider cookies? Here are some fun twists I’ve tried (and loved!):
- Dark chocolate legs – Swap semi-sweet chips for dark chocolate for a richer flavor
- Colorful eyes – Use different sized candy eyes or even mini M&Ms for funky looks
- Pretzel legs – Break skinny pretzel sticks in half for crunchy spider limbs
- White chocolate drizzle – Add spooky webs with melted white chocolate
The best part? However you decorate them, they’ll still taste amazing!
Storing and Serving Peanut Butter Spider Cookies
Okay, confession time – these peanut butter spider cookies rarely last long enough in my house to need storing! But when they do (or when I’m sneakily stashing some away), here’s what works best:
Pop them in an airtight container at room temperature – they’ll stay fresh for up to 5 days. I like layering them between parchment paper so the legs don’t smudge. For longer storage, freeze them undecorated for up to 3 months, then add the chocolate legs and eyes when you’re ready to serve.
These cookies shine brightest at Halloween parties or as after-school surprises. Last year, my daughter insisted we pack them in her lunchbox – her friends went wild! Just be warned: they disappear faster than ghosts at sunrise.
Nutritional Information for Peanut Butter Spider Cookies
Here’s the scoop on what’s in these tasty peanut butter spider cookies – because let’s be real, we all want to know how many we can “sample” before sharing! Each cookie (with all the decorations) comes out to about:
- 150 calories
- 8g fat (3g saturated)
- 18g carbs
- 10g sugar
- 3g protein
Remember – these are estimates. Your exact nutrition may vary slightly based on ingredient brands or if you sneak extra chocolate (no judgement here!). Everything in moderation… unless they’re this delicious!
Frequently Asked Questions
Can I use natural peanut butter for these spider cookies?
I don’t recommend it, friend! Natural peanut butter tends to be oilier and can make your cookies spread too much. The stabilized texture of regular creamy peanut butter (like Jif or Skippy) gives these cookies their perfect shape and consistency. Save the natural stuff for your toast!
How long do peanut butter spider cookies stay fresh?
These cuties keep well in an airtight container at room temperature for about 5 days – if they last that long! The Reese’s cups might start to dry out after day 3, so I think they’re best enjoyed within 2-3 days. Pro tip: Store them single-layer to keep those chocolate legs looking sharp.
Can I make the dough ahead of time?
Absolutely! The peanut butter cookie dough balls (without the sugar coating) can chill in the fridge for up to 3 days or freeze for 3 months. Just let them come to room temperature before rolling in sugar and baking. This actually helps prevent overspreading!
My chocolate legs keep breaking – help!
Oh no! Try letting your melted chocolate cool slightly before piping – it thickens as it cools. Also, pipe thicker legs (about 1/8 inch wide) and let them set completely before moving the cookies. If all else fails? Call them “zombie spiders” with broken legs – the kids will think it’s extra spooky!
Peanut Butter Spider Cookies for Spooky Perfection
Peanut Butter Spider cookies are a fun and festive treat perfect for Halloween or any occasion. These cookies combine creamy peanut butter with mini Reese’s cups and chocolate legs for a playful spider design.
- Total Time: 30 minutes
- Yield: 24 cookies 1x
Ingredients
- ½ cup (113g) unsalted butter, 1 stick, room temperature
- ½ cup (107g) brown sugar
- ⅓ cup (66g) granulated sugar
- ¾ cup (201g) creamy peanut butter, not natural
- 1 large egg
- 1 tsp vanilla extract
- 1 ½ cups (180g) all purpose flour
- 1 tsp baking soda
- ½ tsp baking powder
- ½ tsp salt
- Granulated sugar, for rolling the cookies
- Mini Reese’s Peanut Butter Cups
- ½ cup (85g) semi-sweet chocolate chips, for melting
- Candy eye balls
Instructions
- Unwrap about 24 mini Reese’s cups, place in a bowl and put in the freezer. This helps them to maintain their shape once added to the hot cookies. Preheat the oven to 350°F.
- In a mixing bowl, combine the butter, brown sugar, and sugar. Beat with an electric mixer for 1 minute, until smooth and fluffy.
- Add in the peanut butter, egg, and vanilla extract, beat again, less than 1 minute.
- Add in the flour, baking soda, baking powder and salt, mixing on low or with a spatula just until combined. Be careful not to over mix.
- Use a small cookie scoop or tablespoon to form tablespoon sized balls from the dough. Roll the dough between your hands to form a uniform ball, then roll in granulated sugar. Place the cookies 2-3 inches apart on a silicone lined baking sheet and bake for 8-11 minutes or until the edges of the cookies begin to crack and turn golden in color.
- Remove the cookies from the oven and press a mini Reese’s cup into the center of each cookie. Allow the cookies to cool for 15-20 minutes before moving to cooling rack. Moving the cookies while they are still warm can cause the Reese’s cup to sink, losing its shape.
- Place the chocolate chips in a microwave safe bowl. Microwave for 3 minutes on 50% power, stirring after each minute. Continue to microwave until fully melted. Transfer the melted chocolate into a squeeze bottle or a sandwich bag with the corner cut off. Draw 4 legs on each side of the cookies.
- Use a small amount of melted chocolate on the back of the candy eye balls to attach them to the Reese’s cup. Allow the chocolate to set before moving the cookies to a serving platter.
Notes
- Freezing the Reese’s cups helps them hold their shape when pressed into the hot cookies.
- Do not overmix the dough to keep the cookies tender.
- Let the cookies cool before moving them to prevent the Reese’s cups from sinking.
- Prep Time: 20 minutes
- Cook Time: 10 minutes
- Category: Dessert
- Method: Baking
- Cuisine: American
- Diet: Vegetarian
Nutrition
- Serving Size: 1 cookie
- Calories: 150
- Sugar: 10g
- Sodium: 100mg
- Fat: 8g
- Saturated Fat: 3g
- Unsaturated Fat: 4g
- Trans Fat: 0g
- Carbohydrates: 18g
- Fiber: 1g
- Protein: 3g
- Cholesterol: 15mg
For More recipes Follow me on Facebook!