There’s something undeniably magical about pumpkin donuts with maple glaze—the warm spices, the tender crumb, that sticky-sweet drizzle that makes you want to lick your fingers. As a home cook who’s obsessed with fall flavors (and a self-proclaimed donut enthusiast), I’ve tweaked this recipe more times than I can count to get it just right. These aren’t just any donuts; they’re little rings of autumn comfort, perfect with coffee on a crisp morning or as a sweet surprise after dinner. Trust me, once you try them, you’ll understand why my family begs me to make them all season long.
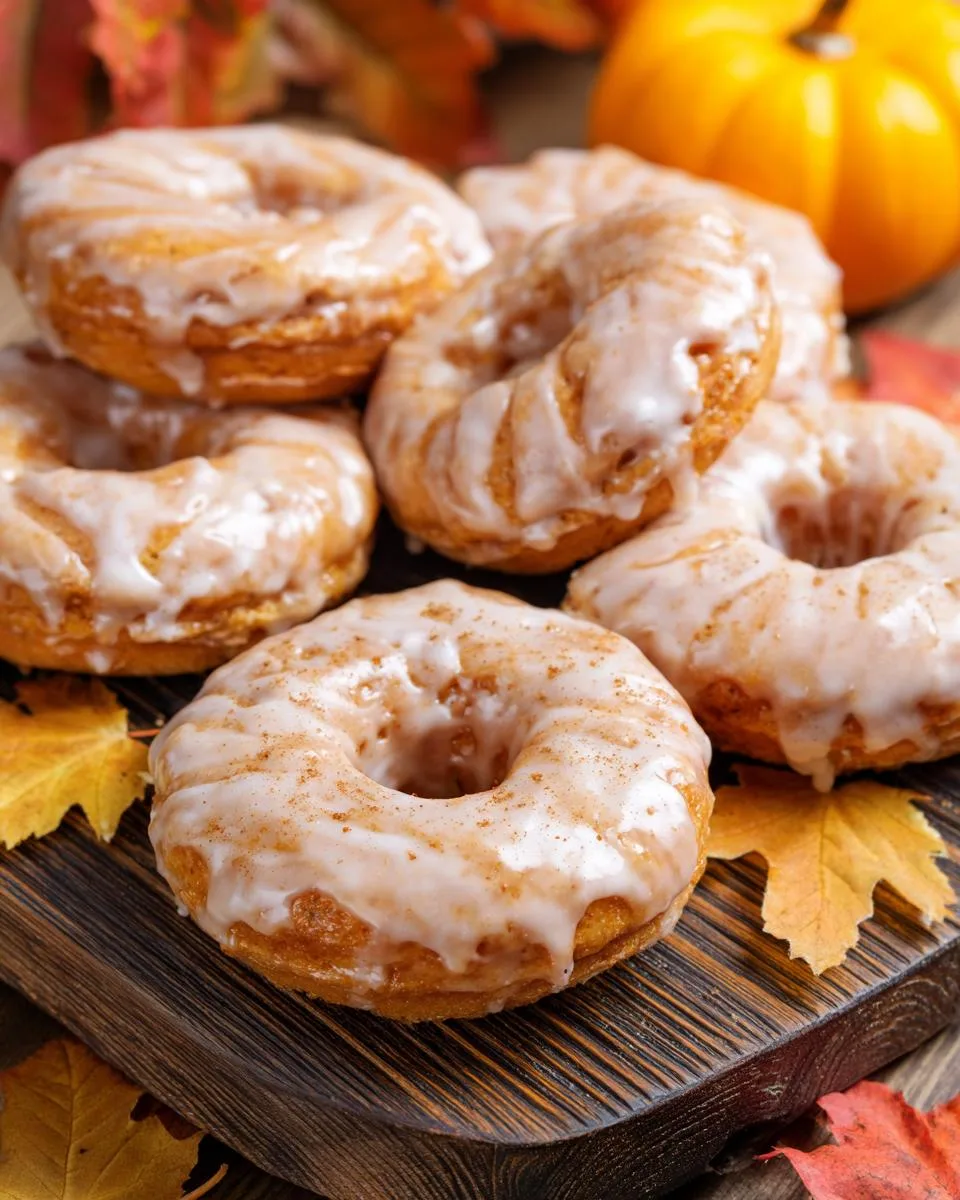
Table of Contents
Table of Contents
Why You’ll Love These Pumpkin Donuts with Maple Glaze
- They bake up light and fluffy—no deep-frying required!
- The pumpkin and warm spices taste like autumn in every bite.
- The maple glaze is just sweet enough without being cloying.
- They come together in under 30 minutes—perfect for last-minute cravings.
- Kids and adults alike go wild for them (I’ve seen it happen!).
Ingredients for Pumpkin Donuts with Maple Glaze
Gathering your ingredients is the first step to donut bliss! Here’s what you’ll need – and yes, I’ve learned through trial and error that each one matters. (Pro tip: Measure everything before you start mixing – it makes the whole process smoother.)
For the Donuts:
- 2 cups all-purpose flour – spooned and leveled, not packed (trust me, this makes a difference)
- 1 ½ teaspoons baking powder – make sure it’s fresh for maximum lift
- 1 ½ teaspoons pumpkin pie spice – or make your own blend if you’re feeling fancy
- ¾ teaspoon kosher salt – I prefer Diamond Crystal brand here
- ¼ teaspoon baking soda – just enough to help with texture
- ½ cup unsalted butter, melted – and slightly cooled so it doesn’t cook the eggs
- 1 cup light brown sugar, packed – dark brown works too for deeper flavor
- 2 large eggs – room temperature blends better
- 1 cup canned pumpkin puree – NOT pumpkin pie filling (learned that lesson the hard way!)
- 2 teaspoons vanilla extract – the good stuff makes all the difference
For the Maple Glaze:
- ¾ cup maple syrup – real maple syrup only, please! No pancake syrup substitutes
- 1 ½ tablespoons unsalted butter – adds richness to the glaze
- 1 teaspoon vanilla extract – balances the maple beautifully
- ¼ teaspoon kosher salt – cuts the sweetness just right
- ¼ cup confectioners’ sugar – sifted to prevent lumps
See? Nothing too crazy – just good, simple ingredients that work together perfectly. Now let’s get mixing!
Equipment You’ll Need
Don’t sweat it—this recipe keeps things simple! You’ll just need a few basics: a donut pan (trust me, it’s worth buying!), an electric mixer (though a bowl and whisk work in a pinch), a small saucepan for the glaze, and a whisk to bring it all together. That’s it—no fancy gadgets required!
How to Make Pumpkin Donuts with Maple Glaze
Okay, let’s get to the fun part—making these irresistible pumpkin donuts! I’ve burned my fair share of batches (who knew donuts could be so temperamental?), so follow these steps carefully for perfect results every time.

Preparing the Donut Batter
First things first—preheat that oven to 400°F. While it’s heating up, grab two bowls: one for dry ingredients, one for wet. In the large bowl, whisk together your flour, baking powder, pumpkin pie spice, salt, and baking soda. Set this aside.
Now for the magic! In your mixer bowl, beat the melted (but slightly cooled) butter and brown sugar until they’re best friends—about 1-2 minutes. Add eggs one at a time, mixing well after each. Then comes the star—pumpkin puree and vanilla. Mix just until combined—overmixing makes tough donuts, and nobody wants that!
Here’s my secret: add the dry ingredients to the wet in three batches, mixing on low speed until just incorporated. Scrape down the sides with a spatula—those hidden pockets of flour love to ruin your day. The batter should be thick but spoonable, like a slightly looser muffin batter.
Baking the Pumpkin Donuts
While you were mixing, your oven should be perfectly preheated. Spray your donut pan generously—those little rings stick like crazy if you skip this step! I use a piping bag to fill the cavities (so much cleaner!), but a spoon works too—just fill each about ¾ full.
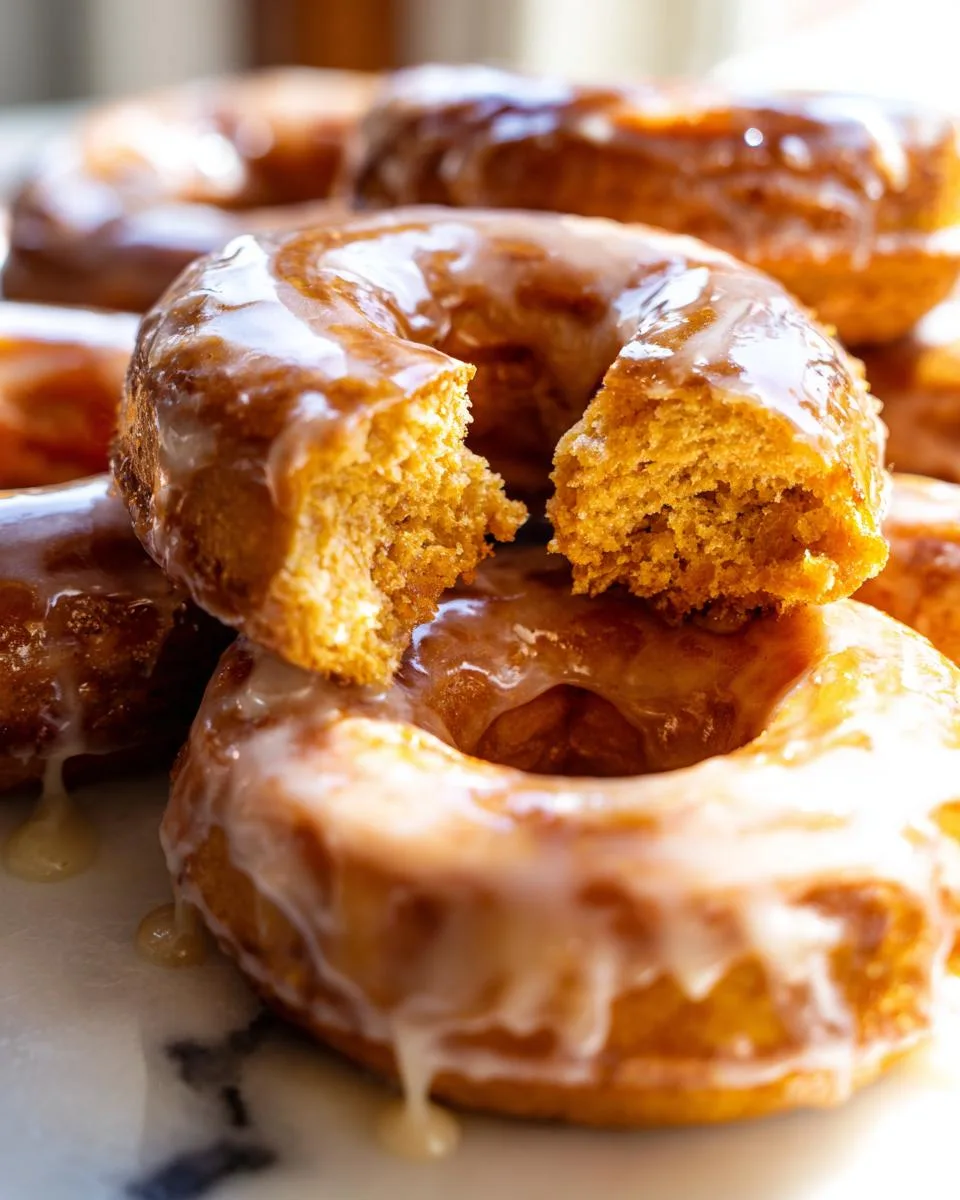
Pop them in the oven for 10-12 minutes. You’ll know they’re done when the edges pull away slightly and the tops spring back when gently pressed. Don’t overbake—we want moist, tender donuts, not hockey pucks!
Making the Maple Glaze
While the donuts bake, let’s make that glorious glaze. In a small saucepan, simmer the maple syrup over medium heat until it reduces to about ½ cup—this concentrates the flavor. Remove from heat and whisk in butter, vanilla, and salt until smooth. Finally, sift in the powdered sugar and whisk until silky.
Here’s the trick: let the donuts cool for about 10 minutes before glazing—too hot and the glaze will slide right off. Dip each donut top into the warm glaze, letting the excess drip off. The glaze will set as it cools, creating that perfect shiny finish. Now try not to eat them all at once—I dare you!
Print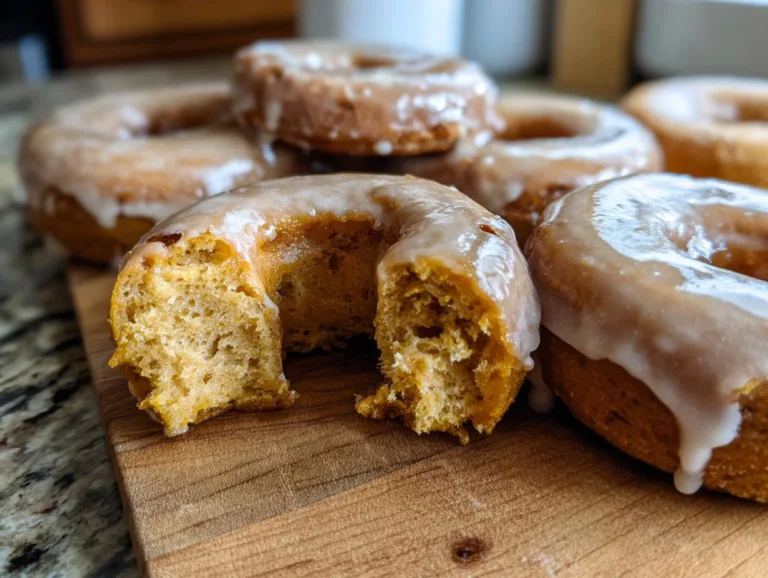
Irresistible Pumpkin Donuts with Maple Glaze in 30 Minutes
Delicious pumpkin donuts with a sweet maple glaze, perfect for fall or any time you crave a spiced treat.
- Total Time: 27 minutes
- Yield: 12 donuts 1x
Ingredients
- 2 cups all-purpose flour
- 1 ½ teaspoons baking powder
- 1 ½ teaspoons pumpkin pie spice
- ¾ teaspoon kosher salt
- ¼ teaspoon baking soda
- ½ cup unsalted butter, melted
- 1 cup light brown sugar, packed
- 2 large eggs
- 1 cup canned pumpkin puree
- 2 teaspoons vanilla extract
- For the maple glaze:
- ¾ cup maple syrup
- 1 ½ tablespoons unsalted butter
- 1 teaspoon vanilla extract
- ¼ teaspoon kosher salt
- ¼ cup confectioners’ sugar
Instructions
- Preheat oven to 400 degrees F. Coat a donut pan with nonstick spray.
- In a large bowl, combine flour, baking powder, pumpkin pie spice, salt, and baking soda.
- In the bowl of an electric mixer fitted with the paddle attachment, beat butter and sugar on medium-high until well combined, about 1-2 minutes.
- Beat in eggs, one at a time, until well combined.
- Beat in pumpkin and vanilla until just combined.
- Gradually add flour mixture to sugar mixture at low speed, beating just until incorporated.
- Scoop the batter evenly into the donut pan.
- Place into oven and bake for 10-12 minutes, or until donuts are slightly browned and spring back when touched.
- To make the glaze, heat maple syrup in a small saucepan over medium heat until reduced to 1/2 cup, about 5 minutes.
- Whisk in butter, vanilla, and salt until the butter has melted.
- Whisk in confectioners’ sugar until smooth.
- When the donuts are done, cool for 10 minutes and dip the tops into the glaze.
- Allow glaze to set before serving.
- Serve warm or at room temperature.
Notes
- Use fresh pumpkin puree for the best flavor.
- Let the donuts cool slightly before glazing to prevent the glaze from melting off.
- Store leftovers in an airtight container at room temperature for up to 2 days.
- Prep Time: 15 minutes
- Cook Time: 12 minutes
- Category: Dessert
- Method: Baking
- Cuisine: American
- Diet: Vegetarian
Nutrition
- Serving Size: 1 donut
- Calories: 220
- Sugar: 18g
- Sodium: 150mg
- Fat: 8g
- Saturated Fat: 5g
- Unsaturated Fat: 2g
- Trans Fat: 0g
- Carbohydrates: 35g
- Fiber: 1g
- Protein: 3g
- Cholesterol: 45mg
Tips for Perfect Pumpkin Donuts with Maple Glaze
After making these pumpkin donuts more times than I can count (and yes, burning a few batches along the way), I’ve picked up some tricks that make all the difference. Here are my absolute must-know tips for donut success:
- Room temperature eggs are non-negotiable – Cold eggs make the batter separate and bake unevenly. I leave mine out for at least 30 minutes before baking.
- Don’t overmix the batter – Stir just until the flour disappears. Overworked batter equals tough donuts, and we want cloud-like texture!
- Let the glaze set completely – I know it’s tempting, but wait at least 15 minutes before stacking or serving. The glaze firms up beautifully if you give it time.
- Use a piping bag for clean filling – Spooning batter into the pan makes a mess. A piping bag (or even a ziplock with the corner snipped) keeps things tidy.
- Store them properly – These keep best in an airtight container at room temperature for up to 2 days. Any longer and they lose their magic texture.
One last secret? The glaze tastes even better if you make it a day ahead – the flavors meld together beautifully overnight. Just reheat gently before dipping!
Variations for Pumpkin Donuts with Maple Glaze
One of the best things about this recipe is how easily you can make it your own! Over the years, I’ve played around with all sorts of fun twists—here are my family’s favorite variations:
- Nutty delight: Fold in ½ cup chopped pecans or walnuts into the batter before baking. The crunch pairs perfectly with the soft donut and sweet glaze.
- Cinnamon sugar magic: Skip the glaze and toss warm donuts in a mix of cinnamon and sugar. My kids call these “pumpkin churros”!
- Dairy-free version: Use coconut oil instead of butter and almond milk in the glaze. You’d never guess it’s not the original!
- Chocolate chip surprise: Add ⅓ cup mini chocolate chips to the batter—the chocolate-pumpkin combo is unreal.
- Spice it up: Add an extra teaspoon of ginger or a pinch of cloves to the batter for those who love bold flavors.
The possibilities are endless—that’s what makes baking so fun! Just remember: if you add mix-ins, keep the total extra ingredients to about ½ cup so the donuts don’t get too heavy.
Serving Suggestions
Now that you’ve made these gorgeous pumpkin donuts with maple glaze, let’s talk about how to serve them for maximum enjoyment! I’ve hosted enough brunches and fall gatherings to know presentation matters almost as much as taste.
For breakfast or brunch, pair them with a steaming mug of spiced coffee or pumpkin spice latte – the flavors complement each other perfectly. If you’re serving them as dessert, try them alongside vanilla ice cream (the cold creaminess against the warm donut is heavenly) or a glass of hot apple cider for ultimate cozy vibes.
Presentation tip: Stack them on a pretty cake stand with some cinnamon sticks or whole star anise scattered around for a festive touch. For parties, I sometimes skewer them on wooden dowels to make a “donut bouquet” centerpiece – it always gets oohs and aahs!
Pro tip from my many kitchen experiments: If you’re serving these at room temperature, give them a quick 10-second zap in the microwave before serving. That slight warmth makes the maple glaze smell incredible and brings out all those cozy pumpkin spice flavors!
Storing and Reheating Pumpkin Donuts
Let’s be real – these pumpkin donuts rarely last long enough to need storing in my house! But when they do (or when I’m smart enough to make a double batch), here’s how I keep them tasting fresh and delicious. The glaze actually helps preserve them – isn’t that brilliant?
For short-term storage, place cooled donuts in an airtight container with parchment between layers. They’ll stay perfect at room temperature for about 2 days. Any longer and they start to dry out – though honestly, mine never make it that far!
Want to freeze them? Here’s my method: freeze unglazed donuts first on a baking sheet until solid (about 2 hours), then transfer to freezer bags. They’ll keep for up to 3 months this way. When you’re ready to enjoy, thaw at room temperature for an hour, then glaze them fresh – the maple flavor pops so much better this way!
For reheating, my favorite trick is the 8-second microwave zap – just enough to take the chill off without making them soggy. If you’re feeling fancy, pop them in a 300°F oven for 5 minutes to crisp up the edges. Either way, that warm pumpkin spice aroma will fill your kitchen all over again!
One warning: don’t refrigerate these donuts – the cold makes them dry out faster. Learned that one the hard way after a sad, stale batch last Thanksgiving. Now I either eat them fresh or freeze them – no in-between!
Nutritional Information
Okay, let’s be real – we’re not eating pumpkin donuts for their health benefits! But since I know some of you like to keep track (or need to for dietary reasons), here’s the scoop on what’s in these sweet treats. Just remember – these numbers are estimates and can change based on your exact ingredients. My advice? Enjoy every delicious bite and savor the moment!
- Serving Size: 1 donut (because let’s be honest, who stops at one?)
- Calories: 220 (worth every single one!)
- Sugar: 18g (mostly from that heavenly maple glaze)
- Sodium: 150mg
- Fat: 8g (5g saturated – thank you, butter!)
- Carbohydrates: 35g
- Fiber: 1g (pumpkin power!)
- Protein: 3g
- Cholesterol: 45mg
Important note: These values can vary based on your specific ingredients and how much glaze you use (I won’t judge if you go heavy on the maple!). For exact numbers, I recommend using a nutrition calculator with your exact brands and measurements.
Frequently Asked Questions
I’ve gotten so many questions about these pumpkin donuts over the years—here are the ones that pop up most often in my kitchen (and my inbox!). Hopefully these answers help you avoid any donut disasters!
Can I use fresh pumpkin instead of canned?
Absolutely! I’ve done it both ways. Just make sure to roast and puree your pumpkin first—and squeeze out excess moisture in a cheesecloth. Fresh pumpkin gives a brighter flavor, but canned is more consistent (and way easier when you’re in a hurry). Either way, avoid pumpkin pie filling—that stuff’s loaded with sugar and spices we don’t need!
How do I keep the glaze from melting off?
Oh boy, learned this one the messy way! The trick is letting the donuts cool for about 10 minutes—warm enough that the glaze sticks, but not so hot it slides right off. If your kitchen’s really warm, pop them in the fridge for 5 minutes after glazing to set faster. And whatever you do—don’t stack them until the glaze is totally dry!
Can I make these gluten-free?
You bet! I’ve had great success swapping the all-purpose flour for a 1:1 gluten-free blend (I like King Arthur’s). Just add ½ teaspoon xanthan gum if your mix doesn’t include it. The texture comes out slightly denser but still delicious—my gluten-sensitive friends go crazy for them!
Why did my donuts turn out dry?
Usually means one of three things: overbaking (set that timer!), overmixing the batter (stop as soon as the flour disappears), or using too much flour (always spoon and level—never scoop!). Next time, try checking at 9 minutes—sometimes ovens run hot.
Can I make these ahead for a party?
Here’s my party trick: bake the donuts the day before (unglazed) and store at room temp in an airtight container. Make the glaze morning-of—it takes 5 minutes! Dip them right before serving so the glaze stays shiny and perfect. Works like a charm every time!
Share Your Thoughts
Okay, now it’s your turn! I want to hear all about your pumpkin donut adventures—the triumphs, the hilarious kitchen fails (we’ve all been there!), and especially those “oh wow” moments when you took your first bite. Did you add any fun twists? How did your family react? Spill the sweet details!
Drop a comment below—I read every single one and love swapping baking stories. Or snap a photo of your gorgeous glazed creations and tag me on Instagram @FrostyRecipes so I can cheer you on! Nothing makes me happier than seeing your versions of these pumpkin donuts with maple glaze.
And hey—if this recipe brought a little autumnal joy to your kitchen, consider giving it a 5-star rating. It helps other bakers find this recipe too. Most importantly, keep baking with love and don’t forget to lick that maple glaze spoon—I won’t tell!