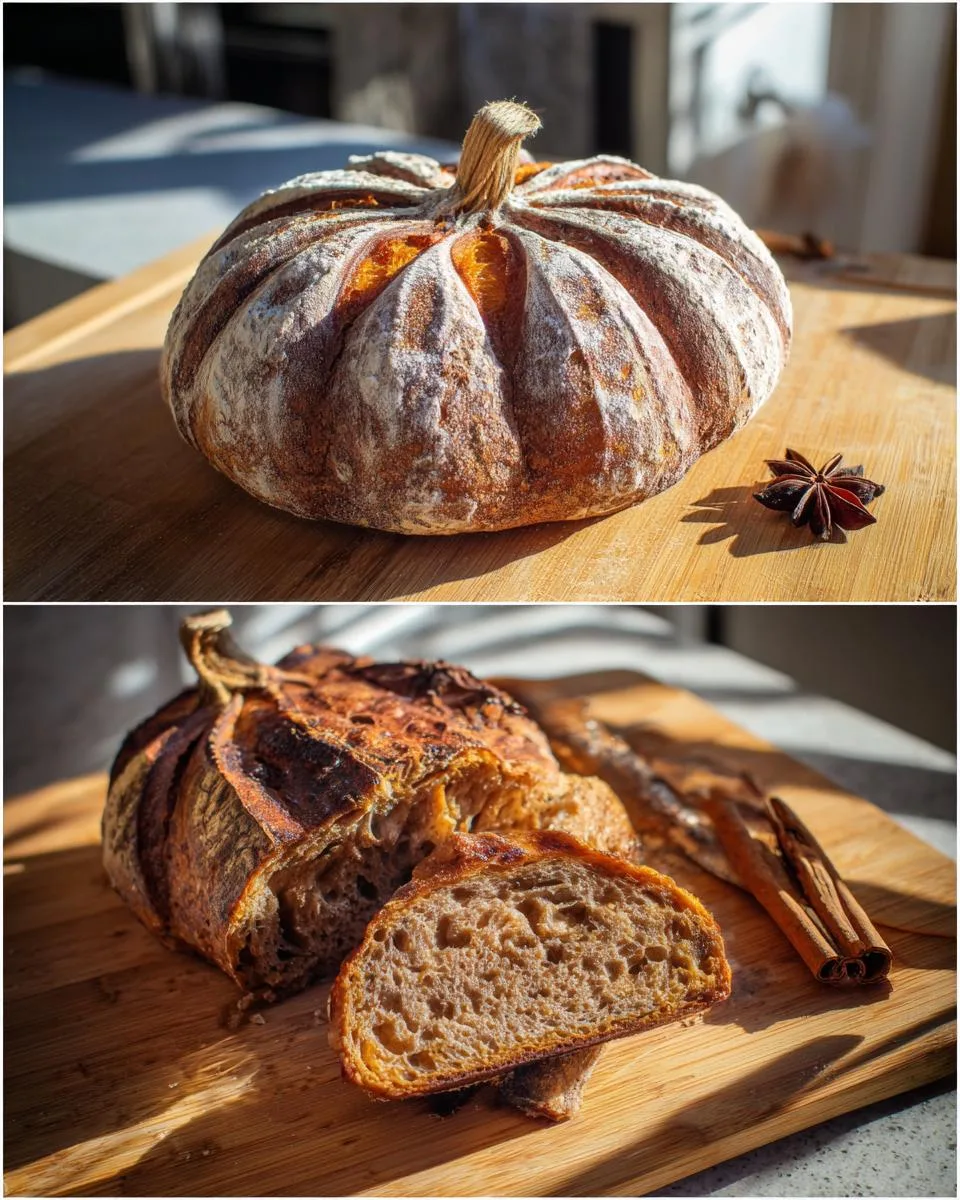
There’s something magical about autumn baking—the scent of cinnamon in the air, the cozy warmth of the oven, and the way simple ingredients transform into something extraordinary. That’s why I love making pumpkin-shaped sourdough bread this time of year. It’s not just bread—it’s a little edible celebration of the season!
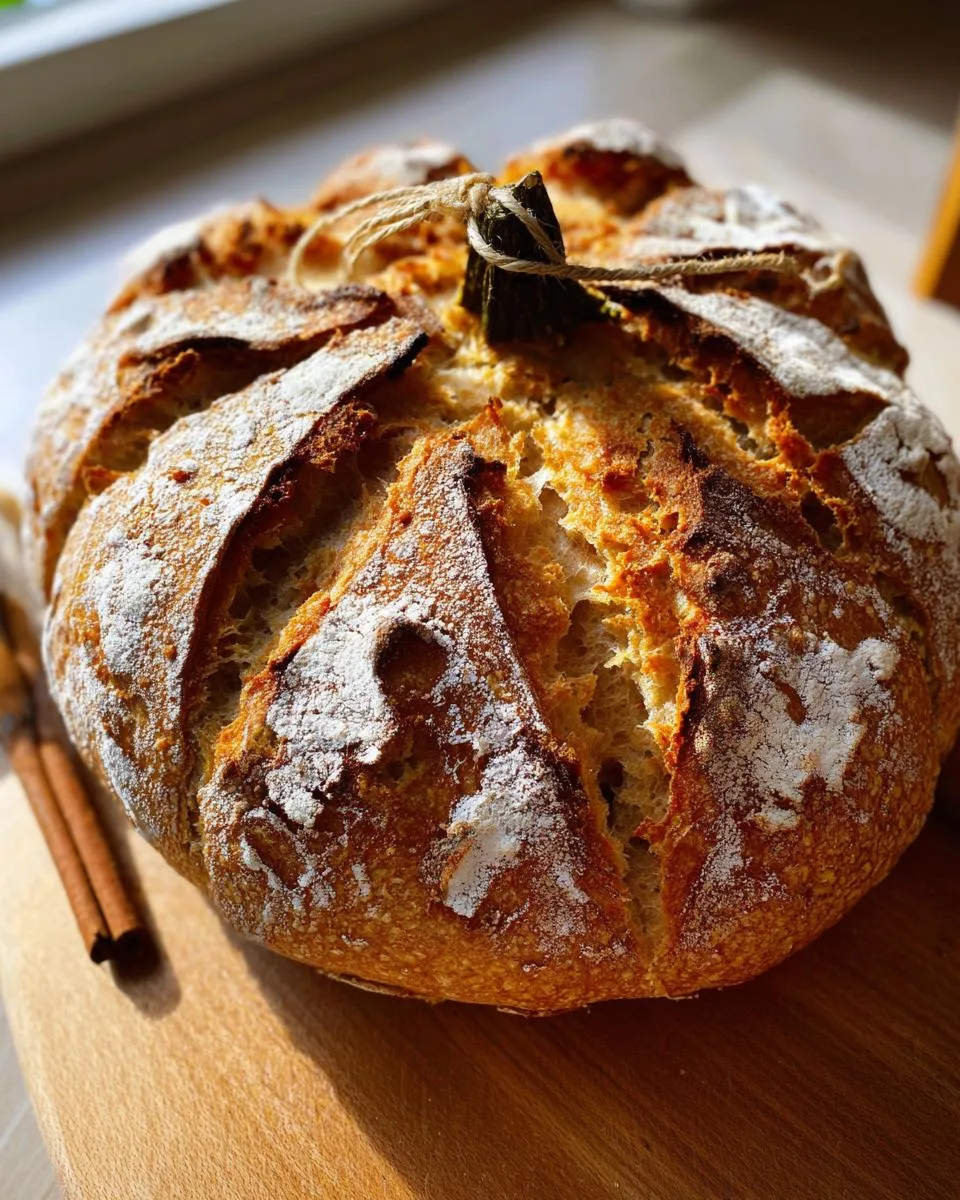
I’ll never forget the first time I tried shaping sourdough into a pumpkin. My kids’ eyes lit up when they saw it on the table—like I’d baked a tiny piece of Halloween magic. Now, it’s our go-to centerpiece for fall gatherings. Friends always ask, “How’d you do that?” as if it’s some complicated pastry trick. But here’s the secret: it’s just your favorite sourdough recipe with a playful twist (and a few pieces of twine).
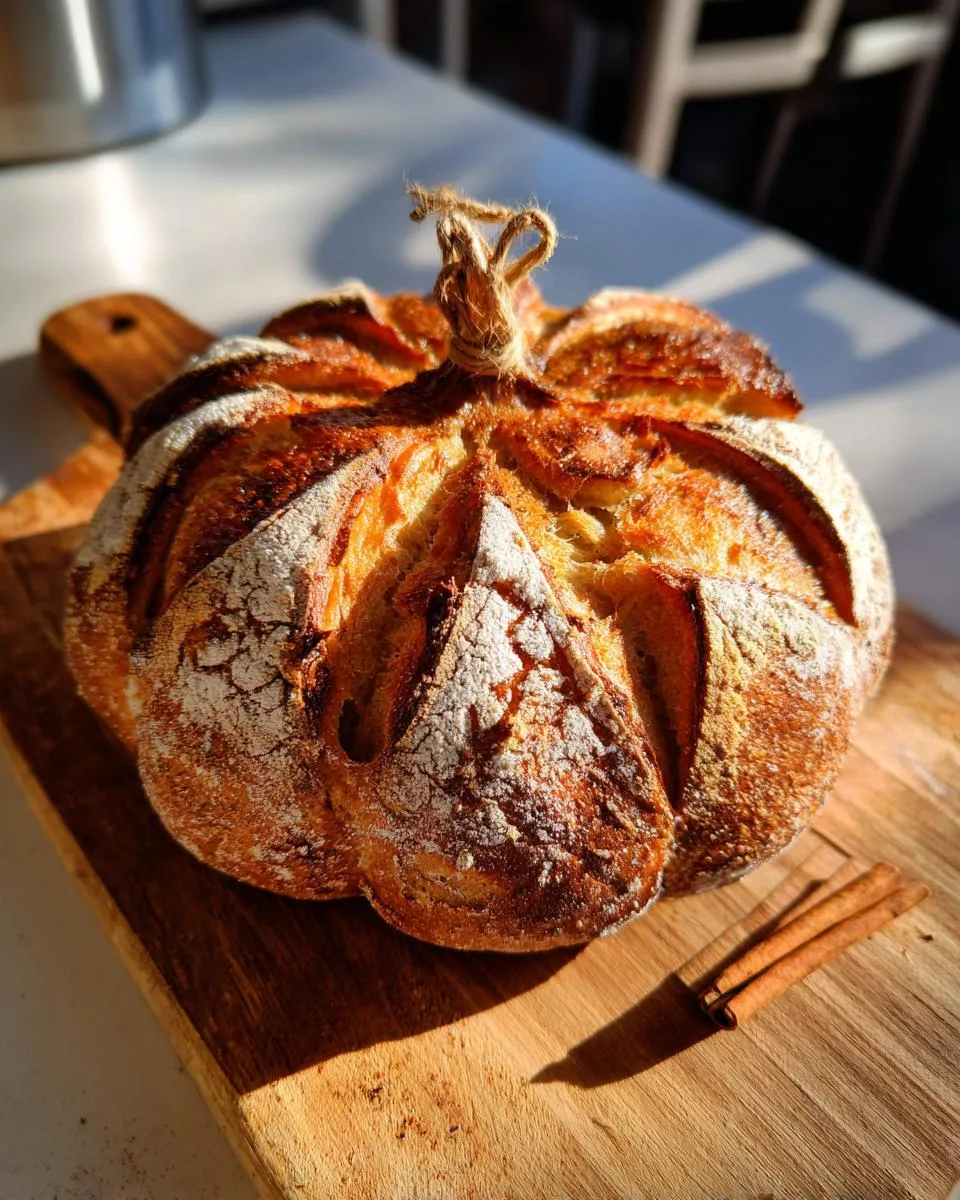
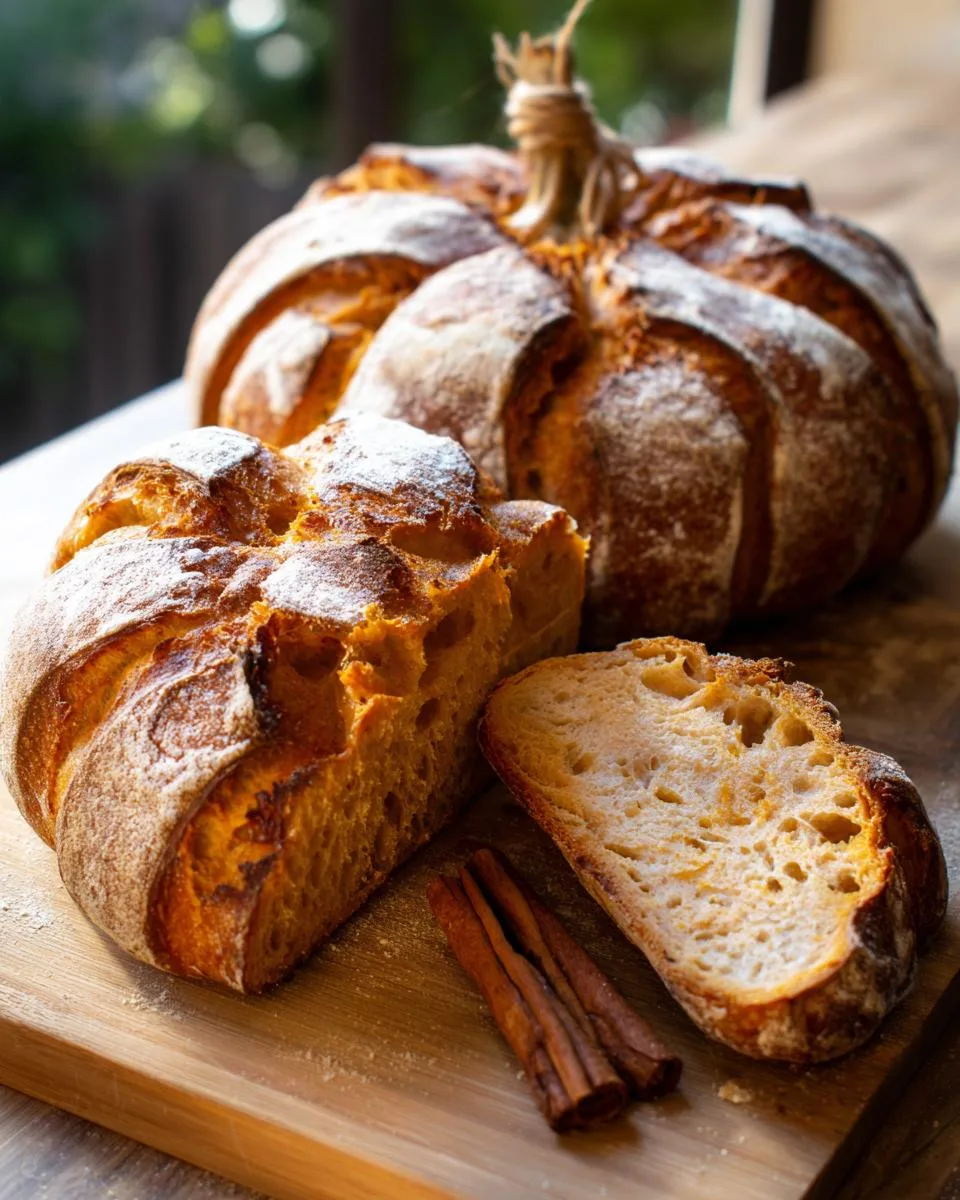
What makes pumpkin-shaped sourdough bread so special? That crisp, golden crust gives way to a tangy, chewy interior—perfect for tearing apart with friends. And that cinnamon stick stem? It fills your kitchen with the coziest aroma while it bakes. Whether you’re hosting a dinner party or just craving a fun weekend project, this loaf turns everyday baking into something unforgettable.
Table of Contents
Table of Contents
Ingredients for Pumpkin Shaped Sourdough Bread
Gathering your ingredients is half the fun when making this festive loaf! Here’s what you’ll need (and yes, that includes ordinary kitchen twine – trust me, it’s about to become your favorite bread accessory):
- 1 batch proofed sourdough dough (already shaped into a round – use your favorite recipe!)
- 4 pieces of twine, each 36″ long (don’t skip the olive oil coating later!)
- 1 tbsp olive oil (for coating those twine pieces)
- Flour for dusting (I use bread flour, but all-purpose works too)
- 1 cinnamon stick (about 3″ long makes the perfect stem)
Ingredient Notes & Substitutions
Twine talk: Regular kitchen twine works great, but must be food-safe (check the label!) and thoroughly coated in oil to prevent sticking. No yarn substitutes – they can melt or leave fibers in your bread.
Out of cinnamon sticks? A pretzel rod makes a cute edible stem alternative. For flour, higher-protein bread flour gives better oven spring, but all-purpose works in a pinch. The dough should be cold from overnight proofing – it holds the pumpkin shape better when firm.
How to Make Pumpkin Shaped Sourdough Bread
Okay, let’s turn that beautiful round of dough into a pumpkin masterpiece! This is where the magic happens – and trust me, it’s easier than you think. Just follow these steps, and you’ll have everyone ooh-ing and aah-ing over your creation.
- Prep your strings: Take those four long pieces of twine and tie them together with a single knot right in the middle. Don’t make it too tight – we’ll adjust this later. Now brush each string with olive oil (this is crucial so they don’t stick to your dough!).
- Dough time: Take your proofed sourdough round (straight from the fridge – cold dough is easier to work with) and place the strings on top, with the knot at the center. Imagine you’re dividing the dough into eight equal wedges – that’s how you’ll space the strings.
- The flip: Place parchment paper and a cutting board on your banneton, then flip everything over in one confident motion. Gently lift off the banneton – your dough should keep its nice round shape.
- Tie it up: Now comes the fun part! Working with opposite strings, gently lift them up and tie them together at the top center of your dough. You want them snug but not tight – we’re making indentations, not cutting through the dough!
- Final touches: Dust the whole thing lightly with flour. This gives it that rustic, bakery look. If you want to get fancy, use a bread lame to score little designs between the strings.
Shaping the Dough
When placing those strings, think of a compass – you want them at north, south, east, west, and the points in between for eight even sections. The key is gentle pressure – you’re guiding the dough to form lobes as it bakes, not strangling it! I like to adjust the strings a few times to make sure they’re perfectly spaced. Pro tip: If a string looks too tight after tying, just loosen it slightly with your fingers. The dough should puff up around the strings, not get pinched by them.
Baking & Finishing Touches
Heat your Dutch oven (or baking vessel) to 475°F while your shaped dough rests. When it’s screaming hot, carefully transfer the dough using the parchment as a sling. Bake covered for 50 minutes – this creates that steamy environment sourdough loves. Then uncover and bake just until golden brown, about 5-10 minutes more. Resist the urge to untie the strings right away! Let the bread cool completely on a rack first – this keeps the shape perfect. Finally, snip and remove the strings, and poke in that cinnamon stick stem. The smell alone is worth the wait!
Print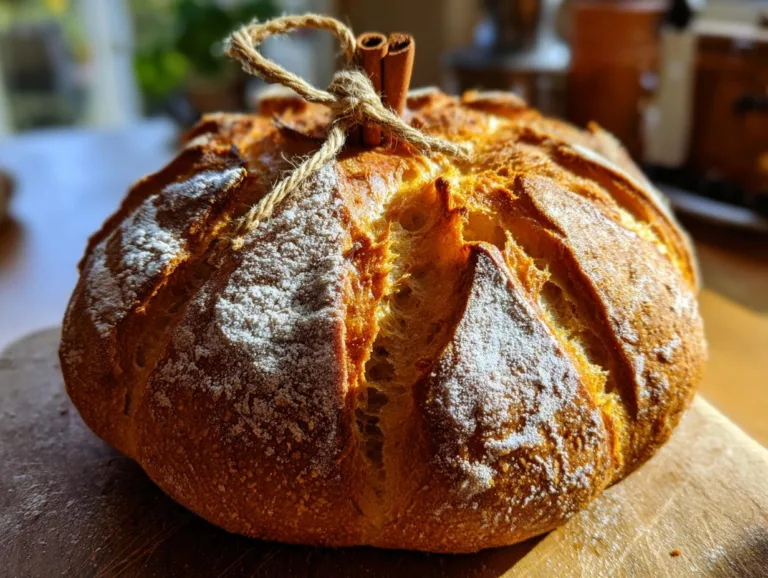
Magical Pumpkin Shaped Sourdough Bread in 5 Easy Steps
A fun and festive pumpkin-shaped sourdough bread, perfect for autumn gatherings or as a creative twist on traditional sourdough.
- Total Time: 12 hours 50 minutes
- Yield: 1 loaf 1x
Ingredients
- Raw sourdough dough, proofed in a round shape
- 4 long pieces of twine (about 36” each)
- Olive oil (for coating the twine)
- Flour (for dusting)
- 1 cinnamon stick (for the stem)
Instructions
- Prepare your favorite sourdough dough, following the usual steps to mix, proof, fold, and shape it into a round. Proof overnight in the fridge.
- Cut four long pieces of twine (about 36” each) and tie them together with a single knot in the middle. Coat the twine in olive oil to prevent sticking.
- Remove the dough from the fridge and spread the twine on top, with the knot centered and strings evenly spaced to create eight lobes.
- Place parchment paper and a cutting board on top of the banneton, then flip everything over. Gently remove the banneton.
- Dust the dough lightly with flour and adjust the strings for even spacing. Tie opposite strings in knots at the top center of the dough and trim excess.
- Score designs into each section with a bread lame if desired.
- Transfer the dough to a preheated baking vessel (like a Dutch oven) using the parchment paper.
- Bake at 475°F for 50 minutes covered, then a few minutes uncovered.
- Cool the bread on a rack, then carefully remove the strings. Insert a cinnamon stick as a stem.
- Let the bread cool completely before slicing for best texture.
Notes
- Soak or coat the twine in olive oil to prevent sticking.
- Use a bread lame to score fun designs for a decorative touch.
- Allow the bread to cool before slicing to retain moisture.
- Prep Time: 12 hours (includes overnight proofing)
- Cook Time: 50 minutes
- Category: Bread
- Method: Baking
- Cuisine: American
- Diet: Vegetarian
Nutrition
- Serving Size: 1 slice
- Calories: 120
- Sugar: 1g
- Sodium: 200mg
- Fat: 1g
- Saturated Fat: 0g
- Unsaturated Fat: 1g
- Trans Fat: 0g
- Carbohydrates: 24g
- Fiber: 2g
- Protein: 4g
- Cholesterol: 0mg
Tips for Perfect Pumpkin Shaped Sourdough Bread
After making this loaf more times than I can count (and learning from plenty of oops moments!), here are my can’t-live-without tips:
- Cold dough is happy dough: That overnight fridge proof isn’t just for flavor – chilled dough holds its pumpkin shape so much better when you tie those strings.
- Kitchen shears are your BFF: Use them to trim excess twine after tying – much cleaner than tearing or cutting with a knife.
- Oil those strings like sunscreen: Miss a spot with the olive oil? That’s where your bread will stick. Be generous!
- Score with a light touch: Those decorative cuts between sections should be shallow – deep scores can make your pumpkin deflate.
- Patience pays off: Wait until the bread is completely cool before removing strings. I know it’s hard – but rushing means losing those perfect pumpkin ridges!
Serving & Storing Pumpkin Shaped Sourdough Bread
This bread deserves a grand entrance! I love placing the whole pumpkin loaf right on the table – it’s such a showstopper. Tear off warm chunks to dip in roasted garlic butter or serve alongside butternut squash soup. For storage, keep it at room temp in a bread bag for up to 3 days. Want to save some? Slice and freeze in a ziplock – just toast slices straight from the freezer for that fresh-baked crunch.
Pumpkin Shaped Sourdough Bread FAQs
I get asked these questions all the time – here are the answers that’ll save you from making the same mistakes I did!
Can I use regular yarn instead of twine?
Oh honey, no! Regular yarn can melt or leave fuzzy bits in your bread. Always use food-safe kitchen twine (check the package!) and coat it well with oil. Cotton twine works best – it’s sturdy but won’t burn.
Help! My pumpkin lobes look uneven!
No worries – this happens to me too! Just gently reposition the strings before baking. If some sections puff more than others during baking, that’s part of the charm – rustic pumpkins are cute too!
Do I have to use a cinnamon stick stem?
Not at all! A pretzel stick works great, or go stemless. But that cinnamon scent wafting through your kitchen? Pure autumn magic.
Can I make mini pumpkins?
Absolutely! Divide your dough into smaller rounds and use shorter strings. Just reduce baking time – start checking at 30 minutes. For more mini pumpkin bread inspiration, check out this recipe!
Nutrition Information
Just so you know – these numbers can dance around depending on your exact ingredients! For a typical slice of pumpkin-shaped sourdough bread, you’re looking at about 120 calories, with 24g carbs and 4g protein. Not bad for something this delicious and adorable, right?
Now go bake some autumn magic – and don’t forget to tag @FrostyRecipes so I can see your gorgeous pumpkin bread creations! You can follow us on Facebook for more baking inspiration.
For More recipes Follow me on Facebook!